PLANNING DUCTWORK AND WIRING
DUCTWORK
1.Use 4" round duct.
2.Plan to run duct from the fan's discharge opening to the outside. For best fan performance, make duct run as short as possible and use minimum number of elbows.
3.Use optional NuTone ducting accessories as needed (refer to NuTone's catalog for a complete listing of optional accessories).
WIRING
Plan to run 120vAC house wiring (with ground) from a power source, through a standard wall switch or an optional NuTone double FAN/LIGHT switch, to the junction box in the
INSTALLATION IN A NEW
CONSTRUCTION SITE
PREPARATION
1.Unplug the power unit.
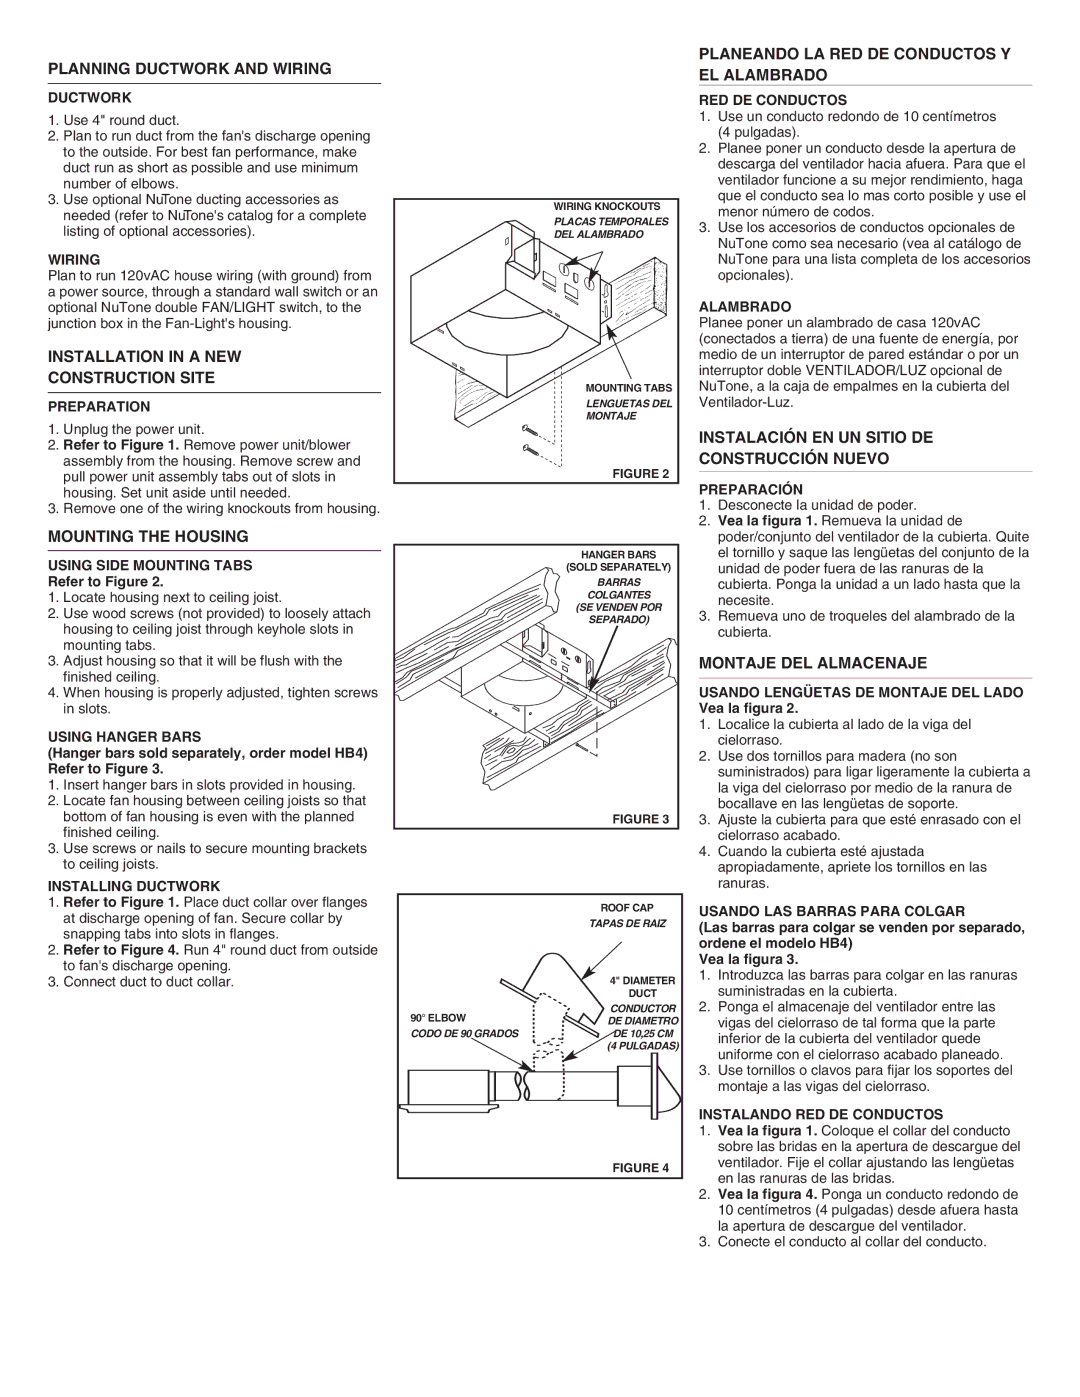
2.Refer to Figure 1. Remove power unit/blower assembly from the housing. Remove screw and pull power unit assembly tabs out of slots in housing. Set unit aside until needed.
3.Remove one of the wiring knockouts from housing.
WIRING KNOCKOUTS |
PLACAS TEMPORALES |
DEL ALAMBRADO |
MOUNTING TABS |
LENGUETAS DEL |
MONTAJE |
FIGURE 2 |
PLANEANDO LA RED DE CONDUCTOS Y EL ALAMBRADO
RED DE CONDUCTOS
1.Use un conducto redondo de 10 centímetros (4 pulgadas).
2.Planee poner un conducto desde la apertura de descarga del ventilador hacia afuera. Para que el ventilador funcione a su mejor rendimiento, haga que el conducto sea lo mas corto posible y use el menor número de codos.
3.Use los accesorios de conductos opcionales de NuTone como sea necesario (vea al catálogo de NuTone para una lista completa de los accesorios opcionales).
ALAMBRADO
Planee poner un alambrado de casa 120vAC (conectados a tierra) de una fuente de energía, por medio de un interruptor de pared estándar o por un interruptor doble VENTILADOR/LUZ opcional de NuTone, a la caja de empalmes en la cubierta del
INSTALACIÓN EN UN SITIO DE
CONSTRUCCIÓN NUEVO
PREPARACIÓN
1. | Desconecte la unidad de poder. |
2. | Vea la figura 1. Remueva la unidad de |
MOUNTING THE HOUSING
USING SIDE MOUNTING TABS
Refer to Figure 2.
1.Locate housing next to ceiling joist.
2.Use wood screws (not provided) to loosely attach housing to ceiling joist through keyhole slots in mounting tabs.
3.Adjust housing so that it will be flush with the finished ceiling.
4.When housing is properly adjusted, tighten screws in slots.
USING HANGER BARS
(Hanger bars sold separately, order model HB4) Refer to Figure 3.
1.Insert hanger bars in slots provided in housing.
2.Locate fan housing between ceiling joists so that bottom of fan housing is even with the planned finished ceiling.
3.Use screws or nails to secure mounting brackets to ceiling joists.
INSTALLING DUCTWORK
1.Refer to Figure 1. Place duct collar over flanges at discharge opening of fan. Secure collar by snapping tabs into slots in flanges.
2.Refer to Figure 4. Run 4" round duct from outside to fan's discharge opening.
3.Connect duct to duct collar.
HANGER BARS |
(SOLD SEPARATELY) |
BARRAS |
COLGANTES |
(SE VENDEN POR |
SEPARADO) |
FIGURE 3 |
| ROOF CAP | |
| TAPAS DE RAIZ | |
| 4" DIAMETER | |
| DUCT | |
90° ELBOW | CONDUCTOR | |
DE DIAMETRO | ||
CODO DE 90 GRADOS | ||
DE 10,25 CM | ||
| (4 PULGADAS) | |
| FIGURE 4 |
poder/conjunto del ventilador de la cubierta. Quite |
el tornillo y saque las lengüetas del conjunto de la |
unidad de poder fuera de las ranuras de la |
cubierta. Ponga la unidad a un lado hasta que la |
necesite. |
3. Remueva uno de troqueles del alambrado de la |
cubierta. |
MONTAJE DEL ALMACENAJE
USANDO LENGÜETAS DE MONTAJE DEL LADO Vea la figura 2.
1.Localice la cubierta al lado de la viga del cielorraso.
2.Use dos tornillos para madera (no son suministrados) para ligar ligeramente la cubierta a la viga del cielorraso por medio de la ranura de bocallave en las lengüetas de soporte.
3.Ajuste la cubierta para que esté enrasado con el cielorraso acabado.
4.Cuando la cubierta esté ajustada apropiadamente, apriete los tornillos en las ranuras.
USANDO LAS BARRAS PARA COLGAR
(Las barras para colgar se venden por separado, ordene el modelo HB4)
Vea la figura 3.
1.Introduzca las barras para colgar en las ranuras suministradas en la cubierta.
2.Ponga el almacenaje del ventilador entre las vigas del cielorraso de tal forma que la parte inferior de la cubierta del ventilador quede uniforme con el cielorraso acabado planeado.
3.Use tornillos o clavos para fijar los soportes del montaje a las vigas del cielorraso.
INSTALANDO RED DE CONDUCTOS
1.Vea la figura 1. Coloque el collar del conducto sobre las bridas en la apertura de descargue del ventilador. Fije el collar ajustando las lengüetas en las ranuras de las bridas.
2.Vea la figura 4. Ponga un conducto redondo de 10 centímetros (4 pulgadas) desde afuera hasta la apertura de descargue del ventilador.
3.Conecte el conducto al collar del conducto.