Programming the Autodialer Functions
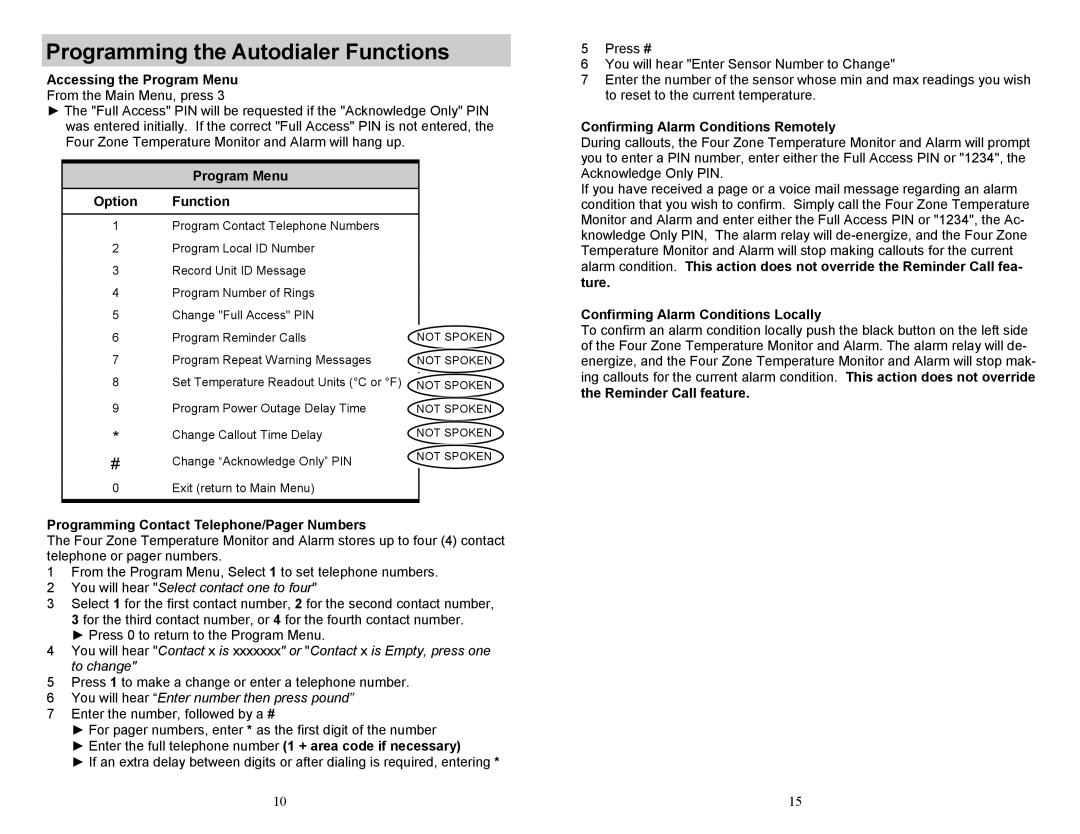
Accessing the Program Menu
From the Main Menu, press 3
►The "Full Access" PIN will be requested if the "Acknowledge Only" PIN was entered initially. If the correct "Full Access" PIN is not entered, the Four Zone Temperature Monitor and Alarm will hang up.
5Press #
6You will hear "Enter Sensor Number to Change"
7Enter the number of the sensor whose min and max readings you wish to reset to the current temperature.
Confirming Alarm Conditions Remotely
During callouts, the Four Zone Temperature Monitor and Alarm will prompt you to enter a PIN number, enter either the Full Access PIN or "1234", the
Program Menu
Option Function
1Program Contact Telephone Numbers
2Program Local ID Number
3Record Unit ID Message
4Program Number of Rings
5Change "Full Access" PIN
6Program Reminder Calls
7Program Repeat Warning Messages
8Set Temperature Readout Units (°C or °F)
9Program Power Outage Delay Time
*Change Callout Time Delay
#Change “Acknowledge Only” PIN
0 | Exit (return to Main Menu) |
NOT SPOKEN
NOT SPOKEN
NOT SPOKEN
NOT SPOKEN
NOT SPOKEN
NOT SPOKEN
Acknowledge Only PIN.
If you have received a page or a voice mail message regarding an alarm condition that you wish to confirm. Simply call the Four Zone Temperature Monitor and Alarm and enter either the Full Access PIN or "1234", the Ac- knowledge Only PIN, The alarm relay will
ture.
Confirming Alarm Conditions Locally
To confirm an alarm condition locally push the black button on the left side of the Four Zone Temperature Monitor and Alarm. The alarm relay will de- energize, and the Four Zone Temperature Monitor and Alarm will stop mak- ing callouts for the current alarm condition. This action does not override
the Reminder Call feature.
Programming Contact Telephone/Pager Numbers
The Four Zone Temperature Monitor and Alarm stores up to four (4) contact telephone or pager numbers.
1From the Program Menu, Select 1 to set telephone numbers.
2You will hear "Select contact one to four"
3Select 1 for the first contact number, 2 for the second contact number, 3 for the third contact number, or 4 for the fourth contact number.
►Press 0 to return to the Program Menu.
4You will hear "Contact x is xxxxxxx" or "Contact x is Empty, press one to change"
5Press 1 to make a change or enter a telephone number.
6You will hear “Enter number then press pound”
7Enter the number, followed by a #
►For pager numbers, enter * as the first digit of the number
►Enter the full telephone number (1 + area code if necessary)
►If an extra delay between digits or after dialing is required, entering *
1015
