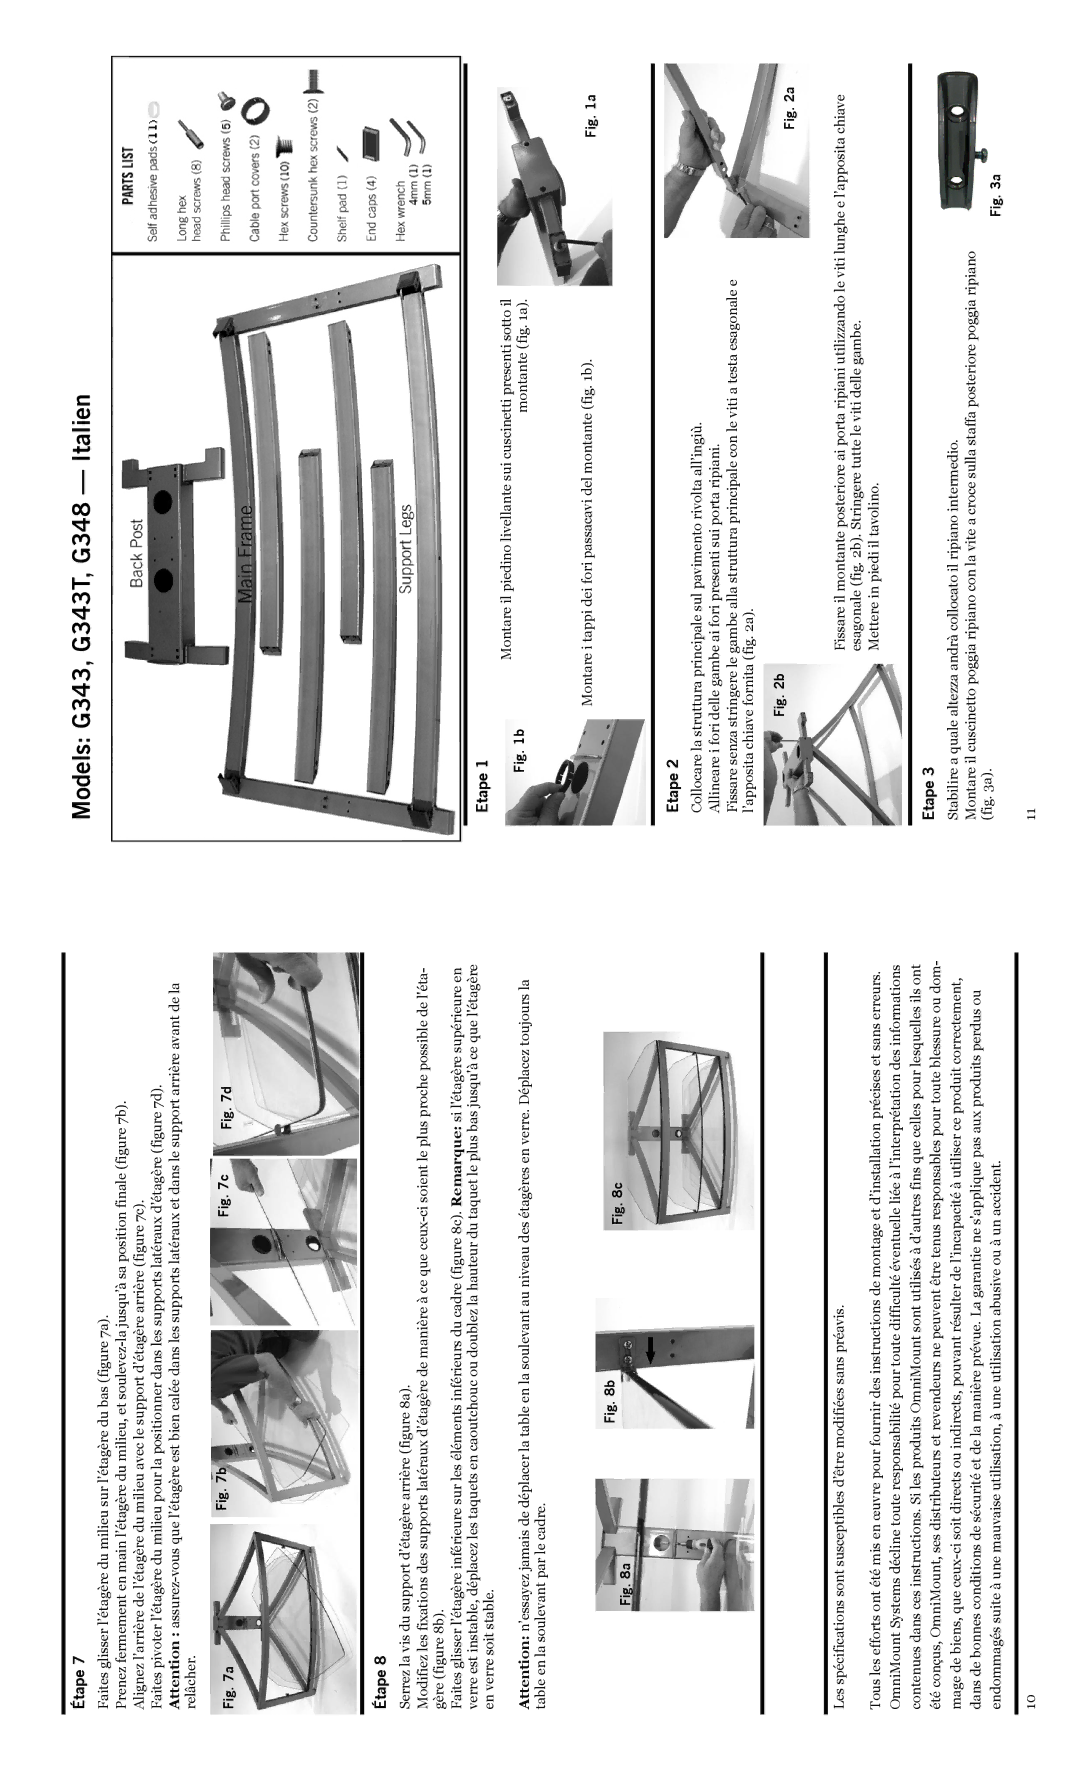
Étape 7

Faites glisser l’étagère du milieu sur l’étagère du bas (figure 7a).

Prenez fermement en main l’étagère du milieu, et soulevez-la jusqu’à sa position finale (figure 7b). Alignez l’arrière de l’étagère du milieu avec le support d’étagère arrière (figure 7c).

Faites pivoter l’étagère du milieu pour la positionner dans les supports latéraux d’étagère (figure 7d).

Attention : assurez-vous que l’étagère est bien calée dans les supports latéraux et dans le support arrière avant de la relâcher.

Fig. 7a

Fig. 7b

Fig. 7c

Fig. 7d

Étape 8

Serrez la vis du support d’étagère arrière (figure 8a).

Modifiez les fixations des supports latéraux d’étagère de manière à ce que ceux-ci soient le plus proche possible de l'éta- gère (figure 8b).

Faites glisser l’étagère inférieure sur les éléments inférieurs du cadre (figure 8c). Remarque: si l'étagère supérieure en verre est instable, déplacez les taquets en caoutchouc ou doublez la hauteur du taquet le plus bas jusqu'à ce que l'étagère en verre soit stable.

Attention: n’essayez jamais de déplacer la table en la soulevant au niveau des étagères en verre. Déplacez toujours la table en la soulevant par le cadre.

Fig. 8a

Fig. 8b

Fig. 8c


Les spécifications sont susceptibles d’être modifiées sans préavis.

Tous les efforts ont été mis en œuvre pour fournir des instructions de montage et d’installation précises et sans erreurs. OmniMount Systems décline toute responsabilité pour toute difficulté éventuelle liée à l’interprétation des informations contenues dans ces instructions. Si les produits OmniMount sont utilisés à d’autres fins que celles pour lesquelles ils ont été conçus, OmniMount, ses distributeurs et revendeurs ne peuvent être tenus responsables pour toute blessure ou dom- mage de biens, que ceux-ci soit directs ou indirects, pouvant résulter de l’incapacité à utiliser ce produit correctement, dans de bonnes conditions de sécurité et de la manière prévue. La garantie ne s'applique pas aux produits perdus ou endommagés suite à une mauvaise utilisation, à une utilisation abusive ou à un accident.

10

Models: G343, G343T, G348 — Italien

Etape 1

Fig. 1b

Montare il piedino livellante sui cuscinetti presenti sotto il


montante (fig. 1a).


Montare i tappi dei fori passacavi del montante (fig. 1b).

Fig. 1a

Etape 2

Collocare la struttura principale sul pavimento rivolta all’ingiù. Allineare i fori delle gambe ai fori presenti sui porta ripiani.

Fissare senza stringere le gambe alla struttura principale con le viti a testa esagonale e l’apposita chiave fornita (fig. 2a).

Fig. 2b

Fig. 2a


Fissare il montante posteriore ai porta ripiani utilizzando le viti lunghe e l’apposita chiave


esagonale (fig. 2b). Stringere tutte le viti delle gambe.


Mettere in piedi il tavolino.

Etape 3


Stabilire a quale altezza andrà collocato il ripiano intermedio.


Montare il cuscinetto poggia ripiano con la vite a croce sulla staffa posteriore poggia ripiano


(fig. 3a).

Fig. 3a


11


Page 10
Image 10
Omnimount manual Models G343, G343T, G348 Italien, Faites glisser l’étagère du milieu sur l’étagère du bas a, Montante a

1002379, G343, G348, G343T specifications

Omnimount, a renowned name in the audio-visual mounting solutions industry, offers a diverse range of products designed to cater to various user needs and preferences. Among its offerings are the models 1002379, G343, G348, and G343T, which embody the company's commitment to quality, functionality, and innovative design.

The Omnimount 1002379 model is particularly notable for its sturdy construction and versatility. Designed for flat-screen television mounting, it supports a wide range of TV sizes, making it suitable for both residential and commercial spaces. One of its key features is the easy-install design, allowing users to mount their televisions with minimal hassle. The integrated cable management system ensures that all wires can be neatly organized, contributing to a clean and aesthetically pleasing setup.

The G343 model stands out with its ability to support a weight capacity of up to 130 pounds. This model is engineered with solid steel construction, giving it the durability needed for heavy-duty applications. The mounting plate features a universal design, making it compatible with most TV brands. The G343 also offers tilt and swivel capabilities, allowing users to adjust the viewing angle for optimal comfort.

In comparison, the G348 model enhances the user experience with additional features. It includes both tilt and pan adjustments, providing maximum flexibility for viewing preferences. This model is perfect for larger screens, accommodating displays up to 70 inches. Its low-profile design keeps the TV close to the wall, ensuring that the overall look of the room remains sleek and modern.

The G343T model builds on the strengths of the G343. It provides a full-motion mounting solution, offering users the ability to pull their TV away from the wall for easier access. This is especially useful in rooms where corner viewing may be required. Moreover, the G343T's design includes built-in cable management that hides unsightly cables and wires, further enhancing the room’s appearance.

In summary, Omnimount's 1002379, G343, G348, and G343T models offer a range of features tailored to enhance the functionality and aesthetics of television mounting. These products not only prioritize durability and weight capacity but also incorporate innovative design elements that make them suitable for various environments, ensuring users can enjoy their viewing experience to the fullest. Whether you're upgrading a home theater or creating a commercial display, these models provide reliable and stylish solutions for all mounting needs.