3.4.1.2Setting IP Parameters as DHCP Client
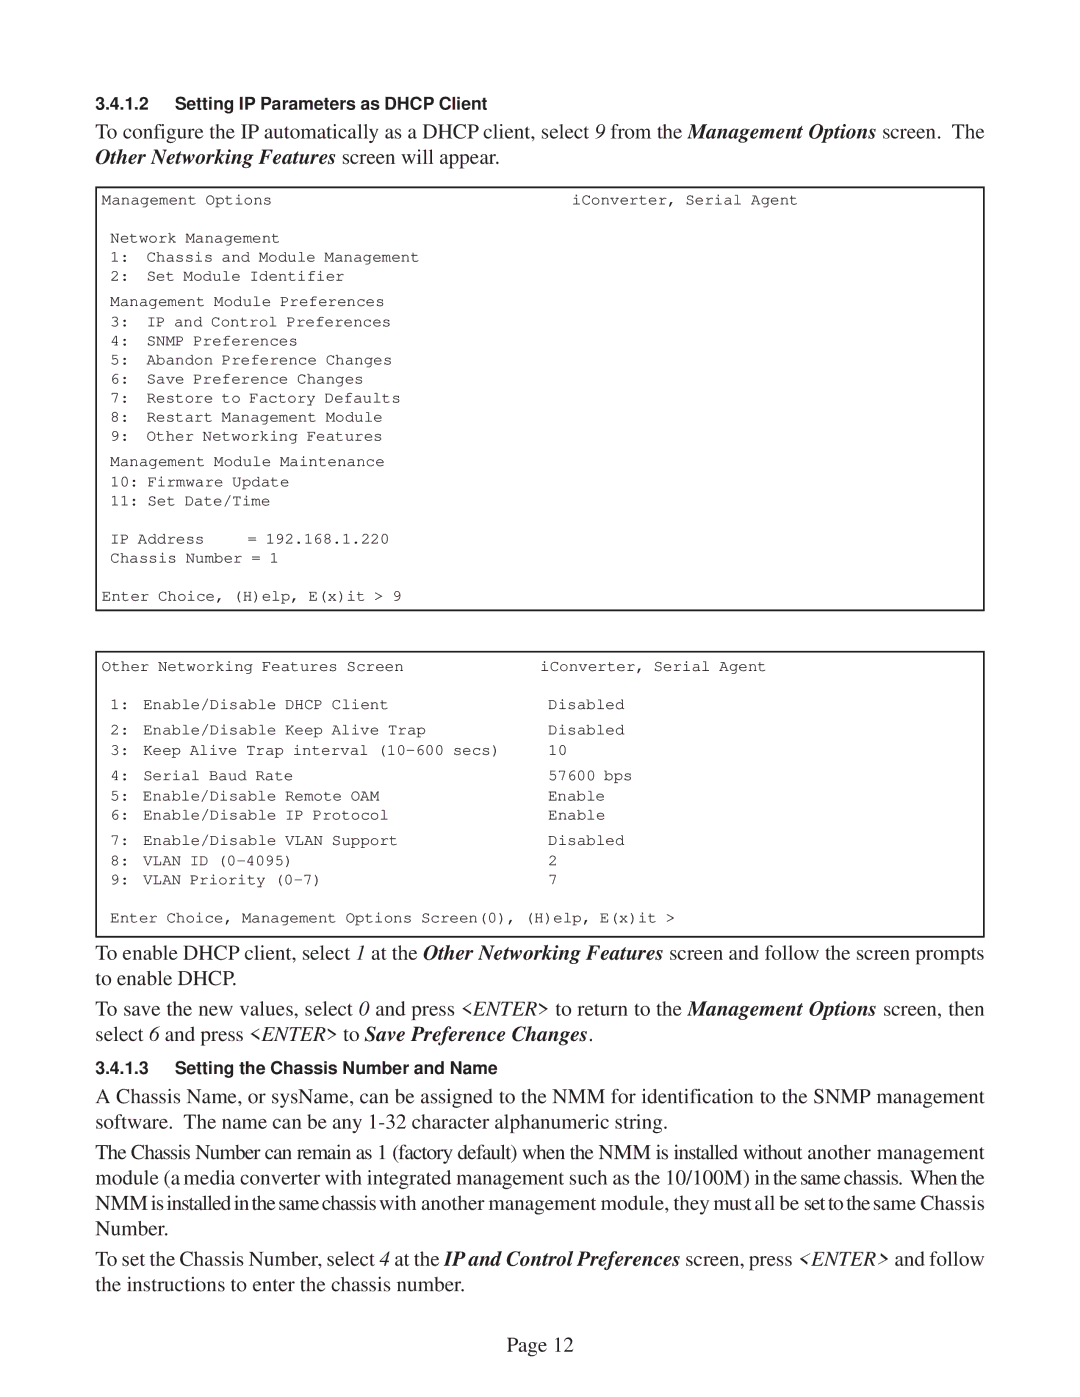
To configure the IP automatically as a DHCP client, select 9 from the Management Options screen. The Other Networking Features screen will appear.
Management Options | iConverter, Serial Agent | ||
Network Management |
| ||
1: Chassis and Module Management |
| ||
2: | Set Module Identifier |
| |
Management Module Preferences |
| ||
3: IP and Control Preferences |
| ||
4: | SNMP Preferences |
| |
5: | Abandon Preference Changes |
| |
6: | Save Preference Changes |
| |
7: Restore to Factory Defaults |
| ||
8: | Restart Management Module |
| |
9: | Other Networking Features |
| |
Management Module Maintenance |
| ||
10: Firmware Update |
| ||
11: Set Date/Time |
| ||
IP Address | = 192.168.1.220 |
| |
Chassis Number = 1 |
| ||
Enter Choice, (H)elp, E(x)it > 9 |
| ||
|
| ||
|
|
|
|
Other Networking Features Screen | iConverter, Serial Agent | ||
1: Enable/Disable DHCP Client | Disabled | ||
2: Enable/Disable Keep Alive Trap | Disabled | ||
3: Keep Alive Trap interval | 10 | ||
4: Serial Baud Rate | 57600 bps | ||
5: Enable/Disable Remote OAM | Enable | ||
6: Enable/Disable IP Protocol | Enable | ||
7: Enable/Disable VLAN Support | Disabled | ||
8: VLAN ID | 2 | ||
9: VLAN Priority | 7 | ||
Enter Choice, Management Options Screen(0), (H)elp, E(x)it >
To enable DHCP client, select 1 at the Other Networking Features screen and follow the screen prompts to enable DHCP.
To save the new values, select 0 and press <ENTER> to return to the Management Options screen, then select 6 and press <ENTER> to Save Preference Changes.
3.4.1.3Setting the Chassis Number and Name
A Chassis Name, or sysName, can be assigned to the NMM for identification to the SNMP management software. The name can be any
The Chassis Number can remain as 1 (factory default) when the NMM is installed without another management module (a media converter with integrated management such as the 10/100M) in the same chassis. When the NMM is installed in the same chassis with another management module, they must all be set to the same Chassis Number.
To set the Chassis Number, select 4 at the IP and Control Preferences screen, press <ENTER> and follow the instructions to enter the chassis number.
Page 12