Connections


MONITOR

DVD

VIDEO 1

VIDEO 2

VIDEO 3

Video output


OUT

IN

OUT

IN

IN

IN


VIDEOVIDEO


4. DVD player


REMOTE


S VSIDVIDEOEO


CONTROL


(DVD)

NO


CD

OUT

TAPE

IN


L

S video output

L (White)


R


FRONT

SURR

CENTER

OPTICAL

COAXIAL


L


1

2


1


Analog audio output

R (Red)


2


R


SUB


ER

MULTI


WOOFER


Digital audio output (Coaxial)

UT


DIGITAL INPUT


CHANNEL INPUT


: Signal flow


Audio connection cable


Left (White)

L

Video connection cable

Right (Red)

R


7. TV monitor or Projector


MONITOR

DVD

VIDEO 1

VIDEO 2

VIDEO 3

Video input


OUT

IN

OUT

IN

IN

IN

(MONITOR OUT)


VIDEO


S video input


REMOTE


CONTROL


S VIDEO


NO

CD

OUT

TAPE

IN


L


R


FRONT

SURR

CENTER

OPTICAL

COAXIAL


L


1

2


1


2


R


SUB


ER

MULTI


WOOFER


UT

CHANNEL INPUT


DIGITAL INPUT


V

Video output


S video

S video output

L (White)

Analog audio output

R (Red)

Digital audio output

(Coaxial)

5. VCR (VIDEO 1)

Video input

S video input

R (Red)

Analog audio input

L (White)

S Video connection cable

Video output

S video output

L (White)

6. Satelite tuner, TV,

or settop box


(VIDEO 2 / VIDEO 3)

R (Red) Analog audio output

Digital audio output (optical)

Connecting your video components

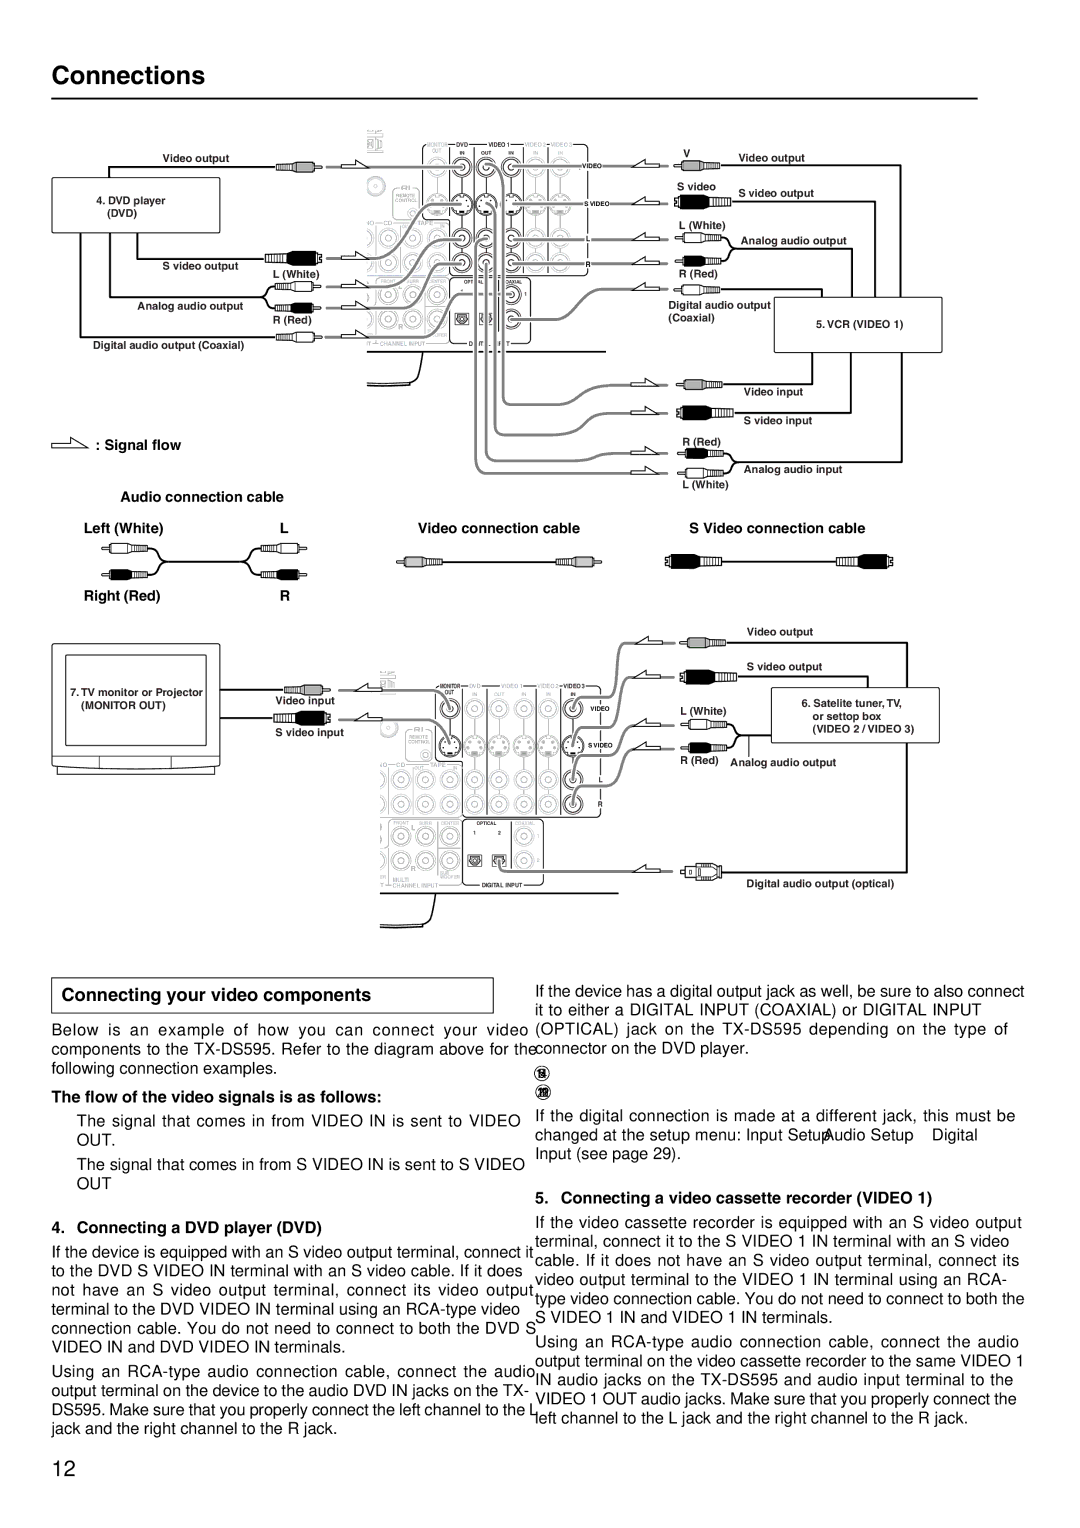
Below is an example of how you can connect your video components to the TX-DS595. Refer to the diagram above for the following connection examples.

The flow of the video signals is as follows:

The signal that comes in from VIDEO IN is sent to VIDEO OUT.

The signal that comes in from S VIDEO IN is sent to S VIDEO OUT

4. Connecting a DVD player (DVD)

If the device is equipped with an S video output terminal, connect it to the DVD S VIDEO IN terminal with an S video cable. If it does not have an S video output terminal, connect its video output terminal to the DVD VIDEO IN terminal using an RCA-type video connection cable. You do not need to connect to both the DVD S VIDEO IN and DVD VIDEO IN terminals.

Using an RCA-type audio connection cable, connect the audio output terminal on the device to the audio DVD IN jacks on the TX- DS595. Make sure that you properly connect the left channel to the L jack and the right channel to the R jack.

If the device has a digital output jack as well, be sure to also connect it to either a DIGITAL INPUT (COAXIAL) or DIGITAL INPUT (OPTICAL) jack on the TX-DS595 depending on the type of connector on the DVD player.

With the initial settings of the TX-DS595, the DVD input source is set for digital input at the COAXIAL 1 jack.

If the digital connection is made at a different jack, this must be changed at the setup menu: Input Setup Audio Setup Digital Input (see page 29).

5. Connecting a video cassette recorder (VIDEO 1)

If the video cassette recorder is equipped with an S video output terminal, connect it to the S VIDEO 1 IN terminal with an S video cable. If it does not have an S video output terminal, connect its video output terminal to the VIDEO 1 IN terminal using an RCA- type video connection cable. You do not need to connect to both the S VIDEO 1 IN and VIDEO 1 IN terminals.

Using an RCA-type audio connection cable, connect the audio output terminal on the video cassette recorder to the same VIDEO 1 IN audio jacks on the TX-DS595 and audio input terminal to the VIDEO 1 OUT audio jacks. Make sure that you properly connect the left channel to the L jack and the right channel to the R jack.

12

Page 12
Image 12
Onkyo TX-DS595 Connecting your video components, Flow of the video signals is as follows, Connecting a DVD player DVD

TX-DS595 specifications

The Onkyo TX-DS595 is an acclaimed multi-channel receiver that has garnered attention for its robust features and superior audio performance, particularly during the late 1990s. Designed for home theater enthusiasts, this receiver combines advanced technology with practical functionality, making it a popular choice for audio and video integration.

One of the standout features of the TX-DS595 is its multi-channel amplification. The receiver is equipped with a powerful 5.1 channel setup, providing users with immersive surround sound. With a total output of 100 watts per channel, it ensures that every audio detail is captured, delivering a dynamic soundstage that enhances the home cinema experience.

At the heart of the TX-DS595 is its support for various surround sound formats. It includes Dolby Digital and DTS decoding, which allows for sophisticated sound processing, creating a more realistic and engaging listening experience. The receiver also features multiple surround modes, enabling users to customize the sound to match their preferences or the type of content viewed.

The Onkyo TX-DS595 offers a wide range of connectivity options, including multiple audio and video inputs. It features six audio inputs, including digital coaxial and optical connections, making it easy to hook up various devices such as DVD players, gaming consoles, and satellite receivers. Additionally, it has dual video outputs, which ensure compatibility with both older and newer television models.

Another notable characteristic is the TX-DS595's user-friendly interface and remote control. The well-organized front panel provides easy access to functions, making it simple to adjust settings without technological fuss. The receiver also includes an advanced on-screen display, which enhances usability, especially when navigating through different audio and video options.

In terms of build quality, the TX-DS595 embraces a solid construction, ensuring durability while maintaining aesthetic appeal. The design showcases a combination of functionality and style that fits well within various home decor themes.

Overall, the Onkyo TX-DS595 stands as a testament to how quality audio and video performance can be blended into a single receiver. Its balanced combination of power, connectivity, and surround sound capabilities not only meets the demands of audiophiles but also positions itself as an essential component in any home theater setup. Whether watching movies or listening to music, the TX-DS595 delivers an exceptional auditory experience.