Before using this unit

Setting the Voltage selector (Worldwide models only)

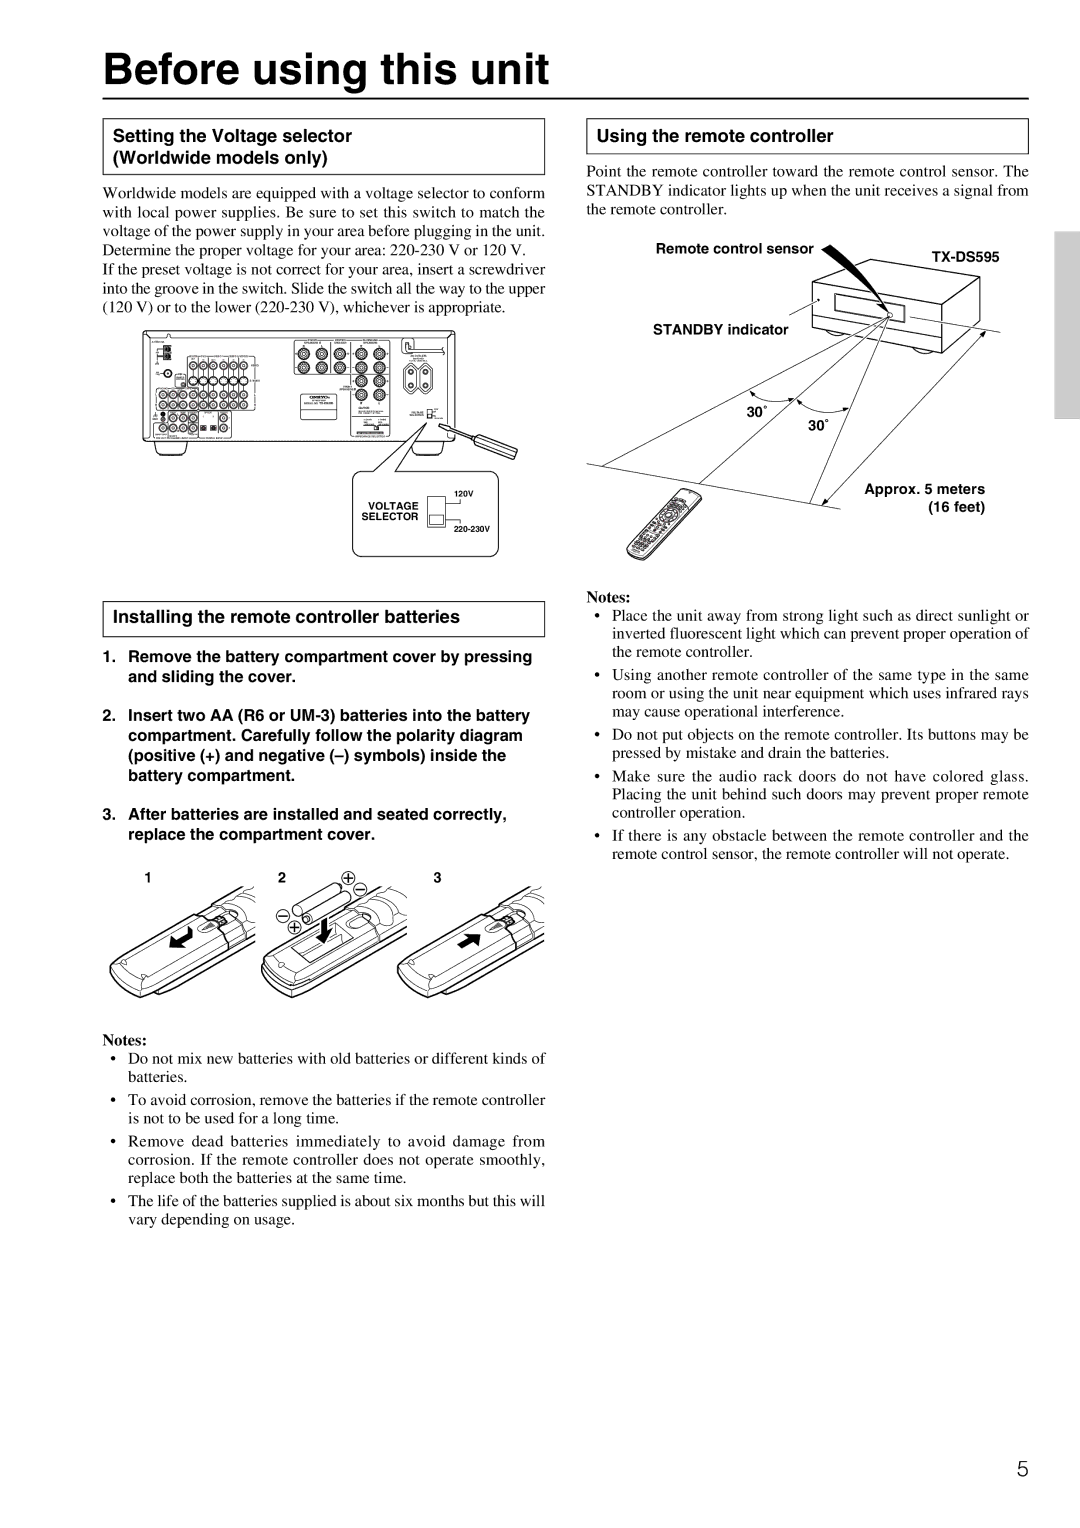
Worldwide models are equipped with a voltage selector to conform with local power supplies. Be sure to set this switch to match the voltage of the power supply in your area before plugging in the unit.

Using the remote controller

Point the remote controller toward the remote control sensor. The STANDBY indicator lights up when the unit receives a signal from the remote controller.

Determine the proper voltage for your area: 220-230 V or 120 V.

If the preset voltage is not correct for your area, insert a screwdriver into the groove in the switch. Slide the switch all the way to the upper (120 V) or to the lower (220-230 V), whichever is appropriate.

ANTENNA


FRONT

A

CENTER


SURROUND


SPEAKERS

SPEAKER


SPEAKERS


R

L

R

L

AM

MONITOR

DVD

VIDEO 1

VIDEO 2

VIDEO 3

AC OUTLETS

OUT

IN

OUT

IN

IN

IN

TOTAL 100W MAX.


SWITCHED


VIDEO

FM

75


REMOTE


CONTROL


S VIDEO


PHONO CD

OUT TAPE IN


FRONT


SPEAKERS B


L


L


AV RECEIVER

R

L


R


R

MODEL NO. TX-DS595


CAUTION:


120V

FRONT

SURR CENTER

OPTICAL

COAXIAL


SEE INSTRUCTION MANUAL

VOLTAGE


FOR CORRECT SETTING.


L

1

2

1


SELECTOR

GND


6 OHMS

4 OHMS

220-230V

Remote control sensor

STANDBY indicator

30˚

TX-DS595


MIN.

MIN.


/ SPEAKER

/ SPEAKER


2


SUBWOOFER

R

SUB

SET BEFORE POWER ON

MULTI

WOOFER

IMPEDANCE SELECTOR

PRE OUT CHANNEL INPUT


DIGITAL INPUT


120V

VOLTAGE

SELECTOR

220-230V

30˚

Approx. 5 meters (16 feet)

Installing the remote controller batteries

1.Remove the battery compartment cover by pressing and sliding the cover.

2.Insert two AA (R6 or UM-3) batteries into the battery compartment. Carefully follow the polarity diagram (positive (+) and negative (–) symbols) inside the battery compartment.

3.After batteries are installed and seated correctly, replace the compartment cover.

1

2

3

Notes:

Do not mix new batteries with old batteries or different kinds of batteries.

To avoid corrosion, remove the batteries if the remote controller is not to be used for a long time.

Remove dead batteries immediately to avoid damage from corrosion. If the remote controller does not operate smoothly, replace both the batteries at the same time.

The life of the batteries supplied is about six months but this will vary depending on usage.

Notes:

Place the unit away from strong light such as direct sunlight or inverted fluorescent light which can prevent proper operation of the remote controller.

Using another remote controller of the same type in the same room or using the unit near equipment which uses infrared rays may cause operational interference.

Do not put objects on the remote controller. Its buttons may be pressed by mistake and drain the batteries.

Make sure the audio rack doors do not have colored glass. Placing the unit behind such doors may prevent proper remote controller operation.

If there is any obstacle between the remote controller and the remote control sensor, the remote controller will not operate.

5

Page 5
Image 5
Onkyo TX-DS595 Before using this unit, Setting the Voltage selector Worldwide models only, Using the remote controller

TX-DS595 specifications

The Onkyo TX-DS595 is an acclaimed multi-channel receiver that has garnered attention for its robust features and superior audio performance, particularly during the late 1990s. Designed for home theater enthusiasts, this receiver combines advanced technology with practical functionality, making it a popular choice for audio and video integration.

One of the standout features of the TX-DS595 is its multi-channel amplification. The receiver is equipped with a powerful 5.1 channel setup, providing users with immersive surround sound. With a total output of 100 watts per channel, it ensures that every audio detail is captured, delivering a dynamic soundstage that enhances the home cinema experience.

At the heart of the TX-DS595 is its support for various surround sound formats. It includes Dolby Digital and DTS decoding, which allows for sophisticated sound processing, creating a more realistic and engaging listening experience. The receiver also features multiple surround modes, enabling users to customize the sound to match their preferences or the type of content viewed.

The Onkyo TX-DS595 offers a wide range of connectivity options, including multiple audio and video inputs. It features six audio inputs, including digital coaxial and optical connections, making it easy to hook up various devices such as DVD players, gaming consoles, and satellite receivers. Additionally, it has dual video outputs, which ensure compatibility with both older and newer television models.

Another notable characteristic is the TX-DS595's user-friendly interface and remote control. The well-organized front panel provides easy access to functions, making it simple to adjust settings without technological fuss. The receiver also includes an advanced on-screen display, which enhances usability, especially when navigating through different audio and video options.

In terms of build quality, the TX-DS595 embraces a solid construction, ensuring durability while maintaining aesthetic appeal. The design showcases a combination of functionality and style that fits well within various home decor themes.

Overall, the Onkyo TX-DS595 stands as a testament to how quality audio and video performance can be blended into a single receiver. Its balanced combination of power, connectivity, and surround sound capabilities not only meets the demands of audiophiles but also positions itself as an essential component in any home theater setup. Whether watching movies or listening to music, the TX-DS595 delivers an exceptional auditory experience.