Connecting Antenna

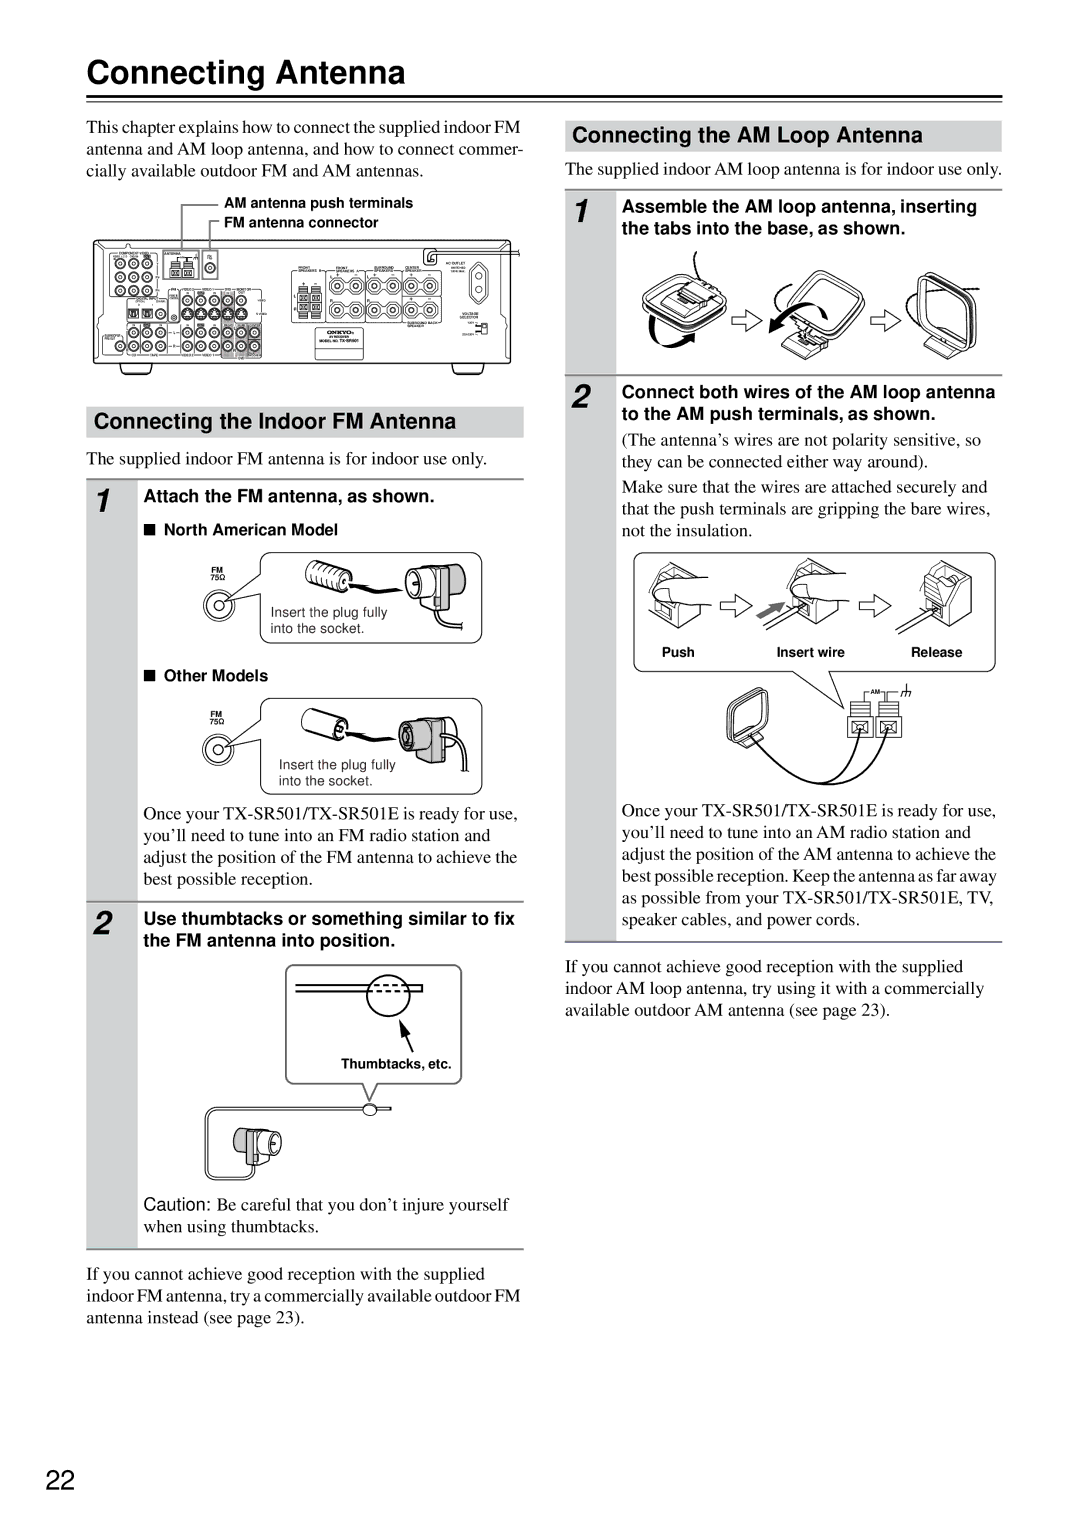
This chapter explains how to connect the supplied indoor FM antenna and AM loop antenna, and how to connect commer- cially available outdoor FM and AM antennas.

AM antenna push terminals

FM antenna connector

COMPONENT VIDEO

ANTENNA

FM


VIDEO 1 / 2 / 3 DVD IN OUT

AM


IN

75


Y


AC OUTLET


FRONT

FRONT

SURROUND

CENTER

SWITCHED


SPEAKERS B

SPEAKERS A

SPEAKERS

SPEAKER

100W MAX.

PB


L

L


PR

VIDEO 2

VIDEO 1

DVD

MONITOR


IN

OUT

IN

IN

OUT

L


DIGITAL INPUT

REMOTE


CONTROL


VIDEO

R

R

OPTICAL

COAXIAL


2

1


R

S VIDEO

VOLTAGE


SELECTOR

IN

OUT

IN

IN

OUT

IN

FRONT

SURR

CENTER

SURROUND BACK

120V

SPEAKER


L


L


L


SUBWOOFER


220-230V


PRE OUT


R


R


R


TAPE

VIDEO 2

VIDEO 1


SUB


CD


DVD

WOOFER


Connecting the Indoor FM Antenna

The supplied indoor FM antenna is for indoor use only.

1

Attach the FM antenna, as shown.


North American Model

FM 75

Insert the plug fully into the socket.

Other Models

FM 75

Insert the plug fully into the socket.

Once your TX-SR501/TX-SR501E is ready for use, you’ll need to tune into an FM radio station and adjust the position of the FM antenna to achieve the best possible reception.

2

Use thumbtacks or something similar to fix


the FM antenna into position.

Thumbtacks, etc.

Caution: Be careful that you don’t injure yourself when using thumbtacks.

If you cannot achieve good reception with the supplied indoor FM antenna, try a commercially available outdoor FM antenna instead (see page 23).

Connecting the AM Loop Antenna

The supplied indoor AM loop antenna is for indoor use only.

1

Assemble the AM loop antenna, inserting


the tabs into the base, as shown.

2

Connect both wires of the AM loop antenna


to the AM push terminals, as shown.


(The antenna’s wires are not polarity sensitive, so


they can be connected either way around).


Make sure that the wires are attached securely and


that the push terminals are gripping the bare wires,


not the insulation.

Push

Insert wire

Release


AM

Once your TX-SR501/TX-SR501E is ready for use, you’ll need to tune into an AM radio station and adjust the position of the AM antenna to achieve the best possible reception. Keep the antenna as far away as possible from your TX-SR501/TX-SR501E, TV, speaker cables, and power cords.

If you cannot achieve good reception with the supplied indoor AM loop antenna, try using it with a commercially available outdoor AM antenna (see page 23).

22

Page 22
Image 22
Onkyo TX-SR501E instruction manual Connecting Antenna, Connecting the Indoor FM Antenna, Connecting the AM Loop Antenna

TX-SR501E specifications

The Onkyo TX-SR501E is a versatile home theater receiver that delivers quality audio performance and a range of features designed to enhance your multimedia experience. With a solid build and an array of connectivity options, it caters to both audiophiles and casual users alike.

One of the standout features of the TX-SR501E is its robust amplification system. It boasts a power output of 80 watts per channel, ensuring that your home theater setup receives ample power for a dynamic listening experience. This is complemented by Onkyo’s wide-range amplifier technology, which provides clear and precise sound reproduction across a variety of audio formats. Whether you're watching movies or listening to music, the receiver’s high current capabilities contribute to improved transient response and overall sound clarity.

The TX-SR501E supports multiple audio formats, including Dolby Digital and DTS, making it a great choice for both home theater enthusiasts and music lovers. The receiver is equipped with a 5.1 channel configuration, allowing you to fully immerse yourself in surround sound, perfect for movie nights or gaming sessions. It also includes various sound modes, enabling customization based on your preferences.

In terms of connectivity, the Onkyo TX-SR501E does not disappoint. It features multiple HDMI inputs, allowing for easy connections with modern devices, such as Blu-ray players, gaming consoles, and streaming devices. Additionally, it includes composite and component video inputs, so you can easily integrate older equipment into your setup. The receiver's outputs include a subwoofer pre-out, making it simple to connect an external subwoofer for enhanced bass response.

Another noteworthy characteristic is the inclusion of Onkyo’s own proprietary technologies, such as the Music Optimizer, which enhances the sound quality of compressed audio files. This feature works well with digital music formats, ensuring that your playlists sound as good as possible, regardless of the source.

The user interface of the TX-SR501E is intuitive, featuring an easy-to-navigate remote and an on-screen display that simplifies setup and operation. This makes it accessible for users of varying technical expertise.

Overall, the Onkyo TX-SR501E is a well-rounded home theater receiver that combines power, flexibility, and excellent sound quality, making it an ideal choice for anyone looking to elevate their audio experience. Whether you're a seasoned enthusiast or new to home theater systems, the TX-SR501E offers the performance and features you need to enjoy your favorite media to the fullest.