Manuals
/
Onkyo
/
Home Audio
/
Stereo Receiver
Onkyo
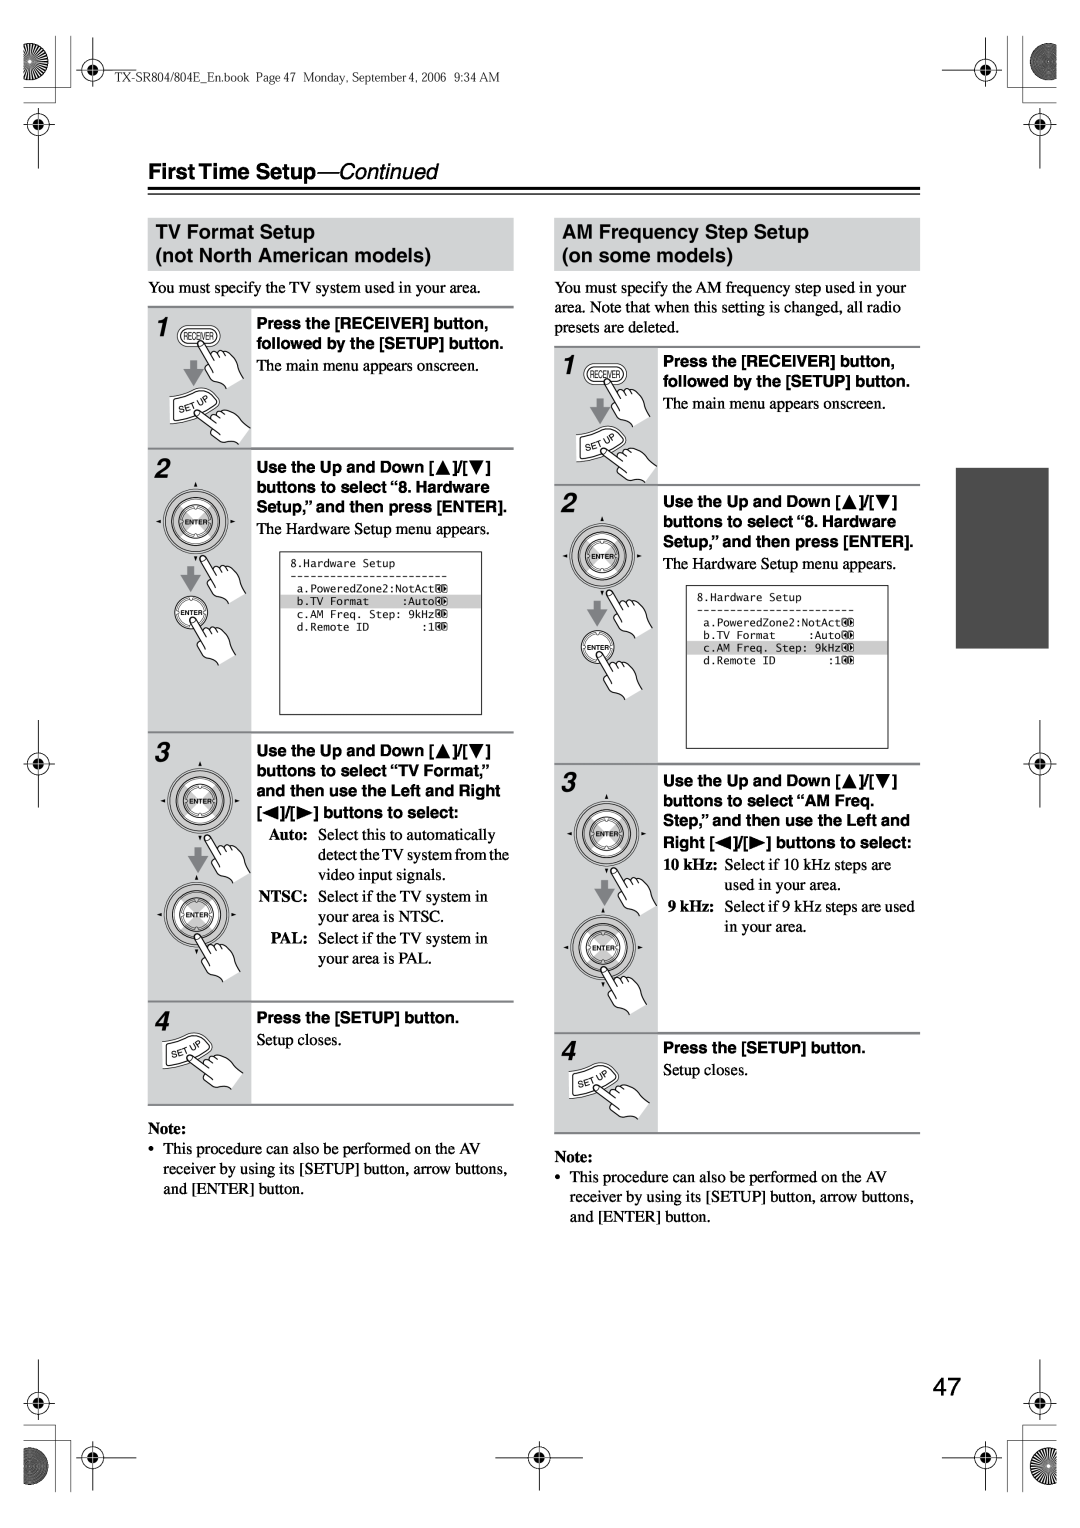
TX-SR804E TV Format Setup not North American models, AM Frequency Step Setup on some models
Models:
TX-SR804E
1
47
96
96
Download
96 pages
59.46 Kb
44
45
46
47
48
49
50
51
Troubleshooting
Install
Video Signal Flow Chart
Distance Error
1MUTING indicator
Connecting Your Speakers
the preset number flashes
Supplied Accessories
First Time Setup
Adjusting Speaker Levels
Page 47
Image 47
Page 46
Page 48
Page 47
Image 47
Page 46
Page 48
Contents
AV Receiver
Contents
TX-SR804 TX-SR804E
Instruction Manual
AVIS
Important Safety Instructions
For European Models
Precautions
Memory Backup
For British models
For Canadian Models
Supplied Accessories
Precautions—Continued
For U.S. models
Audio/Video
Features
Amplifier
Processing
Zone 2 Sub Room
Multiroom Capability
Main Room
Connection
Contents
Turning On & First Time Setup
Introduction
Front Panel
Getting to Know the AV Receiver
On European Model
Getting to Know the AV Receiver—Continued
K L M N O P QRS T U V W
3Listening mode and format indicators
Display
1MUTING indicator
2ZONE 2 indicator
Getting to Know the AV Receiver—Continued
Rear Panel
NRS232
Getting to Know the AV Receiver—Continued
Notes
Remote Controller
Installing the Batteries
Using the Remote Controller
RECEIVER/TAPE Mode
Remote Controller—Continued
About the Remote Controller Modes
ASTANDBY button
Remote Controller—Continued
Remote Controller—Continued
DVD Mode
Remote Controller-Continued
CD, MD, and CDR Modes
Remote Controller—Continued
HDD Mode
Center speaker
Connecting Your Speakers
Enjoying Home Theater
Front left and right speakers
Using Dipole Speakers
Connecting Your Speakers—Continued
Connecting Your Speakers
Connecting a Powered Subwoofer
Connecting Your Speakers—Continued
Speaker Connection Precautions
Connecting the Speaker Cables
Connecting the AM Loop Antenna
Connecting Antenna
Connecting the Indoor FM Antenna
Notes
Connecting Antenna—Continued
Connecting an Outdoor FM Antenna
Connecting an Outdoor AM Antenna
AV Connection Color Coding
Connecting Your Components
About AV Connections
Optical Digital Jacks
Audio Connection Formats
Connecting Your Components—Continued
Which Connections Should I Use?
Video Connection Formats
Hint
Connecting a TV or Projector
C B a
Connecting Your Components—Continued
or the other
Connecting a DVD player
Connecting Your Components—Continued
C B a
Connecting Your Components—Continued
Hooking Up the Multichannel DVD Input
7.1 ch
5.1 ch
Hint
Connecting a VCR or DVD Recorder for Playback
Connecting Your Components—Continued
C B a
Connecting Your Components—Continued
Connecting a VCR or DVD Recorder for Recording
Satellite, cable, set-topbox, etc
Connecting Your Components—Continued
C B a
Hint
About Copyright Protection
Connecting Components with HDMI
About HDMI
Supported Audio Formats
Audio Signal Flow Chart
Making HDMI Connections
Connecting Your Components—Continued
Video Signal Flow Chart
S-Videooutput
Connecting Your Components—Continued
Signal flow
VIDEO 4 INPUT S VIDEO
Connecting Your Components—Continued
Connecting a CD Player
Connecting a Turntable
a IN
Connecting Your Components—Continued
Connecting a Power Amplifier
For HDD-compatiblecomponents that
Connecting an HDD-compatibleComponent
Connecting the Power Cords of Other Components
Connecting Your Components—Continued
Notes
Connecting Onkyo Components
Connecting the Power Cord
Connecting Your Components—Continued
Smooth Operation in a Few Easy Steps
Turning On the AV Receiver
Turning On and Standby
AV receiver is connected
First Time Setup
Automatic Speaker Setup
Notes
Check the Results
First Time Setup—Continued
Cancel
Apply the Results
Using a Powered Subwoofer
First Time Setup—Continued
Distance Error
Changing the Speaker Settings Manually
Setup closes
HDMI Video Setup
First Time Setup—Continued
Setup closes
Component Video Setup
First Time Setup-Continued
Press the SETUP button
Setup closes
Digital Audio Input Setup
First Time Setup—Continued
Press the SETUP button
Setup closes
Changing the Input Display
Minimum Speaker Impedance
First Time Setup—Continued
Setup closes
TV Format Setup not North American models
AM Frequency Step Setup on some models
First Time Setup—Continued
Basic AV Receiver Operation
Playing Your AV Components
Displaying AM/FM Radio Information
Tuning into AM/FM Radio Stations
Listening to the Radio
Listening to AM/FM Stations
Notes
Using RDS European Model Only
Listening to the Radio—Continued
RDS Program Types PTY
Listening to the Radio—Continued
Displaying Radio Text RT
Listening to Traffic News TP
Finding Stations by Type PTY
Listening to the Radio—Continued
Setting the Satellite Radio Mode
North American Models Only
Listening to XM Satellite Radio
Listening to the Radio—Continued
Connecting the XM Mini-Tunerand Home Dock
Signing Up for XM Satellite Radio
Selecting XM Satellite Radio
buttons to select a category
Selecting XM Radio Channels
Listening to the Radio—Continued
You can also use the Left and Right
Setup closes
Displaying XM Radio Information
Positioning the XM Antenna
1.Channel name 2.Channel number & Preset number
The MEMORY indicator appears and
Presetting AM, FM, and XM Stations
Selecting Presets
Deleting Presets
Input Channel
Using the Multichannel DVD Input
Multichannel DVD Input Settings
Using the Multichannel DVD Input
Muting the AV Receiver
Adjusting Speaker Levels
Setting the Display Brightness
Common Functions
Displaying Source Information
Using the Sleep Timer
Using Headphones
Common Functions—Continued
Selecting on the AV Receiver
Using the Listening Modes
Selecting with the Remote Controller
Selecting the Listening Modes
Using the Listening Modes—Continued
Using the Listening Modes—Continued
About the Listening Modes
Using the Listening Modes—Continued
Onkyo Original DSP Modes
Notes
Recording
Recording the Input Source
Recording Audio and Video from Separate Sources
About the Onscreen Setup Menus
Onscreen Setup Menus
The menu for the selected setting
Adjusting the Listening Modes
Audio Adjust Menu
Using the Re-EQFunction
Neo:6 Music
Adjusting the Listening Modes—Continued
Tone Control Settings
PL IIx and Neo:6 Settings PL IIx Music 2 ch only
Multiplex
Dolby Digital Settings
Mono/Multiplex Settings Mono
LFE Level Setting
When you’ve finished, press the
Default Listening Modes
Adjusting the Listening Modes—Continued
SETUP button
Speaker Configuration
Advanced Setup
Speaker Setup
The Speaker Setup menu appears
Setup closes
Advanced Setup—Continued
Low-PassFilter for the LFE Channel
Subwoofer Mode
Setup closes
Speaker Distance
Advanced Setup—Continued
The Speaker Setup menu appears
The Speaker Setup menu appears
Speaker Level Calibration
Advanced Setup-Continued
lute volume setting 82. If you normally listen at
0–1ft 0–0.3m Default: Select this
THX Audio Setup
Advanced Setup—Continued
The Speaker Setup menu appears
The Equalizer Settings menu appears
Equalizer Settings
Advanced Setup—Continued
The Speaker Setup menu appears
To name an AM or FM radio preset
Input Setup
Character Edit
Advanced Setup-Continued
Advanced Setup—Continued
IntelliVolume
Volume Setup
Preferences
OSD Position
OSD Setup
HDMI Setup
Lock Setup
Advanced Setup—Continued
Changing the Remote Controller’s ID
Remote IDs
Changing the AV Receiver’s Remote ID
Press the SETUP button
Digital Input Signal Formats
Advanced Setup—Continued
SETUP button
Advanced Setup-Continued
Correcting Sound and Picture Sync
Zone
Connecting Zone
Using an Amp in Zone
Using Only Speakers in Zone
Controlling Zone 2 from the AV receiver
Powered Zone 2 Setting
Using Zone
Zone 2—Continued
To Mute Zone
Controlling Zone 2 with the Remote Controller
Adjusting the Volume for Zone
Zone 2—Continued
Zone 2-Continued
Using a Multiroom Kit with a Cabinet
Using a Multiroom Kit with Zone
Using a Multiroom Kit with Other Components
The Remote indicator flashes twice
Entering Remote Control Codes
Controlling Other Components
remote control code
The Remote indicator flashes five
Resetting the Remote Controller
Resetting the REMOTE MODE Buttons
Controlling Other Components—Continued
remote controller mode
Cancels functions
Cancels functions
Adjust the TV’s volume
Controlling Other Components—Continued
Learning Commands from Other Remote Controllers
the Remote indicator flashes twice
Deleting Macros
Using Macros
Making Macros
Running Macros
Audio
Troubleshooting
Power
Video
Troubleshooting—Continued
Others
Remote Controller
Tuner
Recording
Troubleshooting—Continued
Video Section
Specification
Amplifier Section
General
ONKYO EUROPE UK Office
2 9 3 4 4 3
ONKYO U.S.A. CORPORATION
ONKYO EUROPE ELECTRONICS GmbH
Top
Page
Image
Contents