F R A N Ç A I S

Guide de dépannage

Assemblage

AVERTISSEMENT: Avant d’exécuter cette opération, débranchez le cordon d’alimentation de la prise murale.

NE CONSULTEZ PAS INUTILEMENT UN RÉPARATEUR...

VÉRIFIEZ D’ABORD CE QUI SUIT:

Est-ce que le sac jetable en papier filtre est plein?

Est-ce que les pores du sac filtrant sont bouchés avec de la poudre ou de la poussière fine?

Quelque chose bloque-t-il le balai tournant, le tube inférieur, l’ouverture d’admission, le ventilateur ou l’ouverture du connecteur?

Est-ce que la courroie est en place et fait tourner le balai?

Est-ce que les extrémités du balai sont correctement placées?

Est-ce que le balai tourne librement? Y a-t-il des cheveux, des fils ou des fibres de moquette enroulées autour du balai?

PROBLÉME

CAUSE POSSIBLE

VÉRIFICATIONS

L’ASPIRATEUR NE

L’appareil est mal branché.

Assurez-vous que

FONCTIONNE PAS


l’aspirateur est correctement


branché dans la prise


murale.


Aucune électricité n’arrive à

Vérifiez le fusible ou le


la prise murale.

disjoncteur du circuit utilisé.


L’ASPIRATEUR NE

Le sac filtrant est plein.

Remplacez le sac filtrant

RAMASSE PAS LES


(voir «Installation du sac à

SALETÉS


poussières en papier


filtre»).

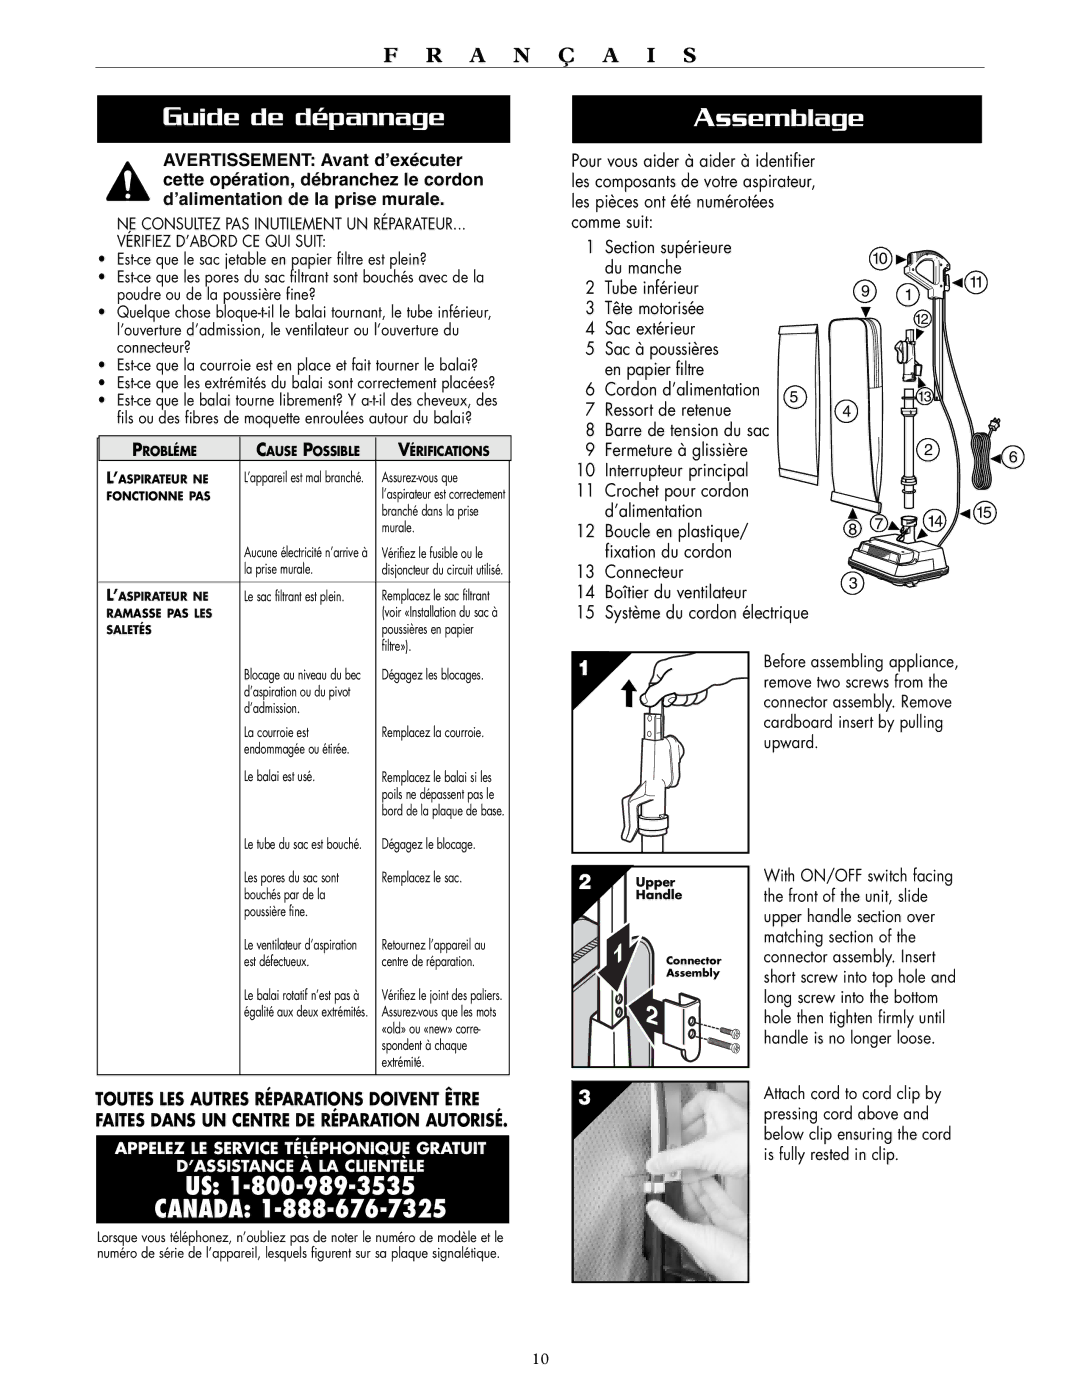
Pour vous aider à aider à identifier les composants de votre aspirateur, les pièces ont été numérotées comme suit:

1Section supérieure du manche

2Tube inférieur

3Tête motorisée

4 Sac extérieur

5Sac à poussières en papier filtre

6

Cordon d’alimentation

5

7

Ressort de retenue


8

Barre de tension du sac


9

Fermeture à glissière


10 Interrupteur principal

11Crochet pour cordon d’alimentation

12Boucle en plastique/ fixation du cordon

13Connecteur

14Boîtier du ventilateur

15Système du cordon électrique


10

9

11

1


12

13

4


2

6


8

7

14

15


3


Blocage au niveau du bec

Dégagez les blocages.

d’aspiration ou du pivot


d’admission.


La courroie est

Remplacez la courroie.

endommagée ou étirée.


Le balai est usé.

Remplacez le balai si les


poils ne dépassent pas le


bord de la plaque de base.

Le tube du sac est bouché.

Dégagez le blocage.

1

Before assembling appliance,


remove two screws from the


connector assembly. Remove


cardboard insert by pulling


upward.

Les pores du sac sont

Remplacez le sac.

bouchés par de la


poussière fine.


Le ventilateur d’aspiration

Retournez l’appareil au

est défectueux.

centre de réparation.

Le balai rotatif n’est pas à

Vérifiez le joint des paliers.

égalité aux deux extrémités.

Assurez-vous que les mots


«old» ou «new» corre-


spondent à chaque


extrémité.

TOUTES LES AUTRES RÉPARATIONS DOIVENT ÊTRE

FAITES DANS UN CENTRE DE RÉPARATION AUTORISÉ.

APPELEZ LE SERVICE TÉLÉPHONIQUE GRATUIT

D’ASSISTANCE À LA CLIENTÈLE

US: 1-800-989-3535

CANADA: 1-888-676-7325

Lorsque vous téléphonez, n’oubliez pas de noter le numéro de modèle et le numéro de série de l’appareil, lesquels figurent sur sa plaque signalétique.

2

Upper


Handle


Connector


Assembly

3


With ON/OFF switch facing the front of the unit, slide upper handle section over matching section of the connector assembly. Insert short screw into top hole and long screw into the bottom hole then tighten firmly until handle is no longer loose.

Attach cord to cord clip by pressing cord above and below clip ensuring the cord is fully rested in clip.

10

Page 10
Image 10
Oreck XL2700RH, XL2700HH, XL2610HH, XL2600HH Guide de dépannage Assemblage, Tube inférieur Tête motorisée Sac extérieur

XL2700RH, XL2610HH, XL2700HH, XL2600HH specifications

The Oreck XL series of vacuum cleaners, including models XL2600HH, XL2700HH, XL2610HH, and XL2700RH, represents a pinnacle in lightweight cleaning technology. Designed for both efficiency and user comfort, these models cater to a variety of floor types and cleaning needs, making them ideal for residential and commercial spaces alike.

One of the standout features of the Oreck XL series is their lightweight design. Weighing around 8 pounds, these vacuums are easy to maneuver, reducing fatigue during extended cleaning sessions. Their slim profile ensures they can easily reach under furniture and into tight corners, maximizing cleaning potential.

The XL2600HH and XL2700HH models are equipped with Oreck's proprietary, high-speed roller brush technology. This feature allows for effective deep cleaning while lifting dirt, dust, and allergens from carpets and bare floors. The brushes rotate at a high velocity, enabling the machines to dig deep into carpet fibers and extract particles that other vacuums may leave behind.

Another important aspect of these models is their multi-floor capability. Whether you're cleaning carpet, tile, hardwood, or laminate, the XL series provides versatile cleaning solutions. The adjustable floor settings seamlessly adapt to different surfaces, allowing users to switch from one type of flooring to another without losing suction power.

The Oreck XL2610HH and XL2700RH models highlight advanced air filtration systems, including a HEPA filtration option that effectively captures 99.97% of particles as small as 0.3 microns. This feature is particularly beneficial for allergy sufferers, as it helps maintain a cleaner indoor air environment.

Additionally, the XL series boasts a unique top-fill design, allowing the bags to fill completely without losing suction. This design maximizes efficiency by utilizing all the available space within the bag.

Furthermore, the Oreck Vacuums come with a warranty, demonstrating the manufacturer's confidence in their durability and performance. With their combination of lightweight design, advanced features, and effective cleaning capabilities, the Oreck XL2600HH, XL2700HH, XL2610HH, and XL2700RH vacuum cleaners stand out as reliable choices for maintaining cleanliness in any space.