SL210
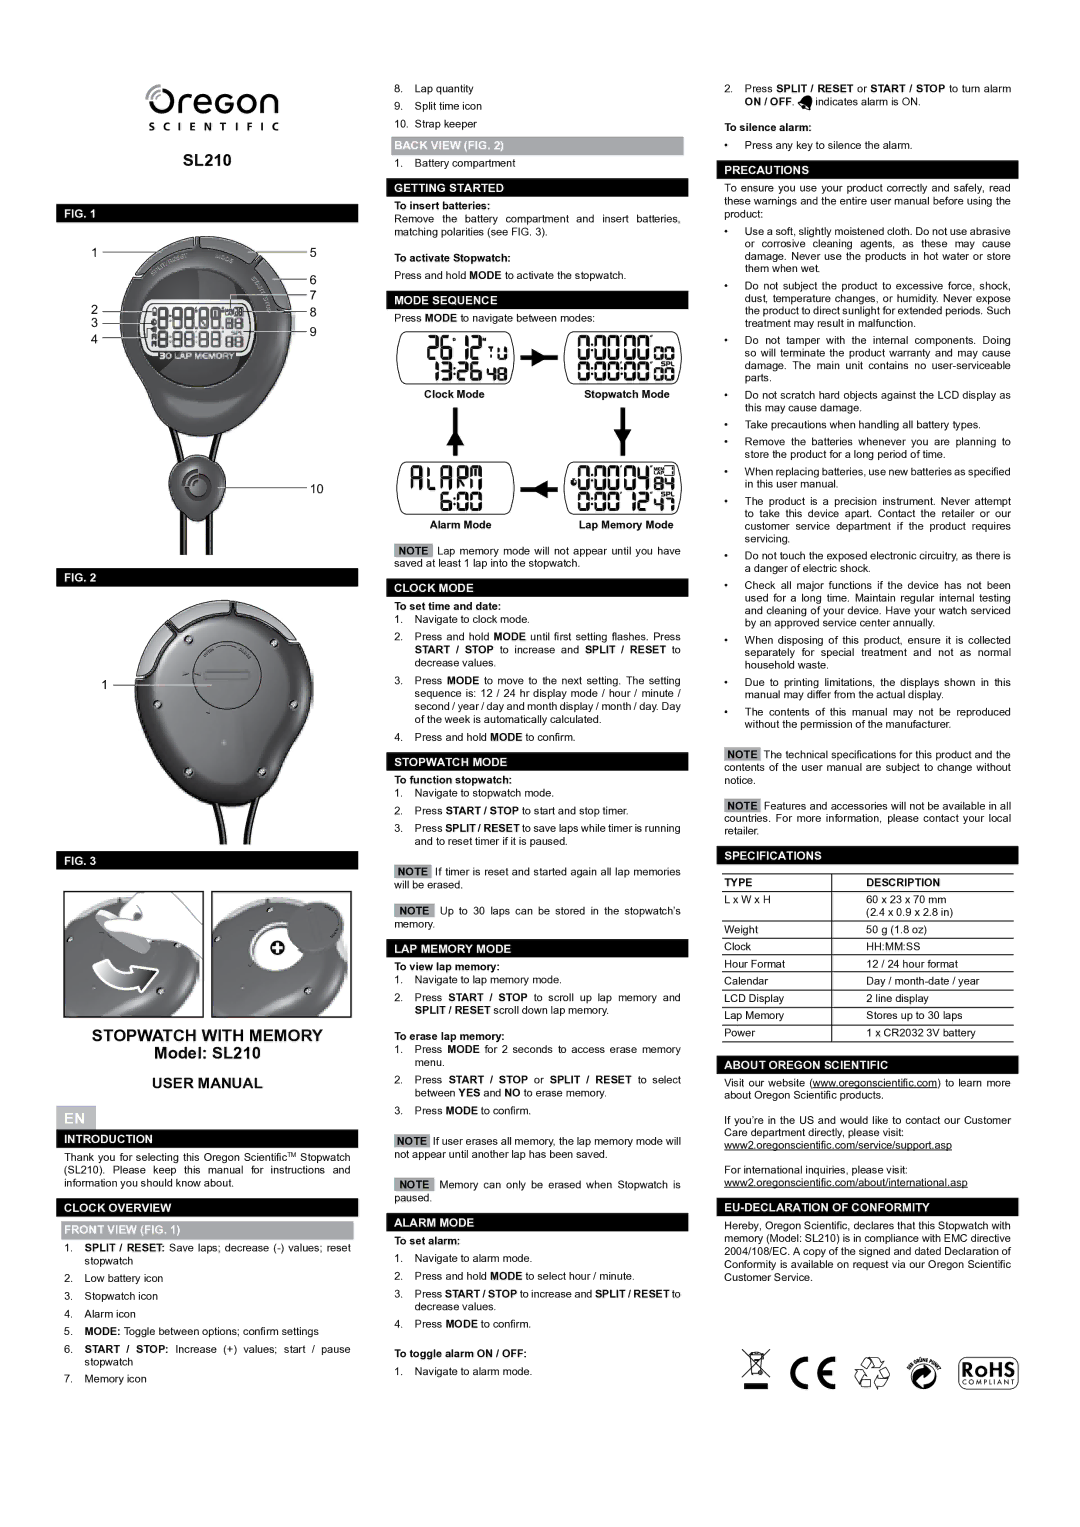
FIG. 1
1 | 5 | |
| 6 | |
2 | 7 | |
| 8 | |
| ||
3 |
|
|
4 | 9 |
|
![]()
![]() 10
10
FIG. 2
1
FIG. 3
STOPWATCH WITH MEMORY
Model: SL210
USER MANUAL
EN
INTRODUCTION
Thank you for selecting this Oregon ScientificTM Stopwatch (SL210). Please keep this manual for instructions and information you should know about.
CLOCK OVERVIEW
FRONT VIEW (FIG. 1)
1.SPLIT / RESET: Save laps; decrease
2.Low battery icon
3.Stopwatch icon
4.Alarm icon
5.MODE: Toggle between options; confirm settings
6.START / STOP: Increase (+) values; start / pause stopwatch
7.Memory icon
8.Lap quantity
9.Split time icon
10.Strap keeper
BACK VIEW (FIG. 2)
1.Battery compartment
GETTING STARTED
To insert batteries:
Remove the battery compartment and insert batteries, matching polarities (see FIG. 3).
To activate Stopwatch:
Press and hold MODE to activate the stopwatch.
MODE SEQUENCE
Press MODE to navigate between modes:
Clock Mode | Stopwatch Mode |
Alarm Mode | Lap Memory Mode |
NOTE Lap memory mode will not appear until you have saved at least 1 lap into the stopwatch.
CLOCK MODE
To set time and date:
1.Navigate to clock mode.
2.Press and hold MODE until first setting flashes. Press
START / STOP to increase and SPLIT / RESET to decrease values.
3.Press MODE to move to the next setting. The setting sequence is: 12 / 24 hr display mode / hour / minute / second / year / day and month display / month / day. Day of the week is automatically calculated.
4.Press and hold MODE to confirm.
STOPWATCH MODE
To function stopwatch:
1.Navigate to stopwatch mode.
2.Press START / STOP to start and stop timer.
3.Press SPLIT / RESET to save laps while timer is running and to reset timer if it is paused.
NOTE If timer is reset and started again all lap memories will be erased.
NOTE Up to 30 laps can be stored in the stopwatch’s memory.
LAP MEMORY MODE
To view lap memory:
1.Navigate to lap memory mode.
2.Press START / STOP to scroll up lap memory and SPLIT / RESET scroll down lap memory.
To erase lap memory:
1.Press MODE for 2 seconds to access erase memory menu.
2.Press START / STOP or SPLIT / RESET to select between YES and NO to erase memory.
3.Press MODE to confirm.
NOTE If user erases all memory, the lap memory mode will not appear until another lap has been saved.
NOTE Memory can only be erased when Stopwatch is paused.
ALARM MODE
To set alarm:
1.Navigate to alarm mode.
2.Press and hold MODE to select hour / minute.
3.Press START / STOP to increase and SPLIT / RESET to decrease values.
4.Press MODE to confirm.
To toggle alarm ON / OFF:
1.Navigate to alarm mode.
2.Press SPLIT / RESET or START / STOP to turn alarm ON / OFF. ![]() indicates alarm is ON.
indicates alarm is ON.
To silence alarm:
•Press any key to silence the alarm.
PRECAUTIONS
To ensure you use your product correctly and safely, read these warnings and the entire user manual before using the product:
•Use a soft, slightly moistened cloth. Do not use abrasive or corrosive cleaning agents, as these may cause damage. Never use the products in hot water or store them when wet.
•Do not subject the product to excessive force, shock, dust, temperature changes, or humidity. Never expose the product to direct sunlight for extended periods. Such treatment may result in malfunction.
•Do not tamper with the internal components. Doing so will terminate the product warranty and may cause damage. The main unit contains no
•Do not scratch hard objects against the LCD display as this may cause damage.
•Take precautions when handling all battery types.
•Remove the batteries whenever you are planning to store the product for a long period of time.
•When replacing batteries, use new batteries as specified in this user manual.
•The product is a precision instrument. Never attempt to take this device apart. Contact the retailer or our customer service department if the product requires servicing.
•Do not touch the exposed electronic circuitry, as there is a danger of electric shock.
•Check all major functions if the device has not been used for a long time. Maintain regular internal testing and cleaning of your device. Have your watch serviced by an approved service center annually.
•When disposing of this product, ensure it is collected separately for special treatment and not as normal household waste.
•Due to printing limitations, the displays shown in this manual may differ from the actual display.
•The contents of this manual may not be reproduced without the permission of the manufacturer.
NOTE The technical specifications for this product and the contents of the user manual are subject to change without notice.
NOTE Features and accessories will not be available in all countries. For more information, please contact your local retailer.
SPECIFICATIONS
TYPE | DESCRIPTION |
|
|
L x W x H | 60 x 23 x 70 mm |
| (2.4 x 0.9 x 2.8 in) |
|
|
Weight | 50 g (1.8 oz) |
|
|
Clock | HH:MM:SS |
Hour Format | 12 / 24 hour format |
Calendar | Day / |
|
|
LCD Display | 2 line display |
|
|
Lap Memory | Stores up to 30 laps |
|
|
Power | 1 x CR2032 3V battery |
|
|
ABOUT OREGON SCIENTIFIC
Visit our website (www.oregonscientific.com) to learn more about Oregon Scientific products.
If you’re in the US and would like to contact our Customer Care department directly, please visit: www2.oregonscientific.com/service/support.asp
For international inquiries, please visit: www2.oregonscientific.com/about/international.asp
EU-DECLARATION OF CONFORMITY
Hereby, Oregon Scientific, declares that this Stopwatch with memory (Model: SL210) is in compliance with EMC directive 2004/108/EC. A copy of the signed and dated Declaration of Conformity is available on request via our Oregon Scientific Customer Service.
