Failure to adjust correctly may result in loss of braking power and personal injury.
Single Cable Casing
Cable Adjuster
Cable Splitter
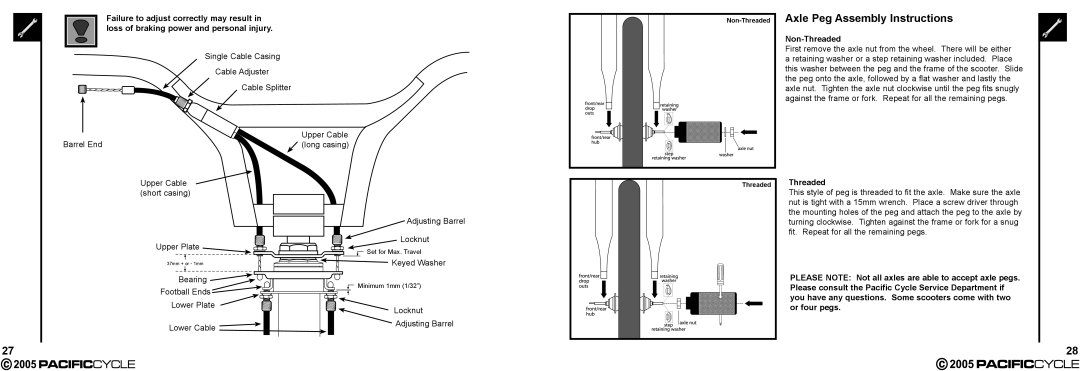
Axle Peg Assembly Instructions
Non-Threaded
First remove the axle nut from the wheel. There will be either a retaining washer or a step retaining washer included. Place this washer between the peg and the frame of the scooter. Slide the peg onto the axle, followed by a flat washer and lastly the axle nut. Tighten the axle nut clockwise until the peg fits snugly against the frame or fork. Repeat for all the remaining pegs.
| Upper Cable | |
Barrel End | (long casing) | |
Upper Cable |
| |
(short casing) |
| |
| Adjusting Barrel | |
Upper Plate | Locknut | |
Set for Max. Travel | ||
| ||
37mm + or - 1mm | Keyed Washer | |
Bearing | Minimum 1mm (1/32”) | |
Football Ends | ||
| ||
Lower Plate | Locknut | |
| ||
Lower Cable | Adjusting Barrel | |
|
Threaded |
Threaded
This style of peg is threaded to fit the axle. Make sure the axle nut is tight with a 15mm wrench. Place a screw driver through the mounting holes of the peg and attach the peg to the axle by turning clockwise. Tighten against the frame or fork for a snug fit. Repeat for all the remaining pegs.
PLEASE NOTE: Not all axles are able to accept axle pegs. Please consult the Pacific Cycle Service Department if you have any questions. Some scooters come with two or four pegs.
27 | 28 |