Operating Instructions
Model No. AG-HVX200AP
For Battery of Remote Controller
For Battery Pack
Read this first
Camera-Recorder
FCC Warning
Declaration of Conformity
Notification Canada
For USA-California Only
Software information for this product
Important Safety Instructions
Contents
Connecting external units
On SD memory cards Clip metadata Using the Counter
Audio dubbing Nonlinear editing with P2 card PC mode
Host mode
Outline of operations
Host mode
PC mode
Saving and editing on external devices
Video equipment/ Television
Precaution for use
About this manual
Accessories
Right side and rear side
Description of parts
Focus ring Zoom ring
Left side
Terminals and mounting parts
Description of parts
Light shoe Microphone shoe USB terminal Mini-BPages 78
Headphone jack 3.5 mm stereo mini jack
Photo Shot Title MULTI/P-IN-P Select Store OFF/ON PB. Zoom
Remote control
DATE/TIME button OSD button Counter button
ZOOM/VOL buttons Pages 33 16 VAR. Search button Menu button
Plug the AC cord into the power outlet
Battery
Power Charge
Charging
Installing and removing the battery
Installing and removing the power supply
Installation
Connecting and disconnecting the power cord
Detaching and attaching the lens hood
Adjusting the hand strap
Attaching the shoulder strap
Insert the battery
Remote control
Remote control setup
Setting
OFF
Turn on/off the camera
Tally lamp
Viewfinder
Using the viewfinder
Keep the LCD monitor closed
Fitting the eye cup
Set the Power switch to on
Using the LCD
Viewfinder
Emphasizing outlines
Set the Power switch to ON. Press the Menu button
Adjusting the screen display
Viewfinder adjustments
LCD monitor adjustments
Example of Menu in the Tape mode
Setting the calendar
Operation button.
Choose a year between 2000
Basic shooting operations P2 card
Preparing to shoot using a P2 card
Shooting in auto mode
Basic shooting operations P2 card
P2 card access lamps
Checking photos taken REC Check
Protecting against a possible erasure
Recording times
Formatting P2 cards
Remove the P2 card
Check that the P2 card access lamp is not blinking orange
Basic shooting operations Cassette tape
Preparing to shoot using a tape Shooting in auto mode
Cassette holder is completely in position
Button Lock
Checking scenes taken REC Check
Basic shooting operations Cassette tape
Remove the cassette tape
Shooting pause mode, press the REC Check button
Tape loading and unloading
Cassette tapes
Preventing accidental erasure
Formatting SD memory card
Using SD/SDHC memory cards
Installing and removing the SD memory card
On the remote control
Using the zoom function
Handle Zoom switch Handle zoom button Zoom button Zoom ring
Servo Zoom
Variable frame rates VFR
24PN mode
Native recording
Using the Operation Type function
Standard recording
PROPERTY-CLIP PROPERTY-VIDEO
Variable frame rates VFR
Using variable frame rates VFR
30P mode
Shooting in 1080i/480i progressive mode
24P mode
24P advanced mode
Switching to manual mode
Shooting in manual mode
Manual focusing
Using focus assist
Adjusting the gain
Iris adjustments
Light intensity adjustments
ND Filter switch Iris button Gain switch Iris dial
Adjusting the white balance
Shooting in manual mode
White balance adjustments
LOW Light
Black balance adjustments
Using presets
Auto Tracking White ATW
ABB Active
Low-angle shooting
Shooting techniques for different targets
Self-portrait shooting
Mirror
Marker
Zebra pattern
Image level detection area Marker
Normal display reappears if you press
Changing the image size
Shooting techniques for different targets
Checking and displaying shooting status
Optical Image Stabilizer
Using the User buttons
Adding effects to images
Backlight compensation
Backup recording
Adjusting the volume while shooting
Adjusting the volume
To adjust the recording level
Shot mark function
Slot continuous recording
Press or in the shooting standby mode
Using the special recording functions
Finding specific scenes image search
Index recording
Interval Time Interval Time
Interval recording Interval REC
Loop recording Loop REC
Using the special recording functions
One-shot recording ONE-SHOT REC
Adjusting the shutter speed
Progressive Shutter speed Mode 50 Hz
Adjusting the shutter speed
Synchro scan
Gain is fixed at 0 dB with a shutter speed of 1/12 and 1/15
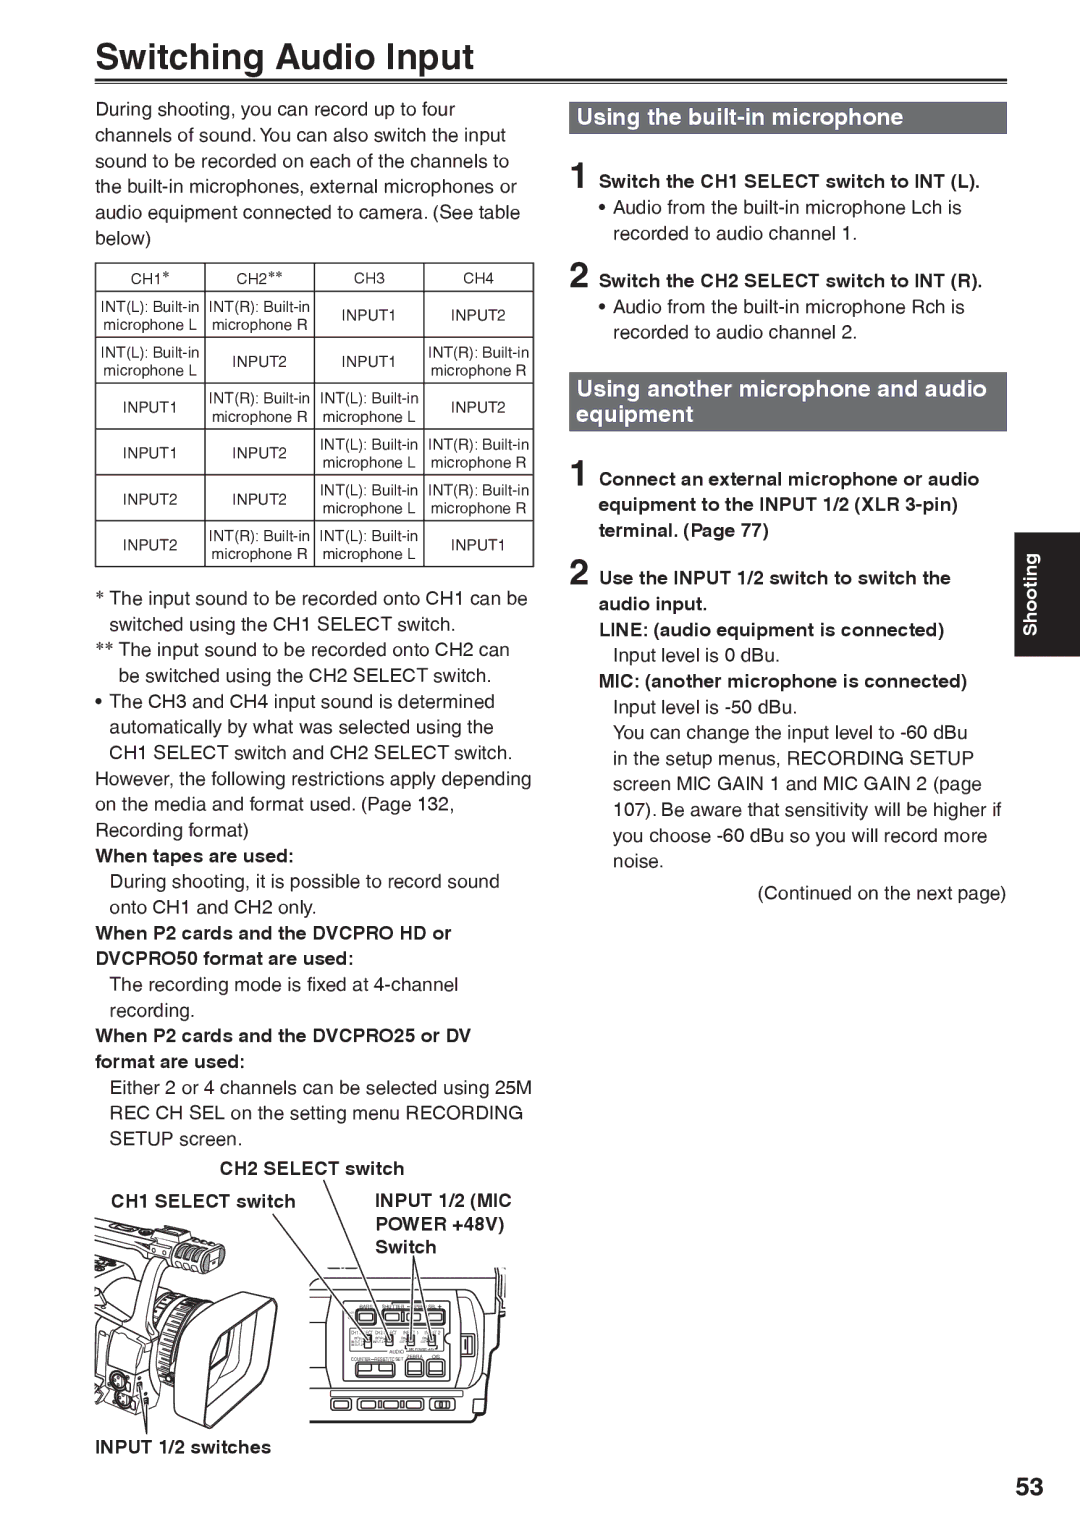
Using the built-in microphone
Switching Audio Input
Using another microphone and audio equipment
Power +48V
Input
Switching Audio Input
Adjusting the recording level
Changing scene file settings
Using scene files
Following screen appears, select YES, then press button
Using scene files
Perform steps 1 to
To title a file
Button
To reload a file from an SD memory card
What the clip metadata consists
Clip metadata
1394TC preset mode
Using the Counter
Memory stop mode Tape
Counter display P2 card / Tape
Recharging the built-in battery
Charging the built-in battery/Setting the time data
Setting the time code
Specifying the time code TC Preset
When the screen below appears, set the time code value
Setting user information
Counter Reset
From the last time code value of the previous
Camera or Remote control
Setting the time data
Setup menus, Recording Setup screen UB MODE, select User
Basic playback operations P2 card
Basic playback operations Tape
Basic thumbnail screen operations
Thumbnail screen
To use the thumbnail menu
Thumbnail Operation Property Meta Data
Thumbnail screen
Adding shot marks to clips
Normal playback standby screen 1394 input mode appears
Clearing the thumbnail screen
Direct shooting functions
Selecting the thumbnail display method Thumbnail
Thumbnail operations
Text Memo IND
Marked IND
Voice Memo IND
Wide IND
Deleting clips and formatting cards Operation
Thumbnail operations
Checking the clip or card information Property
Not Supported
Format Error
No Card
SD Standard
Load
Uploading the metadata Meta Data
Record
Initialize
Variable speed search P2 card / Tape
Useful playback functions
Slow playback P2 card / Tape
Fast forward/rewind playback P2 card
Clip skip P2 card
Frame-by-frame playback P2 card / Tape
End search Tape
Press the END Search button
Useful playback functions
Adjusting the volume P2 card / Tape
Index search Tape
Viewing images on a television P2 card / Tape
Headphones
Connecting external units
External microphone
AG-MC200G
Computer non-linear editing/file transfer
Connecting external units
File transfer/nonlinear editing
1394AVC transfer/nonlinear editing
This camera Other Digital video equipment
Digital video equipment Dubbing
Ferrite core until it clicks into place and locks
VCR
Video deck Dubbing
TV/Monitor playback/dubbing
AIN
Audio dubbing
MIC
MIX
Audio dubbing
Press the Menu button twice to release
Nonlinear editing with P2 card PC mode
Proceed with nonlinear editing using your computer
Nonlinear editing with P2 card PC mode
Switch OFF the camera
Card Bus driver is contained in the CD-ROM provided
Copying from P2 cards to the hard disk drive 1394 Host mode
Copying from P2 cards to the hard disk drive 1394 Host mode
Dubbing
Dubbing the contents of P2 cards onto a tape dubbing mode
Digital input/output P2 card/Tape
Dubbing
SEL to a User button, the allocated operation
Holding down the REC button
Stop recording in the recorder
Analog output P2 card/Tape
On this unit, press the button
Stop playback on the other unit
Analog input Tape
Set the Media switch to the Tape position.
Regular displays
Screen displays
Remote
P2 Lack
Screen displays
Blank
Stndby
Cannot Access
LOW Battery
REC END
Copy Inhibited
Errors
ALL Partial OFF
Setting the Display items
Mode Check Display
Using the menus
Using the setup menus
Camera mode Example Press the button to make the setting
MCR/VCR mode Example
Initializing the menu settings
Using the setup menus
To change other settings, repeat steps 4
To change other functions, repeat steps 2 to
Camera mode menu
Setup menu structure
MCR/VCR playback and external input mode menu
Setup menu structure
Dubbing mode menu
This screen appears only in the dubbing mode
Scene File screen
Setup menu list
101
102
Setup menu list
103
Camera Setup screen
104
SW Mode screen
105
AGC
106
Auto SW screen
107
Recording Setup screen
Input channels
Delivered to two channels always CH1 and CH2
108
UB Preset
UB Mode
MCR VCR DUB Preset
109
Playback Functions screen
110
MIX
Audio OUT P2 MCR
111
112
Dubbing Setup screen
AV IN/OUT Setup screen
113
Display Setup screen
114
Other Functions screen
115
Card Functions screen
116
Time Zone
117
118
119
Power supply
Before calling for service
Battery
120
Shooting when using a tape
Shooting when using a P2 card
121
Editing
122
Before calling for service
Displays
Playback
Other
123
AC adapter and battery
Operating precautions
Take precautions not to drop the camera when moving it
124
Battery will become unchargeable
Battery characteristics
Protective caps for the connectors
125
Condensation
Updating the driver in the camera
126
Https//eww.pavc.panasonic.co.jp/pro-av
127
System resetting
Cleaning
Regular Maintenance
Using a Cleaning Tape Page 136, Optional Units
Video Heads
128
129
Storage Precautions
130
How to handle data recorded on P2 cards
131
Checkpoints for using memory cards
Cards you can use
Cards you cannot use
132
Recording format
Frame rate
Over
133
Appendix
Selecting the User Clip Name recording method
TYPE2
General
Specifications
134
Video IN/OUT
135
Memory Card
136
Specifications
137
Technical Support
Eastern Zone
Western Zone