Digital Camera Lens Kit/Body
Model No. DMC-G5X/DMC-G5K DMC-G5
Basic Owner’s Manual
VQT4G94
Carefully observe copyright laws
Information for Your Safety
Dear Customer
To reduce the risk of fire, electric shock or product damage
THE FOLLOWING APPLIES ONLY IN THE U.S.A FCC Note
∫ Product identification marking
Declaration of Conformity
Battery charger
∫ About the battery pack
∫ About the battery charger
Battery pack Lithium ion battery pack
Do not use this unit near radio transmitters or high-voltage lines
If you see this symbol
∫ Cautions for Use
Information on Disposal in other Countries outside the European Union
Taking pictures using the Touch Shutter function
Contents
Changing the Clock Setting
Installing supplied software
Do not subject to strong vibration, shock, or pressure
Avoid using the camera in places with a lot of dust, water, sand, etc
Care of the camera
This camera is not dust/drip/water proof
Standard Accessories
VFC4765
DMC-G5X DMC-G5K DMC-G5
DMW-BLC12PP
DE-A79B
8 910 111213 14 16 17 18 19 20
Names and Functions of Components
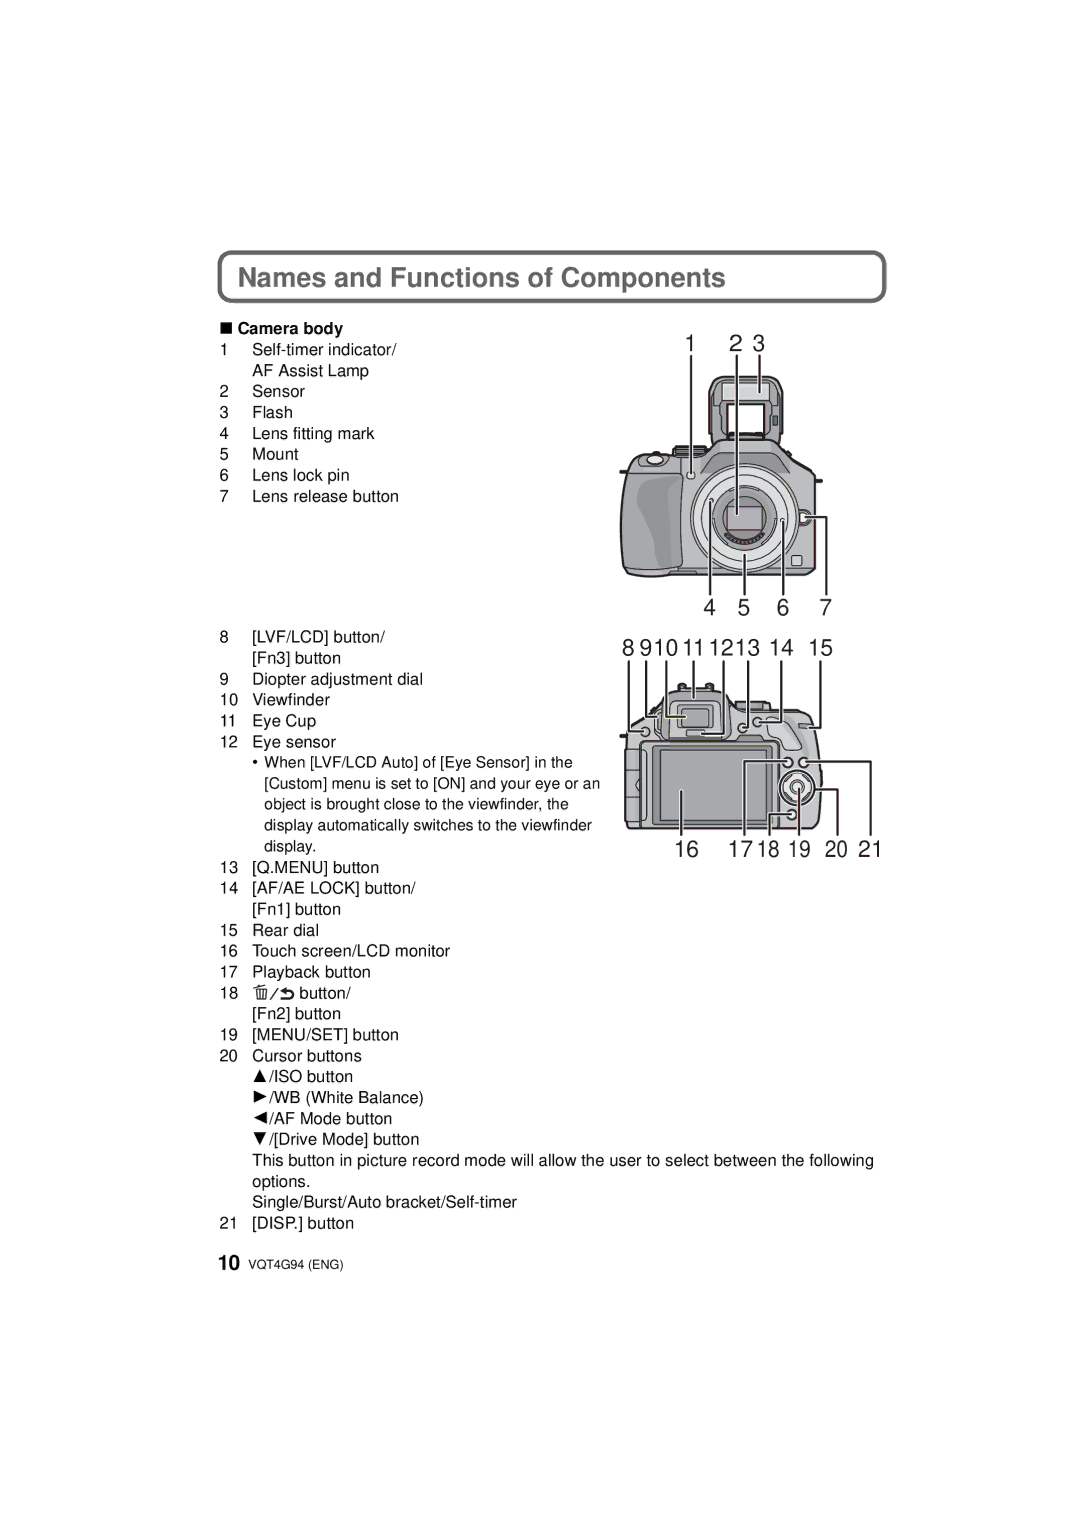
4 5 6
∫ Camera body
30 31 32
25 26
Focus distance reference mark
H-FS014042
∫ Lens
H-PS14042
Touch screen
Attaching the lens
Changing the Lens
Detaching the lens
Pass the shoulder strap through the shoulder
Attaching the Shoulder Strap
strap eyelet on the camera body
the battery
Charging the Battery
Attach the battery paying
The battery that can be used with this unit is DMW-BLC12PP
1 Close the card/battery door
Inserting and Removing the Card optional/ the Battery
Pull the lever A in the direction of the arrow to remove the battery
2 Slide the release lever in the direction of the arrow
About the Card
About cards that can be used with this unit
Select Clock Set in the Setup menu
Setting Date/Time Clock Set
Changing the Clock Setting
1 Turn the camera on
Press
Selecting the Recording Mode
Select the mode by rotating the mode dial
∫ To select a Recording Mode with the mode dial
Taking a Still picture
Taking pictures using the Touch Shutter function
∫ To cancel the Touch Shutter function Touch
Applicable modes 1 Select the Recording Mode
Recording Mode
Taking Pictures using the Automatic Function
Intelligent Auto Mode
∫ Scene Detection
∫ Adjusting brightness 1 Touch 2 Touch to display the setting screen
Recording using Intelligent Auto Plus Mode
Press MENU/SET when in Intelligent Auto Mode Touch iA MODE
Select and then touch Set
Taking Pictures with Defocus Control Function
to display the setting screen
2 Touch to display the setting screen
Applicable modes
2 Stop the recording by pressing the motion picture button again
Recording Motion Picture
1 Start recording by pressing the motion picture button
Recording still pictures while recording motion pictures
Rotate the rear dial to compensate the exposure
Press the rear dial to switch to Exposure Compensation operation
Compensating the Exposure
Properly UnderexposedOverexposed exposed
Using the function button
Touch the function you want to assign
Set the mode dial to
Taking Pictures that match the Scene being
recorded Scene Guide Mode
3 Touch Set
1 Set the mode dial to
Taking Pictures with different image effects
Creative Control Mode
Touch the example image to select image effects
1 Press
Playing Back Pictures/Motion Pictures
Playing Back Pictures
2 Forward or rewind the image by dragging the screen horizontally
Once deleted, pictures cannot be recovered To delete a single picture
3 When Delete Multi is selected Touch the picture to be deleted
4 When Delete Multi is selected Touch OK
Deleting Pictures
In Recording Mode
Switching the display of the LCD Monitor
Press DISP. to change
In Playback Mode
∫ Switching to other menus
Setting the Menu
Touch the Setting to set
Press MENU/SET
Touch Exit to exit menu once the setting is completed
Setting the Quick Menu
Touch the setting
∫ When using the viewfinder
Types of menus
∫ Rec Menu
∫ Motion Picture Menu
∫ Custom Menu
Eye Sensor AF
button is pressed halfway with Auto Focus Mode set to
∫ Setup Menu
The card is formatted
to the front of the imaging device is performed
∫ Playback Menu
∫ To uninstall the Owner’s Manual PDF format
Select the desired language and then click Owner’s Manual to install
∫ When the Owner’s Manual PDF format will not open
Reading the Owner’s Manual PDF format
Install the software on to your computer before use
About the supplied software
The supplied CD-ROM includes the following software
1 Check the environment of your PC
Installing supplied software
3 Click on the Recommended Installation
2 Insert the CD-ROM with the supplied software
Power Consumption
Specifications
Power Source
Digital Camera Body DMC-G5
Metering range
Minimum Illumination
Shutter speed
White Balance
Recording quality
Picture size
Still picture
Motion pictures
Battery Charger Panasonic DE-A79B
Dimensions
Mass weight
Battery Pack lithium-ion Panasonic DMW-BLC12PP
Interchangeable Lens H-PS14042
“LUMIX G X VARIO PZ 14-42 mm/F3.5-5.6 ASPH./POWER O.I.S.”
O.I.S. switch
Focal length
“LUMIX G VARIO 14-42 mm/F3.5 -5.6 ASPH./MEGA O.I.S.”
None Setting of the Stabilizer is done in Rec menu
Interchangeable Lens H-FS014042
f=14 mm to 42 mm
Accessory#
Digital Camera Accessory System
Description
This unit is compatible with UHS-I standard
50 VQT4G94 ENG
Digital Camera Accessory Order Form
For USA and Puerto Rico Customers
Panasonic Consumer Marketing Company of North America
Limited Warranty ONLY FOR U.S.A. AND PUERTO RICO
Limited Warranty Coverage For USA and Puerto Rico Only
Division of Panasonic Corporation of North America
Panasonic Exchange Center 4900 George McVay Drive Suite B McAllen, TX
Mail-In Service
Limited Warranty Limits And Exclusions
panacare@us.panasonic.com
For hearing or speech impaired TTY users, TTY
Customer Services Directory United States and Puerto Rico
Accessory Purchases United States and Puerto Rico
1-800-211-PANA Monday-Friday 9am-9pm, Saturday-Sunday 10am-7pm EST
ENG VQT4G94
For USA
Printed in China
One Panasonic Way, Secaucus, NJ Panasonic Corporation