Example
Warranty can be found on
Before moving the unit, ensure the disc tray is empty
FCC Note
Following Applies only in the U.S.A
RQLS0233 Inside of product
Features
Accessories
Table of contents
Do not connect the unit through a video cassette recorder
Antenna and television connections
Batteries
Remote control
Use
Do not
Adding and deleting channels
Press 3, 4 to select Antenna Sys Tem and press Enter
Press 3, 4 to select VCR Plusr CH Setting and press Enter
VCR Plusi guide channel settings
Station Guide Channel Channel setting
Step
Television operation
Set up to match your television
Press 3, 4 to select TV Screen and press
Press 3, 4 to select TV Type and press Enter
Disc information
Event of a power failure
During setup
Safeguards against accidental loss
HDD Hard disk drive
Power button Í, DVD Power
Remote control
Control reference guide
Unit’s display
Main unit
Recording television programs
Press REC Mode to select the recording mode next
Inserting discs
Press OPEN/CLOSE to open the tray and insert a disc left
Watching the television while recording
FR Flexible Recording Mode
Recording modes and approximate recording times in hours
Recording/Dubbing/Transferring of a program
Recording from a video cassette recorder
Simultaneous rec and play
Playing while you are recording
Reviewing the recorded images while recording-Time Slip
Press OPEN/CLOSE to open the tray and insert a disc
Playing discs
To stop play
To pause play
Using the Direct Navigator
When a menu screen appears on the television
Position Memory
Slow-motion play
Other methods of play
Frame-by-frame viewing
Skipping
Selecting an amount of time to skip- Time Slip
Skipping a minute forward-CM Skip
Fast forward and rewind-SEARCH
Quick View
Press Marker
Marking places to play again-MARKER
Press Display
Press Select Play
Using the tree screen to find a group
Using menus to play MP3 discs
Press TOP Menu
Press 3, 4, 2, 1 to select a group and press Enter
Using VCR Plusr codes to make timer recordings
Timer recording
Specify a time to stop recording
Press PROG/CHECK or Return
Manually programming timer recordings
Press 1 to move through the items Change the items with 3
Check programs
Auto Renewal Recording
Change or delete the program
Press Cancel or ADD/DLT to delete
Press 3, 4 to select the program
Or press Enter to change
Dubbing programs or play list
Select the recording mode
Select items for dubbing
Select the dubbing direction
Press Dubbing
One Touch Dubbing HDD DVD
Press 2, 1 to select Yes and press Enter
Press Enter at the start point
Creating play lists
Press Enter at the end point
Press 3, 4 to select Exit and press Enter
Playing play list scenes
Playing play lists
To erase a play list or a play list scene during playback
Preparation
Editing play lists
While stopped
For your reference
Repeat to erase other scenes
Move
Direct Navigator
Editing programs
Enter at
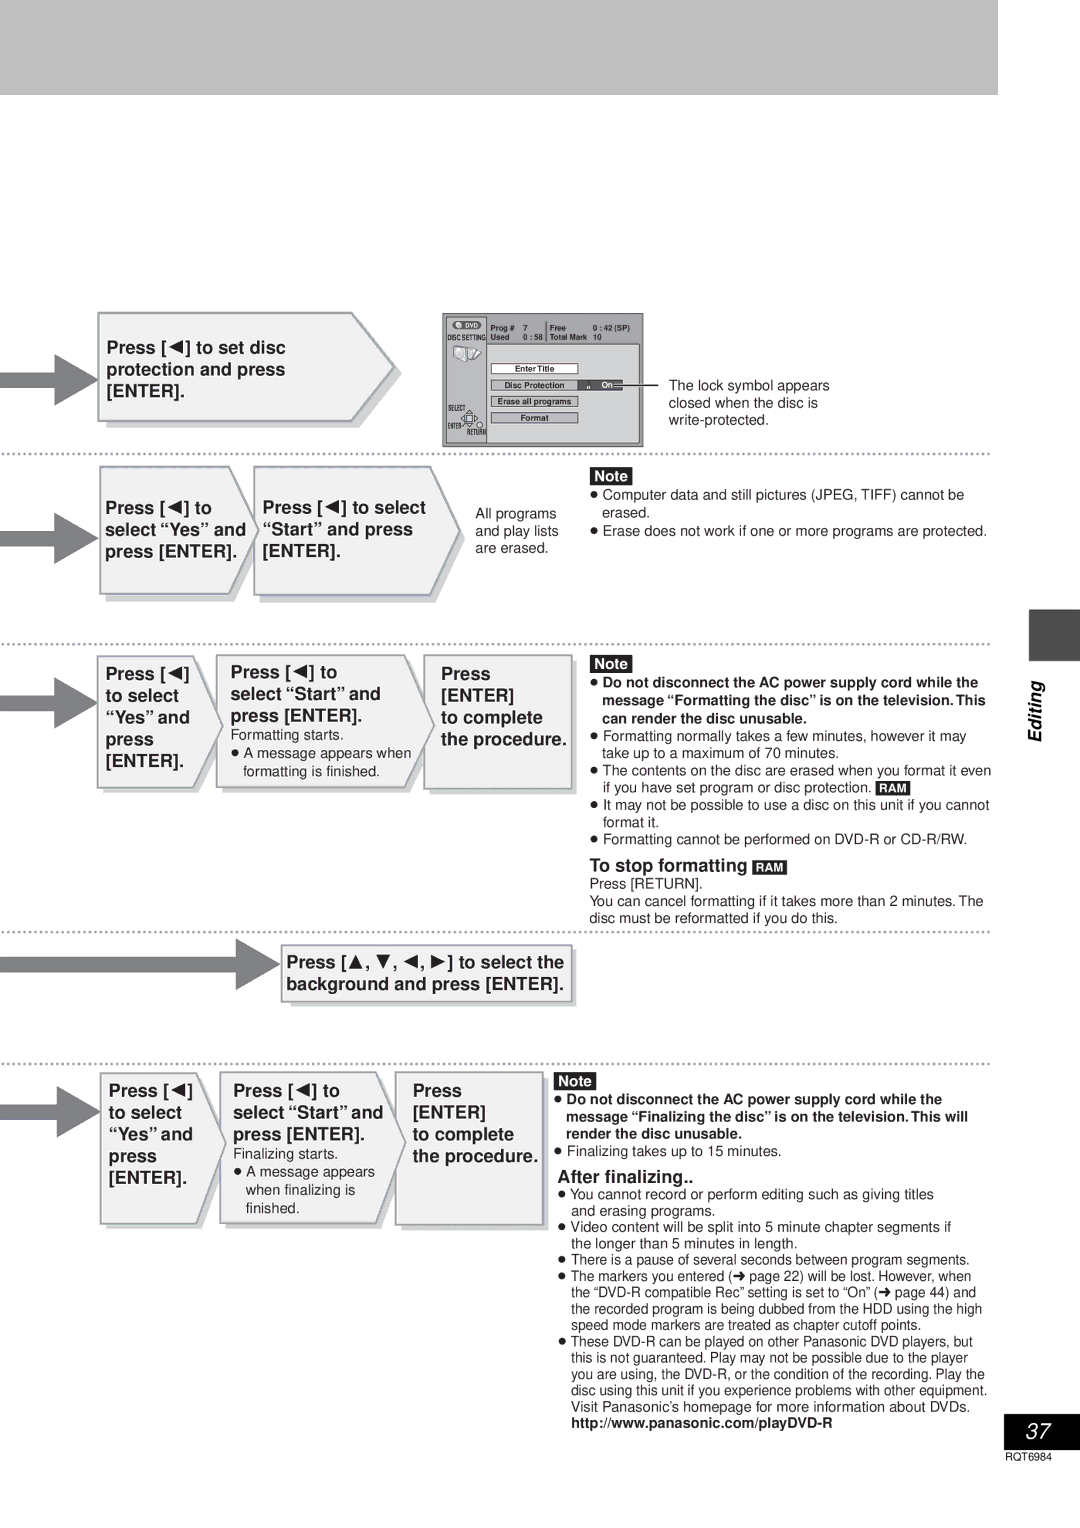
Disc Protection
HDD, Disc setting
Write-protected
Closed when the disc is
Entering text
Using the numbered buttons to enter characters
Press 3, 4, 2, 1 to select the character and press Enter
To erase a character
Press Audio
Changing audio
While playing HDD, DVD-RAM or Video CD
While playing DVD-Audio or DVD-Video
Common procedures
Using on-screen menus
Disc menu
Press 3, 4 to select the menu
Audio menu
Play menu
Video menu
On next
Press Functions
When User is selected
Press 3, 4, 2, 1 to select an item
3D NR
Changing the information displayed
On-screen displays
Press Status
Display examples
Summary of settings
Changing the unit’s settings
Display
Audio
Screen
DTS
Press Setup
Press Setup to show the menus
Tabs Menus Options
Press 3, 4 to select Manual Clock Setting and press Enter
Clock settings
Press 3, 4 to select Auto Clock Setting and press Enter
Press 3, 4 to select Time Zone Adjust and press Enter
To return to the previous screen When you are finished
Other channel settings
Press 3, 4 to select the caption and then press
Press 3, 4 to select the channel and then press
Home Theater
Enjoying more powerful sound
Enjoying CATV/Satellite broadcasts
One cable TV box/satellite receiver
Connecting a cable TV box/satellite receiver
Two cable TV boxes
Recording to digital recording equipment or cassette tapes
Connecting an amplifier or system component
This unit Yellow white red Video cable§
Connecting other video equipment
Other video equipment
Other video equipment
Other antenna connection to the unit
Other antenna connections
Other antenna connection from the unit to the television
Handling precautions
How to hold a disc
Glossary
Disc handling
On the television
Error messages
On the unit’s display
Troubleshooting guide
Will be the front two speakers only
Recording and timer recording
Maintenance
To clean this unit, wipe with a soft, dry cloth
Cannot record
Product Service
Specifications
Product information
Panasonic DVD Recorder Limited Warranty
Limited Warranty only for U.S.A
User memo
Warranty Service
Limited Warranty only for Canada
If YOU Ship the Product to a Servicentre
Panasonic Canada Inc
Conexiones del televisor y de la antena
Guía de referencia rápida en español
Para disfrutar del vídeo progresivo
Preparación
Grabación de progr amas de televisión
Pulse REC Mode para seleccionar el modo de grabación
Pulse ¥, REC para iniciar la grabación
Reproducción de discos
Electric Corporation of America Puerto Rico, Inc. PSC
Index
Erase
Protection

