Copying from a video cassette recorder

Numbered


buttons


CANCEL

INPUT

SELECT

u,i

DELETE


g


h


e,r,w,q

FUNCTIONS

ENTER


SUB MENU

RETURN

*REC REC MODE

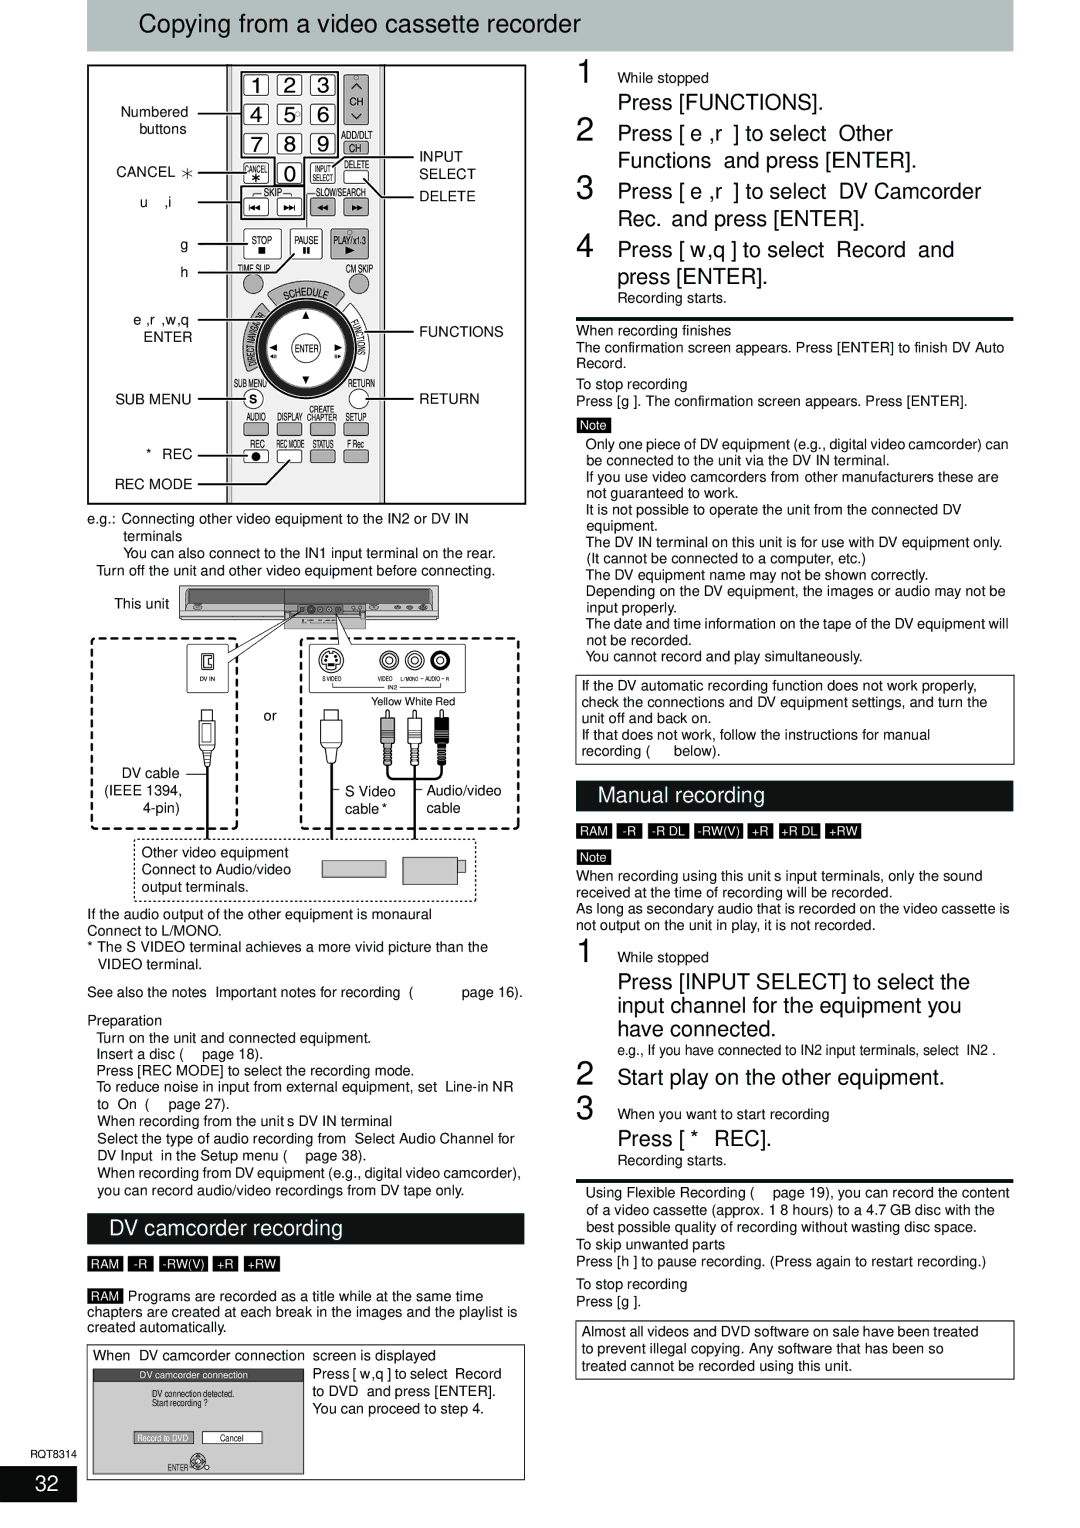
e.g.: Connecting other video equipment to the IN2 or DV IN terminals

You can also connect to the IN1 input terminal on the rear.

• Turn off the unit and other video equipment before connecting.

This unit

CH

DV IN

IN2

1 While stopped

Press [FUNCTIONS].

2 Press [e,r] to select “Other Functions” and press [ENTER].

3 Press [e,r] to select “DV Camcorder Rec.” and press [ENTER].

4 Press [w,q] to select “Record” and press [ENTER].

Recording starts.

When recording finishes

The confirmation screen appears. Press [ENTER] to finish DV Auto Record.

To stop recording

Press [g]. The confirmation screen appears. Press [ENTER].

Note

Only one piece of DV equipment (e.g., digital video camcorder) can be connected to the unit via the DV IN terminal.

If you use video camcorders from other manufacturers these are not guaranteed to work.

It is not possible to operate the unit from the connected DV equipment.

The DV IN terminal on this unit is for use with DV equipment only. (It cannot be connected to a computer, etc.)

The DV equipment name may not be shown correctly.

Depending on the DV equipment, the images or audio may not be input properly.

The date and time information on the tape of the DV equipment will not be recorded.

You cannot record and play simultaneously.

or

DV cable (IEEE 1394, 4-pin)

Other video equipment

Connect to Audio/video output terminals.

Yellow White Red

S Video


Audio/video


cable*


cable

If the DV automatic recording function does not work properly, check the connections and DV equipment settings, and turn the unit off and back on.

If that does not work, follow the instructions for manual recording (Ô below).

Manual recording

RAM -R -R DL -RW(V) +R +R DL +RW

Note

When recording using this unit’s input terminals, only the sound received at the time of recording will be recorded.

RQT8314

32

If the audio output of the other equipment is monaural Connect to L/MONO.

*The S VIDEO terminal achieves a more vivid picture than the VIDEO terminal.

See also the notes “Important notes for recording” (Ô page 16).

Preparation

Turn on the unit and connected equipment.

Insert a disc (Ô page 18).

Press [REC MODE] to select the recording mode.

To reduce noise in input from external equipment, set “Line-in NR” to “On” (Ô page 27).

When recording from the unit’s DV IN terminal

Select the type of audio recording from “Select Audio Channel for DV Input” in the Setup menu (Ô page 38).

When recording from DV equipment (e.g., digital video camcorder), you can record audio/video recordings from DV tape only.

DV camcorder recording

RAM -R -RW(V) +R +RW

RAM Programs are recorded as a title while at the same time chapters are created at each break in the images and the playlist is created automatically.

When “DV camcorder connection” screen is displayed


Press [ ,

] to select “Record


DV camcorder connection

w q


DV connection detected.

to DVD” and press [ENTER].


Start recording ?


You can proceed to step 4.


Record to DVD


Cancel


ENTER


As long as secondary audio that is recorded on the video cassette is not output on the unit in play, it is not recorded.

1 While stopped

Press [INPUT SELECT] to select the input channel for the equipment you have connected.

e.g., If you have connected to IN2 input terminals, select “IN2”.

2 Start play on the other equipment.

3 When you want to start recording

Press [* REC].

Recording starts.

• Using Flexible Recording (Ô page 19), you can record the content of a video cassette (approx. 1–8 hours) to a 4.7 GB disc with the best possible quality of recording without wasting disc space.

To skip unwanted parts

Press [h] to pause recording. (Press again to restart recording.)

To stop recording

Press [g].

Almost all videos and DVD software on sale have been treated to prevent illegal copying. Any software that has been so treated cannot be recorded using this unit.

Page 32
Image 32
Panasonic DMR-ES15 warranty Copying from a video cassette recorder, Manual recording, DV camcorder recording, Press * REC

DMR-ES15 specifications

The Panasonic DMR-ES15 is a versatile and user-friendly DVD recorder that has garnered attention for its excellent functionality and performance in the realm of home entertainment. Released as part of Panasonic’s esteemed lineup, the DMR-ES15 combines cutting-edge technology with user-centric design, making it a popular choice among consumers seeking to enhance their viewing experiences.

One of the standout features of the DMR-ES15 is its ability to record in various formats, including DVD-R, DVD-RW, and DVD-RAM. This flexibility allows users to choose the medium that best suits their needs, whether for permanent archiving or for temporary use. With a built-in 1080p upconversion feature, the DMR-ES15 can enhance the quality of standard DVDs, taking your older movie collection and providing a sharper and clearer visual experience.

The recorder also boasts an intuitive user interface that simplifies the recording process. Its one-touch recording feature allows users to start recording their favorite shows at the press of a button, while the timer recording function enables users to schedule recordings days in advance, ensuring that they never miss an episode of their favorite series.

Another significant aspect of the DMR-ES15 is its compatibility with a variety of video formats, including MPEG-2 and AVCHD. This feature makes it easier to transfer and record content from various sources, such as VHS tapes or digital cameras, into a more manageable and durable DVD format. The unit also includes an onboard editing function, allowing users to cut out unwanted segments of their recordings and create customized viewing experiences.

In terms of connectivity, the DMR-ES15 is equipped with multiple options including composite video, S-video, and audio outputs, making it easy to connect to televisions and audio systems. The machine’s compact design also means that it can fit seamlessly into any entertainment setup without taking up excessive space.

In summary, the Panasonic DMR-ES15 is a robust DVD recorder with a multitude of features that cater to both novice and advanced users alike. Its recording versatility, compatibility with various formats, easy-to-use interface, and solid connectivity options make it a reliable choice for anyone looking to archive their favorite media or explore new possibilities in home entertainment. Whether it’s for personal use or simply enhancing your audiovisual library, the DMR-ES15 stands out as a formidable option in its category.