Setting the Remote Control to Operate Your TV

You can operate the TVs of the manufacturers listed below with the remote control after setting it.

This setting procedure allows you to operate the TVs of some manufacturers using the supplied remote control.

Preparation

• Turn on the TV.

Operations

1Find the manufacturer number of your TV while referring to the following table.

2While holding down [TV-ON/OFF] (17) on the remote control, use [Numeric] (3) to enter the manufacturer number. This completes the settings for the TV manufacturer.

Be sure to enter the number in two digits. Example: 1 ) 01

3To confirm the correct settings were made, check whether the TV can be operated properly.

When a manufacturer has multiple numbers in the following table, try entering other numbers if the TV operations cannot be performed properly, and then select the optimal number.

Notes:

If you are using a Panasonic TV, this setting has already been made, and so you do not need to perform the above setting procedure. However, this remote control may not work with some Panasonic TVs.

Some TV models cannot be operated using this remote control (including all TVs non-remote compatible).

List of TVs Compatible with the VCR Remote Control

[Brand]

[Code]


Panasonic/National

01-04


SONY

05


TOSHIBA

06


JVC

07


HITACHI

08


MITSUBISHI

09, 10


SHARP

11


PHILIPS, SAMSUNG

12


NEC

13


SANYO

14


GOLDSTAR/LG

15, 16


SAMSUNG

17, 18


SANYO

19


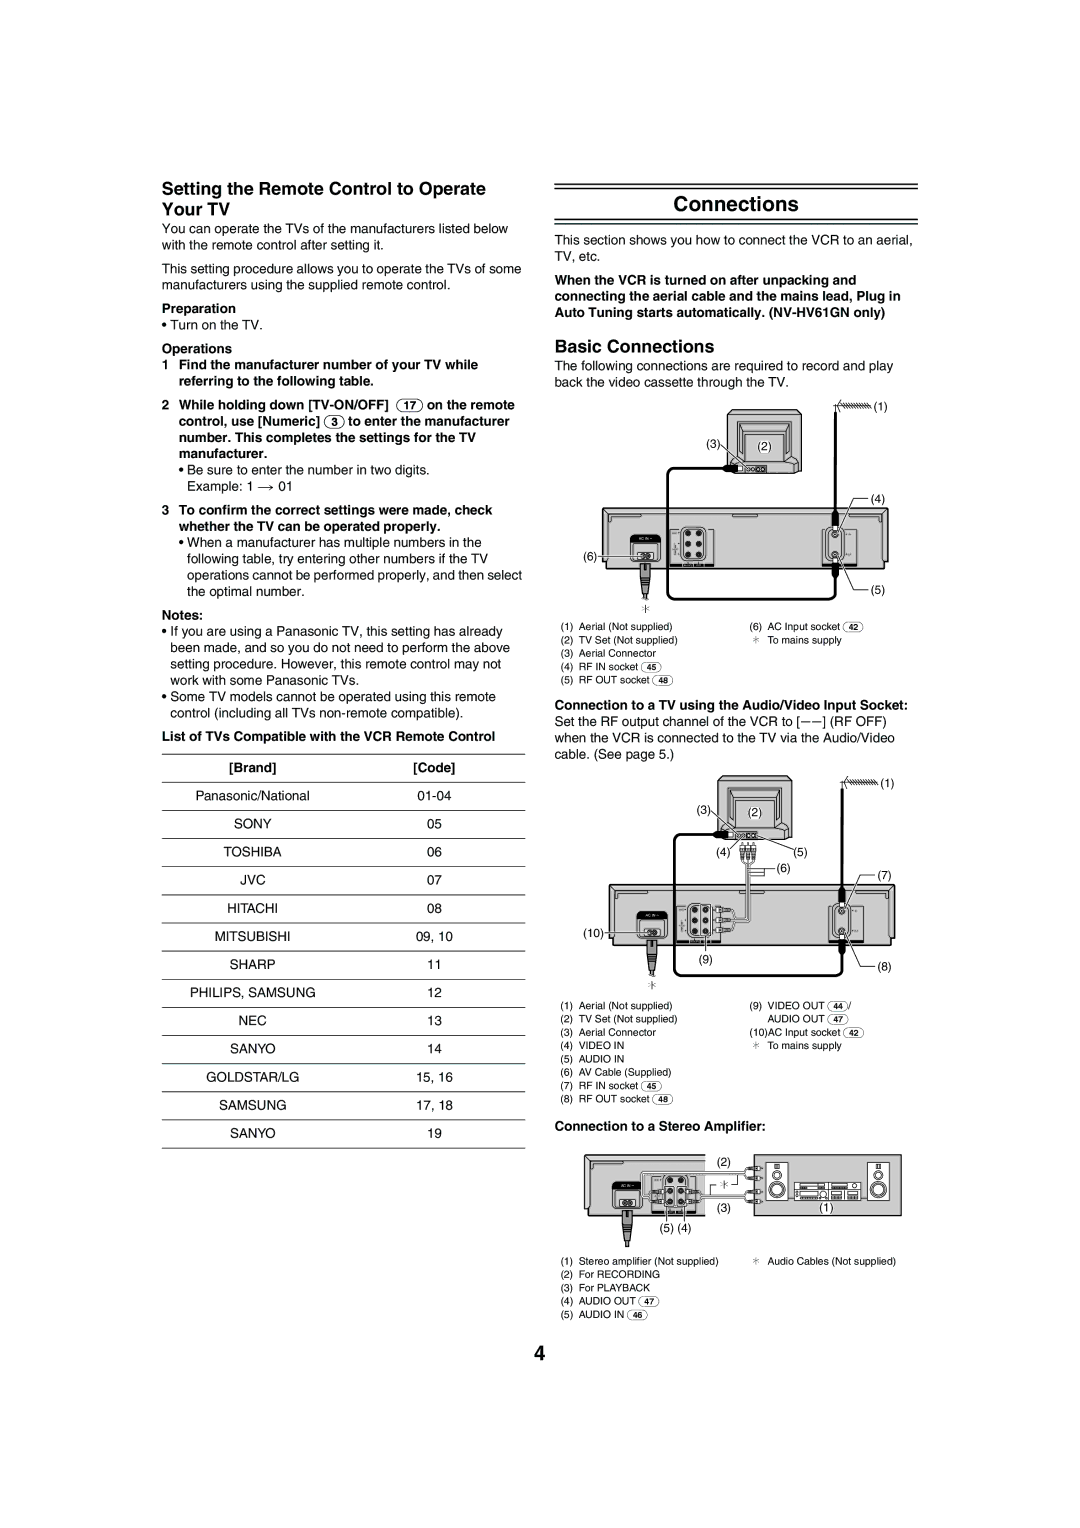
Connections

This section shows you how to connect the VCR to an aerial, TV, etc.

When the VCR is turned on after unpacking and connecting the aerial cable and the mains lead, Plug in Auto Tuning starts automatically. (NV-HV61GN only)

Basic Connections

The following connections are required to record and play back the video cassette through the TV.


(1)


(3)

(2)


(4)


VIDEO2

2 IN


AC IN ~


L 2


(6)

AUDIO


R 2

2 OUT


IN (AV1) OUT

RF


(5)


¢


(1) Aerial (Not supplied)

(6) AC Input socket (42)

(2) TV Set (Not supplied)

¢ To mains supply

(3)Aerial Connector

(4)RF IN socket (45)

(5)RF OUT socket (48)

Connection to a TV using the Audio/Video Input Socket:

Set the RF output channel of the VCR to [ss] (RF OFF) when the VCR is connected to the TV via the Audio/Video cable. (See page 5.)


(1)


(3)

(2)


(4)

(5)


(6)

(7)


AC IN ~

VIDEO2

2 IN


L 2


(10)

AUDIO


R 2

2 OUT


IN (AV1) OUT

RF


(9)


(8)


¢


(1)

Aerial (Not supplied)


(9) VIDEO OUT (44)/


(2)

TV Set (Not supplied)


AUDIO OUT (47)


(3)

Aerial Connector


(10)AC Input socket (42)


(4)

VIDEO IN


¢ To mains supply


(5)AUDIO IN

(6)AV Cable (Supplied)

(7)RF IN socket (45)

(8)RF OUT socket (48)

Connection to a Stereo Amplifier:


(2)


L 2


¢


VIDEO2


2 IN


AC IN ~


AUDIO


R 2


(3)

2 OUT


IN (AV1)

OUT

RF(1)


(5) (4)


(1)

Stereo amplifier (Not supplied)

¢ Audio Cables (Not supplied)

(2)For RECORDING

(3)For PLAYBACK

(4)AUDIO OUT (47)

(5)AUDIO IN (46)

4

Page 4
Image 4
Panasonic NV-HV61 specifications Setting the Remote Control to Operate Your TV, Basic Connections

NV-HV61 specifications

The Panasonic NV-HV61 is a standout model in the realm of VHS video cassette recorders, showcasing the brand's commitment to innovation and quality. Released during an era when home video was burgeoning, the NV-HV61 exemplifies the technological advancements of the time, appealing to both casual viewers and dedicated videophiles.

One of the most notable features of the NV-HV61 is its excellent video quality, which is achieved through the use of Panasonic's proprietary technologies. The machine employs advanced digital signal processing, ensuring that the video output maintains clarity and vibrancy. The built-in 4-head system enhances the playback quality, providing improved longitudinal and transverse fidelity. This means that users can expect superior sound and picture quality, allowing them to enjoy their favorite films and shows precisely as intended.

The NV-HV61 is also characterized by its user-friendly interface, making video recording and playback a straightforward task. With features such as one-touch recording, users can easily capture live broadcasts without any complicated setup. The device is equipped with a variety of recording modes, including EP and SP settings, which allow users to choose between long play and standard recording based on their needs.

Another highlight of the Panasonic NV-HV61 is its versatility in connectivity. It features several input and output options, including composite video and audio connectors, which enable it to be easily integrated into existing home entertainment systems. Users can connect it to televisions and other devices, making it an excellent addition to any media setup.

In terms of design, the NV-HV61 showcases Panasonic’s attention to aesthetics, combining a sleek, compact form with practicality. The controls are intuitively placed, and the overall build quality is robust, ensuring longevity and reliability. Furthermore, the inclusion of features such as on-screen displays and programmable timers adds to its functionality, making video recording a seamless experience.

Collectively, the Panasonic NV-HV61 stands out with its combination of high-quality playback, user-friendly functionality, and solid connectivity options. While technology has advanced significantly since its initial release, the NV-HV61 remains a beloved choice for enthusiasts of the VHS format, symbolizing a significant era in home entertainment history. Its ability to deliver consistent, quality performance continues to be appreciated by those who cherish classic video formats.