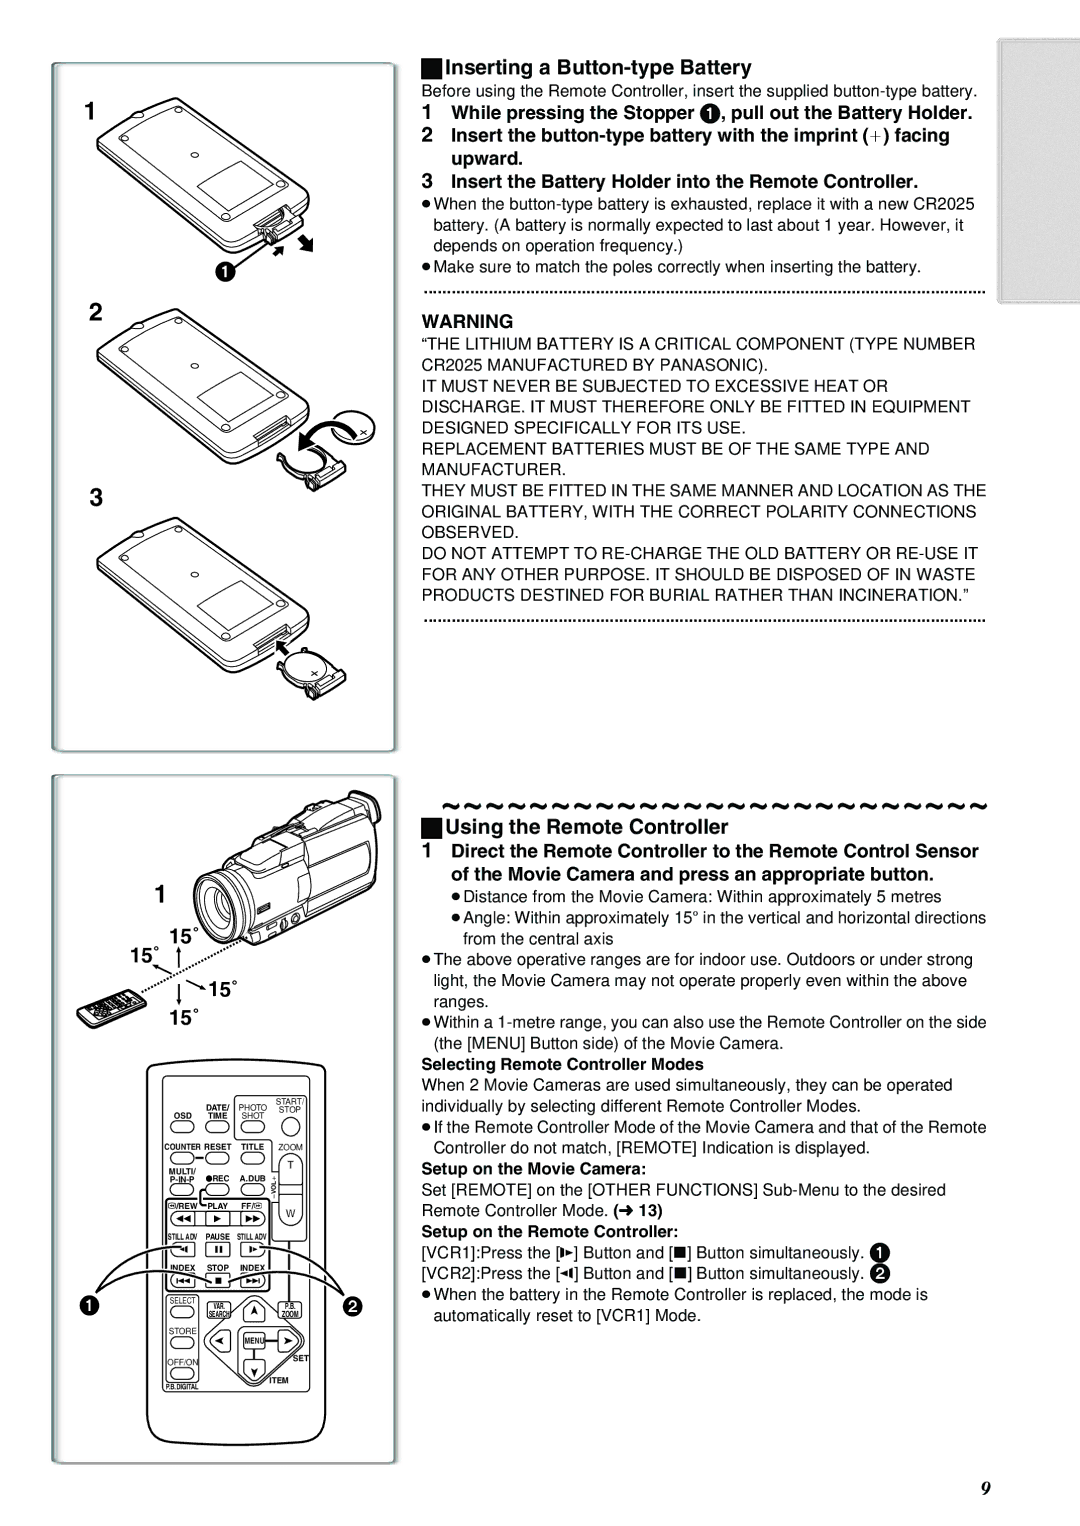
ªInserting a Button-type Battery

1

Before using the Remote Controller, insert the supplied button-type battery.

1 While pressing the Stopper 1, pull out the Battery Holder.

2Insert the button-type battery with the imprint (i) facing upward.

3Insert the Battery Holder into the Remote Controller.

When the button-type battery is exhausted, replace it with a new CR2025 battery. (A battery is normally expected to last about 1 year. However, it depends on operation frequency.)

1Make sure to match the poles correctly when inserting the battery.

.........................................................................................................................

2

WARNING


“THE LITHIUM BATTERY IS A CRITICAL COMPONENT (TYPE NUMBER


CR2025 MANUFACTURED BY PANASONIC).


IT MUST NEVER BE SUBJECTED TO EXCESSIVE HEAT OR


DISCHARGE. IT MUST THEREFORE ONLY BE FITTED IN EQUIPMENT


DESIGNED SPECIFICALLY FOR ITS USE.


REPLACEMENT BATTERIES MUST BE OF THE SAME TYPE AND


MANUFACTURER.

3

THEY MUST BE FITTED IN THE SAME MANNER AND LOCATION AS THE

ORIGINAL BATTERY, WITH THE CORRECT POLARITY CONNECTIONS


OBSERVED.


DO NOT ATTEMPT TO RE-CHARGE THE OLD BATTERY OR RE-USE IT


FOR ANY OTHER PURPOSE. IT SHOULD BE DISPOSED OF IN WASTE


PRODUCTS DESTINED FOR BURIAL RATHER THAN INCINERATION.”


.........................................................................................................................

1

15˚ 15˚

15˚ 15˚

~~~~~~~~~~~~~~~~~~~~~~~~~

ªUsing the Remote Controller

1Direct the Remote Controller to the Remote Control Sensor of the Movie Camera and press an appropriate button.

Distance from the Movie Camera: Within approximately 5 metres

Angle: Within approximately 15o in the vertical and horizontal directions

from the central axis

The above operative ranges are for indoor use. Outdoors or under strong light, the Movie Camera may not operate properly even within the above ranges.

Within a 1-metre range, you can also use the Remote Controller on the side (the [MENU] Button side) of the Movie Camera.


Selecting Remote Controller Modes


When 2 Movie Cameras are used simultaneously, they can be operated

1


DATE/

PHOTO

START/

2

individually by selecting different Remote Controller Modes.

OSD

STOP

TIME

SHOT


If the Remote Controller Mode of the Movie Camera and that of the Remote


COUNTER RESET

TITLE

ZOOM

Controller do not match, [REMOTE] Indication is displayed.

MULTI/


T

Setup on the Movie Camera:

P-IN-P ¥RECrA. UB


Set [REMOTE] on the [OTHER FUNCTIONS] Sub-Menu to the desired


sVOL


V6/REW PLAY1

FF/5W

W

Remote Controller Mode. (l13)

STILL ADV

PAUSE

STILL ADV


Setup on the Remote Controller:

E

;


D


[VCR1]:Press the [D] Button and [] Button simultaneously. 1

INDEXKLSTOP￿INDEX


[VCR2]:Press the [E] Button and [] Button simultaneously. 2

SELECT

VAR.


When the battery in the Remote Controller is replaced, the mode is


P.B.


automatically reset to [VCR1] Mode.


SEARCH


ZOOM


STORE


MENU

OFF/ON

SET


P.B.DIGITAL

ITEM


9

Page 9
Image 9
Panasonic NV-MX8A operating instructions Inserting a Button-type Battery, 15˚ 15˚, Using the Remote Controller

NV-MX8A specifications

The Panasonic NV-MX8A is a compact and sophisticated camcorder that was introduced in the early 2000s, positioning itself as an innovative device within the market of consumer-grade video equipment. Equipped with a range of advanced features, this model appealed to both amateurs and semi-professional videographers.

One of the standout features of the NV-MX8A is its advanced optical system, which includes a 10x optical zoom lens. This allows users to capture stunning images and videos from a distance without losing detail or clarity. The lens, paired with Panasonic's proprietary Digital Signal Processor, ensures that footage is sharp and vibrant, showcasing the vivid colors and intricate details of the subjects being filmed.

Another key technology incorporated into the NV-MX8A is the 3CCD sensor. This innovative imaging technology captures color information more effectively than standard CCD configurations, resulting in exceptional image quality, especially in low-light conditions. The 3CCD system enhances color fidelity and provides better overall brightness, making it ideal for various filming environments.

In terms of usability, the NV-MX8A features a user-friendly interface complemented by a 2.5-inch LCD monitor that flips out for easy framing and playback. The LCD screen provides excellent visibility, making it easier to frame shots accurately and navigate menus effortlessly even in bright conditions. Additionally, the camcorder has an electronic viewfinder for users who prefer a more traditional shooting style.

For audio capture, the camcorder is equipped with a built-in stereo microphone, delivering clear sound quality to match the high-resolution video. The NV-MX8A also includes options for external audio input, catering to users needing more professional audio solutions.

Another notable characteristic of the NV-MX8A is its versatility in recording formats and media. The camcorder supports MiniDV tapes, ensuring compatibility with existing formats while delivering high-quality video playback. Additionally, it features various recording modes, including LP (long play) and SP (standard play), allowing users to choose the best setting for their needs.

The build quality of the NV-MX8A reflects Panasonic's commitment to durability and handling. Its compact design makes it portable, enabling users to take it on various excursions or events without hassle. Overall, the Panasonic NV-MX8A remains a memorable and influential camcorder in its era, combining advanced features, high-quality recordings, and user-friendly design, making it an excellent choice for budding filmmakers and video enthusiasts alike.