NV-RZ15B
LCD Monitor Remote Controller
Information for Your Safety
AC Mains Lead
Check List for the Standard Accessories
Advanced Precautions, Technical Information, etc
Preparations Basic Operations
Controls and Functions
Battery Holder p Battery Eject Lever 2BATTERY Eject p
Cassette Compartment Lock Button Lock p Viewfinder p
Grip Belt p
33 34 30 29 30 31
Tripod Receptacle
Supplying Power from an AC Mains Socket
2 Types of Power Supply
Supplying Power with the Battery
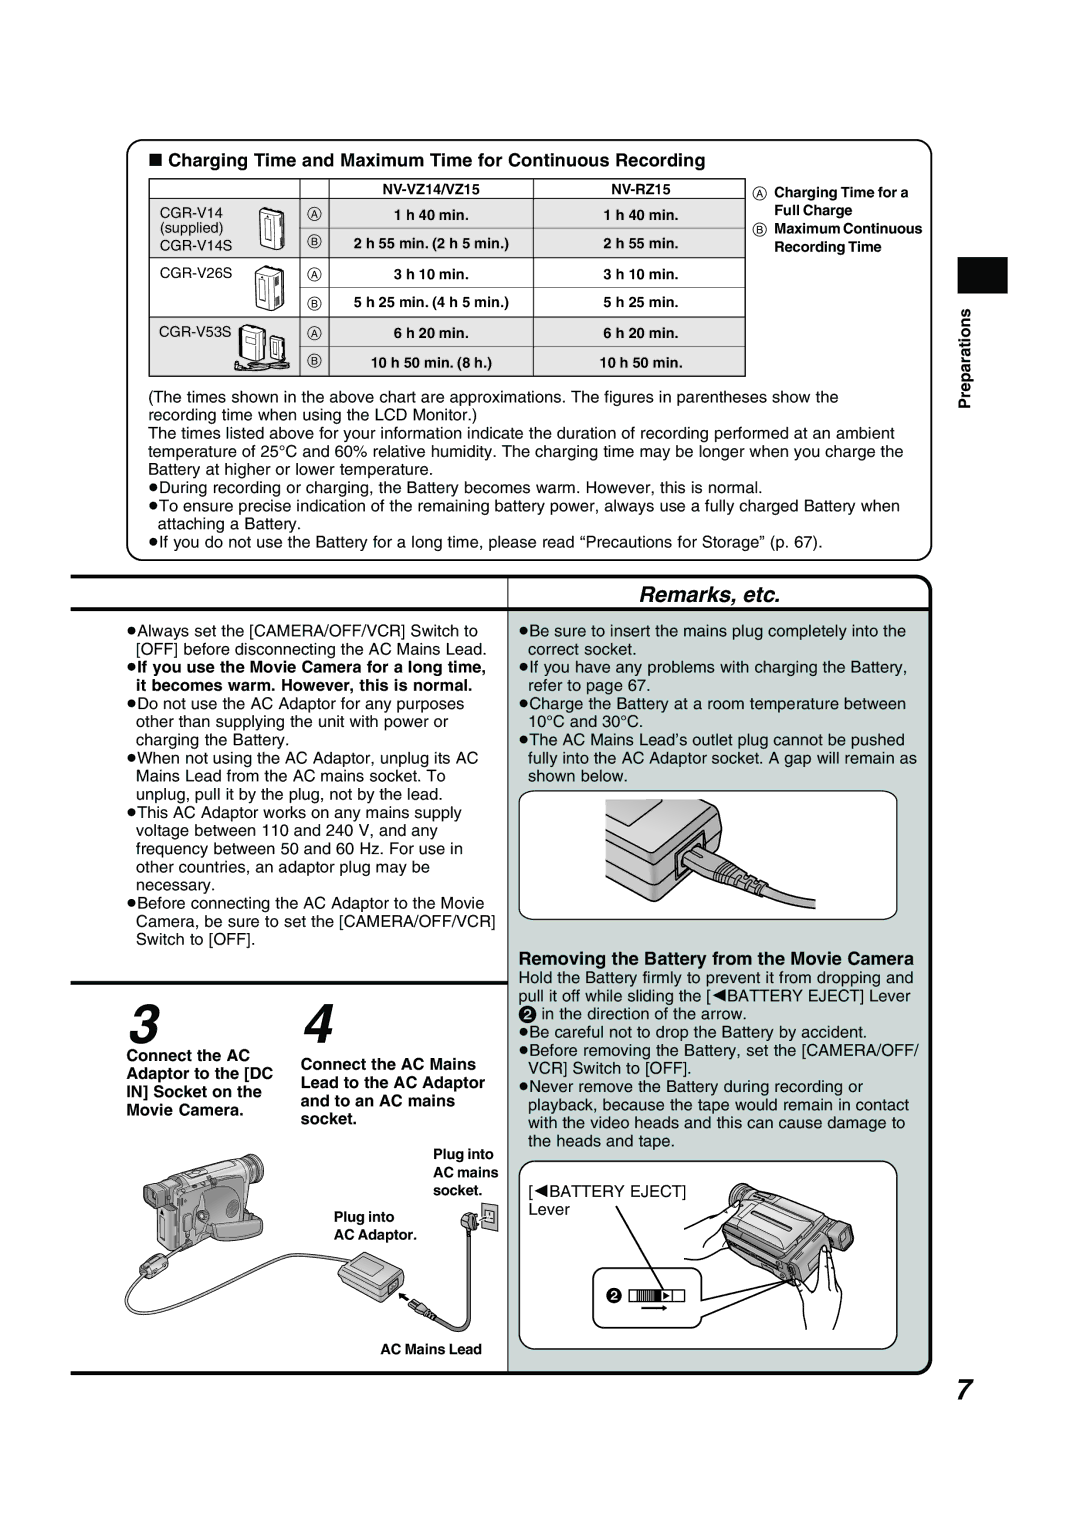
Charging Time and Maximum Time for Continuous Recording
Removing the Battery from the Movie Camera
Relationship between Viewfinder and LCD
Using the Viewfinder
Using the LCD Monitor
Could damage internal parts of the unit
Attaching the Lens Cap
Preparations Adjust by turning the Eyepiece Corrector Lever
Adjusting the Angle of the LCD Monitor
Closing the LCD Monitor
Sub-Menu
Using the Menu Screen
Press the Menu Turn the 34 Dial to
Button Select the desired
Turn the 34 Dial to select the item to be set
Camera Mode Main-Menu
VCR Mode Main-Menu
Exiting the Menu
Menu Functions
Camera Mode Menu 1`8 Camera Setup Sub-Menu
Fade Setup Sub-Menu
Title Setup Sub-Menu
LCD/EVF Setup Sub-Menu Other Functions Sub-Menu
DATE/TIME Setup Sub-Menu Display Setup Sub-Menu
DATE/TIME Setup Sub-Menu
VCR Mode Menu 1`7 Digital Effect Sub-Menu
LCD/EVF Setup Sub-Menu 6 p
LCD/EVF Setup Sub-Menu
Setting the Date and Time
LCD Colour Level LCD Colour
Adjusting the LCD Monitor/Viewfinder
LCD Monitor adjustment is only for NV-VZ14/VZ15
Preparations LCD Brightness LCD Brightness
Facing outward
If the AC Adaptor or Battery is used to supply power, it
Inserting/Ejecting the Cassette
Preventing Accidental Erasure Recordings
Confirming the Remaining Tape Time
Selecting the Correct Tape Length
Press the Menu Button
Close the Cassette Compartment by pressing the Lock Button
Camera while Auto Indication
Recording Filming
Pressing the button Appears
Record
To finish recording Set the CAMERA/OFF/VCR Switch to OFF
Recording Check
Checking If the Picture Is Recorded
Viewing Recorded Scenes During Recording Pause
Recording Backlit Scenes
Press the Recording Start/Stop Button to start recording
Release the pressed Search Button
Basic Operations Returning to Normal Recording
Deleting the Date/Time/Title Indication
Enlarging Your Subject or Widening the Recording Angle
Recording with the Time and/or
Zooming In/Out
Date Time
Date/Time/Title Indication
Playback
Viewing the Just Recorded Scenes on the Movie Camera
Fast-Forwarding
Following Cases, the TBC Function Does Not Work
Cancelling the TBC Function
Adjusting the Sound Volume NV-VZ14/VZ15 only
TBC Time Base Corrector Function
Playback Functions During
Using the Cue, Review and Still
Manual Tracking Adjustment
Eliminating Picture Distortions
Returning to the Auto Tracking Mode
After Use
By connecting the Movie Camera to a TV, you can
Take out the cassette Set the CAMERA/OFF VCR Switch to OFF
Play Back on a TV
Cleaning the Lens
Cleaning the Viewfinder
Cleaning the LCD Monitor NV-VZ14/VZ15 only
Cleaning the Movie Camera Body
Digital Effects
Recording with Special Effects
Press the Menu Button to exit the Menu
Cancelling the Digital Effect
Advanced Operations Solarisation Mode Solari
Stretch Mode Stretch
Effect
To select D.ZOOM
Cancelling the Digital Zoom Function
Select Digital Zoom on the Camera Setup Sub- Menu. p
Advanced Operations
Selected digital fade Effect
Using the Fade Functions
Fading
Picture disappears Gradually with
Normal Fading In/Out
Interval REC
Interval Recording
Interval Time
Press the SET Button to select the desired Recording Time
Cancelling the Interval Recording Mode
Turn the 34 Dial to select
REC Time
Camera Functions Sensor
Cancelling the Motion
Sensor Function During Stand-by Mode During Recording
Motion-Sensor-Controlled Recording
Advanced
Press the SET Button to select on
Operations
LCD Monitor NV-VZ14/VZ15 only
Super Image Stabilizer
Any Illumination
Recording with Minimised Camera Shake
Lux Night View Function
Cancelling the Super Image Stabilizer Function
Cancelling the 0 Lux Night View Function
Auto Indication appears
Balance Adjustment
Recording with Manual White Balance Adjustment
Press the PROG. AE Button repeatedly until
Following Cases, the 1 Indication Flashes
Following cases, you cannot change White Balance
Manual Focus
Focusing on the Subject Manually
Recording Yourself
Recording with the LCD Monitor Facing
Turn the 34 Dial to select Self Shoot
Mirror Mode
Stopping Recording Press the Recording Start/Stop Button
Programme AE
Surf & Snow Mode
Spotlight Mode
Cancelling the Selected Programme AE Function
Ohter Functions
Insert Editing
Adding New Sound on a Recorded Cassette Audio Dubbing
CAMERA/OFF/VCR
Cancelling the Audio Dubbing Function
Reset the Tape Counter to zero
Set Display on Display Setup Sub-Menu to Memory
Cancelling the Insert Editing Function
Using the Remote Controller
Remote Controller
Inserting the Batteries
Buttons with the same mark as on the Movie
Buttons on the Remote Controller
Camera generally have the same function
Deleting the Title
Titles Inserted in the Picture
Deleting the Pre-programmed Title Indication
Recording with Pre-programmed Title Inserted in the Picture
Turn the 34 Dial to select Colour
Press the SET Button repeatedly to select the desired title
During Playback
Using Various Functions
Suspending the Playback Digital Effect Temporarily
Cancelling the Playback Digital Effect
To exit
Menu
There are various Playback Digital Fade Modes
Playback Digital Fade
Advanced Operations Release the Fade Button
Set Fade OUT to the desired Digital Fade Mode
Release the Fade Button at the point where you wish to fade
Set Fade Colour to the desired colour
VCR Functions
Using the Tape Counter Indication
Using the Memory Stop Function
Checking the Elapsed Tape Time
Counter to zero
Reset
VCR Mode B
Setting
Dubbing
Copying onto an VHS Cassette
VCR
BLC TBC
Optional Accessories
Information, etc
Do not use benzine, alcohol or thinner for cleaning
Condensation
Optimum Use of the Battery
Glossary
Precautions for Storage
Other Useful Information
Recording subjects behind glass covered with dirt or dust
Auto Focus Adjustment
Focus
Human Eyes
Auto White Balance Adjustment
White Balance Adjustment
Colour Temperature
White Balance Adjustment
Demonstration Mode
000.00
Indications
R030 45k
000.00 R045
Title small indication p
Audio Dubbing Mode p
Date and Time p
Video
Specifications
Audio
Before Requesting Service Problems & Solutions
Others P1 The cassette cannot be taken out
P3 The Remote Controller does not work. NV-RZ15/VZ15 only
P2 The playback picture is distorted or contains noise bars
P4 The playback picture is not in colour
Index
Page
Page
VQT9485 LYT0919-001A