| LAMP indicator | ||
| Displayed for 30 |
| |
More than 2 250 hours | seconds. Pressing any |
| |
button will clear the | Illuminates red during | ||
| |||
| display. | image projection and | |
| Remains displayed until | standby mode. | |
More than 2 500 hours |
| ||
any button is pressed. |
| ||
|
|
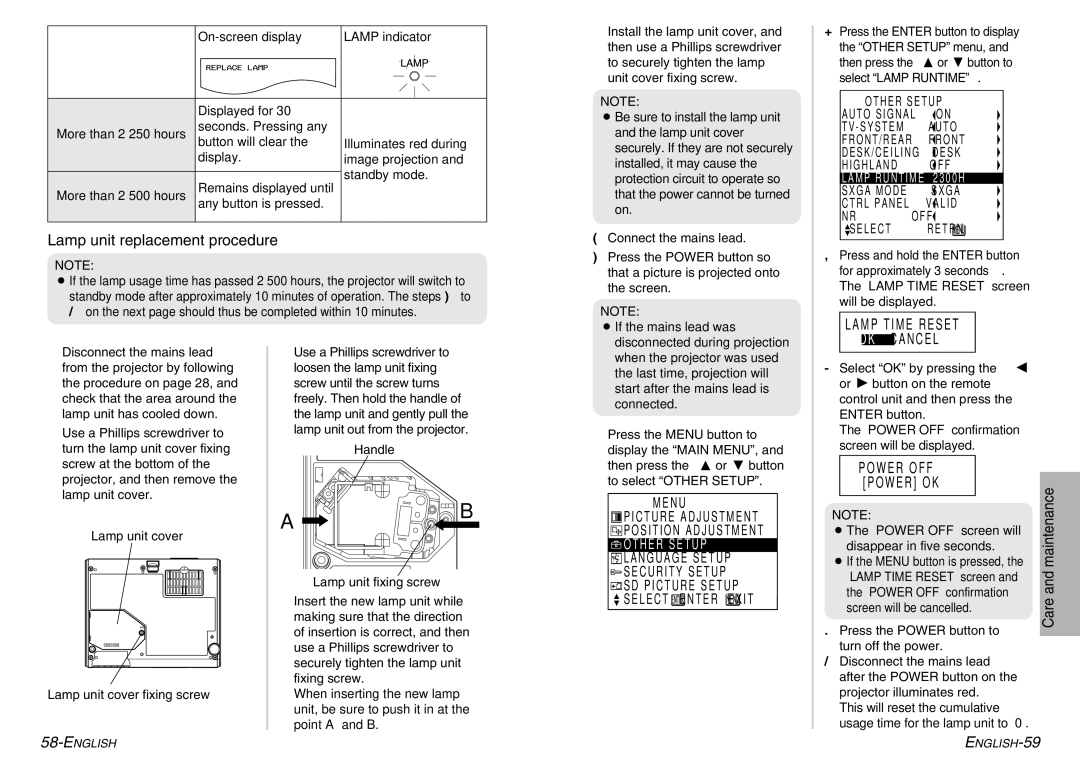
Lamp unit replacement procedure
NOTE:
BIf the lamp usage time has passed 2 500 hours, the projector will switch to standby mode after approximately 10 minutes of operation. The steps ) to / on the next page should thus be completed within 10 minutes.
'Install the lamp unit cover, and then use a Phillips screwdriver to securely tighten the lamp unit cover fixing screw.
NOTE:
BBe sure to install the lamp unit and the lamp unit cover securely. If they are not securely installed, it may cause the protection circuit to operate so that the power cannot be turned on.
(Connect the mains lead.
)Press the POWER button so that a picture is projected onto the screen.
NOTE:
B If the mains lead was |
disconnected during projection |
+Press the ENTER button to display the “OTHER SETUP” menu, and then press the F or G button to select “LAMP RUNTIME”.
OTHER SETUP
AUTO SIGNAL ![]() ON
ON
FRONT/REAR ![]() FRONT
FRONT
DESK/CEILING ![]() DESK
DESK
HIGHLAND ![]() OFF
OFF
LAMP | RUNTIME | 2300H | ||
SXGA | MODE | SXGA | ||
CTRL | PANEL | VALID | ||
NR |
|
|
| OFF |
|
|
| ||
|
|
|
| |
SELECT | RETRN | |||
,Press and hold the ENTER button for approximately 3 seconds.
The “LAMP TIME RESET” screen will be displayed.
LAMP TIME RESET
OK CANCEL
#Disconnect the mains lead from the projector by following the procedure on page 28, and check that the area around the lamp unit has cooled down.
$Use a Phillips screwdriver to turn the lamp unit cover fixing screw at the bottom of the projector, and then remove the lamp unit cover.
Lamp unit cover
Lamp unit cover fixing screw
%Use a Phillips screwdriver to loosen the lamp unit fixing screw until the screw turns freely. Then hold the handle of the lamp unit and gently pull the lamp unit out from the projector.
Handle
A![]() B
B
Lamp unit fixing screw
&Insert the new lamp unit while making sure that the direction of insertion is correct, and then use a Phillips screwdriver to securely tighten the lamp unit fixing screw.
When inserting the new lamp unit, be sure to push it in at the point A and B.
when the projector was used |
the last time, projection will |
start after the mains lead is |
connected. |
*Press the MENU button to |
display the “MAIN MENU”, and |
then press the F or G button |
to select “OTHER SETUP”. |
MENU
![]() PICTURE ADJUSTMENT
PICTURE ADJUSTMENT ![]() POSITION ADJUSTMENT
POSITION ADJUSTMENT
![]() OTHER SETUP
OTHER SETUP
![]() LANGUAGE SETUP
LANGUAGE SETUP
![]() SECURITY SETUP
SECURITY SETUP
![]() SD PICTURE SETUP
SD PICTURE SETUP ![]() SELECT
SELECT![]() ENTER
ENTER![]() EXIT
EXIT
-Select “OK” by pressing the I or H button on the remote control unit and then press the ENTER button.
The “POWER OFF” confirmation screen will be displayed.
POWER OFF [POWER] OK
NOTE:
BThe “POWER OFF” screen will disappear in five seconds.
BIf the MENU button is pressed, the “LAMP TIME RESET” screen and the “POWER OFF” confirmation screen will be cancelled.
.Press the POWER button to turn off the power.
/Disconnect the mains lead after the POWER button on the projector illuminates red.
This will reset the cumulative usage time for the lamp unit to “0”.
Care and maintenance