PV-GS59 Shown
LSQT1000 B
Thank you for choosing Panasonic
Above markings are located on the appliance bottom cover
FCC
Declaration Conformity
Model
Canadian ICES-003
Important Safety instructions
ODD not Expose Your Camcorder
USE & Location
Damage to the iNTERNAL Parts
Page
CGA-DU12
Demo Mode OFF
CGR-DU06
USB
For Macintosh
Reset
IMovie HD
Pull the LCD Monitor O out
While
Tape Recording Mode is displayed on the screen
Adjust by turning the Eyepiece Corrector Knob O
Set the Mode Dial to Tape Recording Mode
Start Playback
AUTO/MANUAL/FOCUS pp
AV Cable pp
USB Cable and CD=ROM
Lens Hood p
Built=in LED Light pp ~34
Fast ForwardlCue Button ! p
Insert the Battery Holder into the Remote Control
Pp ~36
Enter Button Enter p
Page
CGR-DUO6
Remove the Sensor tag. Then, replace Grip Belt
Cassette Holder is housed
Close the Cassette Holder by pressing
Push mark @
Do not place fingers here
Only after the Cassette Holder is
Page
Lithium
Pull the LGD Monitor out in the direction of the arrow
Llcd BET LCD Color Level @
Auto
Set your desired mode to O
Tape Recording Mode
Recording Mode
Card Recording Mode
Mode When AUTO/MANUAL/FOCUS Switch is
Go to next Is displayed while recording on a tape
Mode
When the AUTO/MANUAL/FOCUS Switch is Set to Focus
III Card Recording
For
Set t Language English Fran£ais or Espaol
Move the Joystick Control a or T to select the Sub=Menu
Select a menu item
Demo Mode Demonstration Mode p
Display Display Mode p
Sit Quick Start Quick Start Mode p
Xremote PV-GS59Only Remote Control Mode p
=DEEP Sound
Setup
Power Save Power Save Mode p
Format Card
Set Setup Inital SET YES or no
Set to Tape Recording Mode
Press the Recording Start/Stop Sutton
Focu
Still pictures can be recorded on a tape
Press the Photo Shot Button in the Recording Pause mode
To Cancel Blank Search
Before
2GB
Picture Quality
High Normal 220 440 880 128 MB 760 256 520 512 040
Set to Tape/Card Recording Mode
Press and hold the Photo Shot Button
Press the Light Sutton
Press the Light Sutton. O
II To Stop the Self-timer in Progress Press the Menu Button
SELF-TIMER OFF
Indication appears
Ill To Cancel the Image Stabilizer
Set to Tape Recording Mode
Function
With Indication
Fade
Press
Record NOW Fading
To Cancel the Soft-Skin Mode
,4Indication appears
III To Cancel the Cinema Function Set Basic Cinema OFF
Set Basic /WIND CUT on
Sports Mode/Portrait Mode
Portrait Mode
Low Light Mode
Spotlight Mode
Move the Joystick Control a to select
Set to Tape/Card Recording Mode
White Balance indication appears. etc
Indication and the One-Touch Navigation icon appears
100002
Indication One-Touch Navigation Icon Appears
Move the Joystick Control or 1 to adjust the focus
To cancel Repeat Playback Mode
Pause Playback
II To Resume Normal Playback
Press the a T Button to select a desired search speed
Move the Joystick Control 1 or
Ill
Images
LOne-Touch Navigation icon
Deleting
Set to Picture Playback Mode
Control
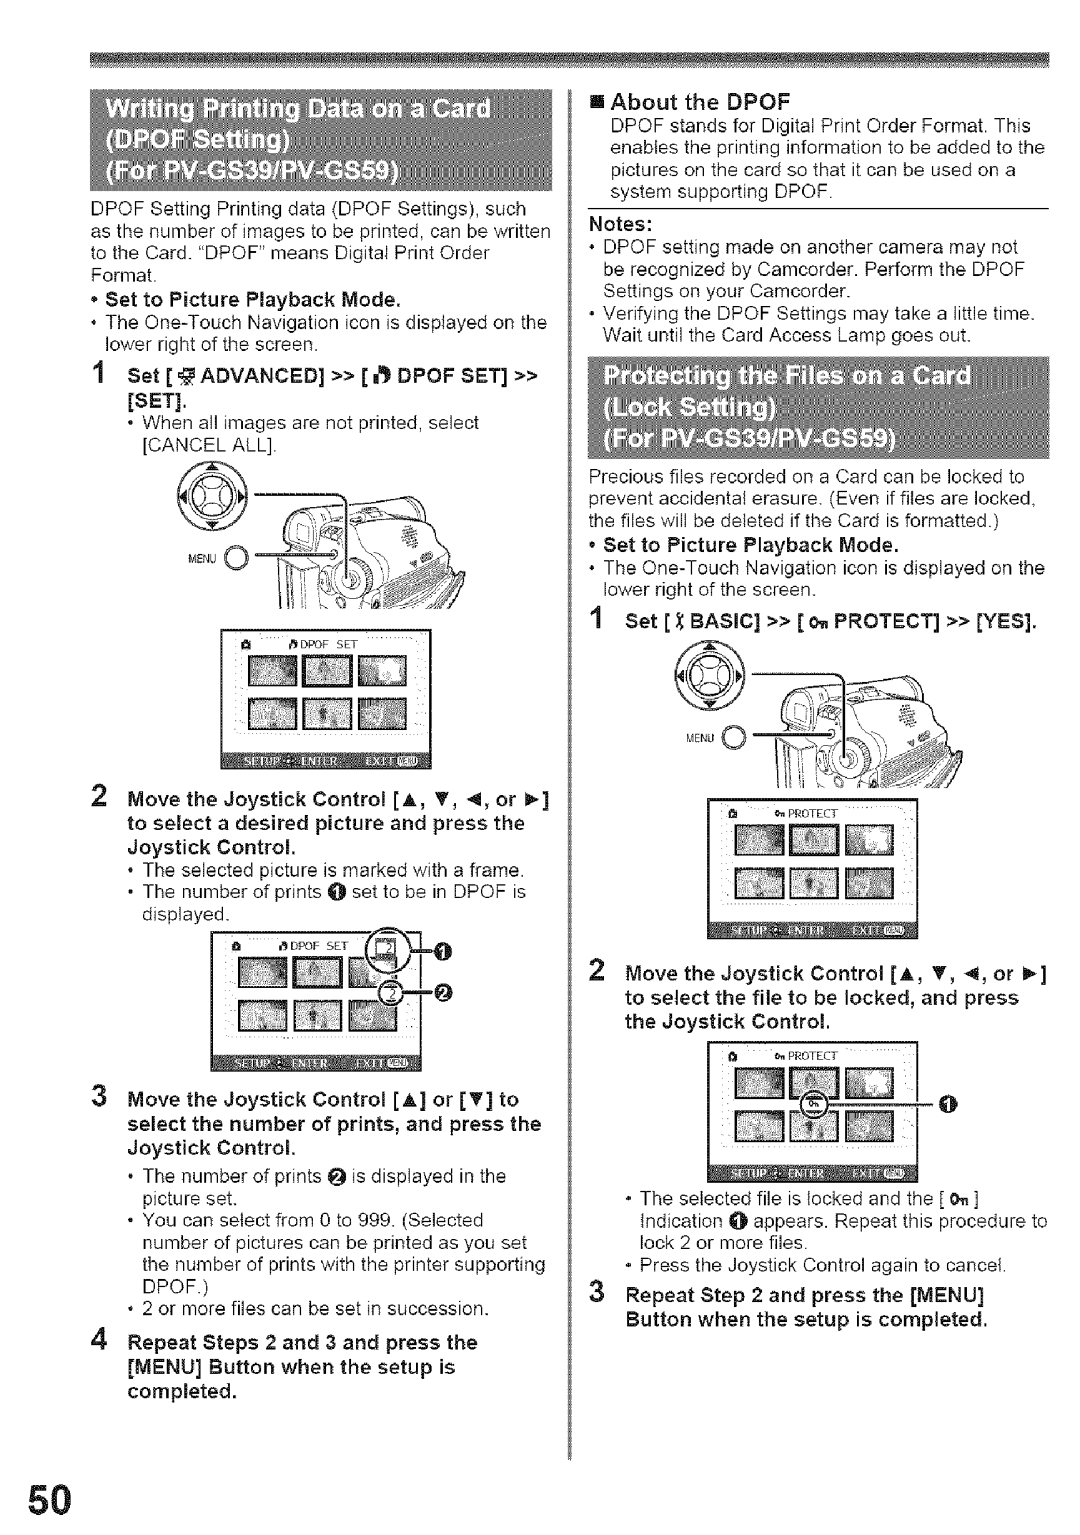
Dpof
Dpof
Videoin Audio
Turn on this Camcorder and set the Mode
Connect to the TV with the AM Cable O
Use the AC adaptor to avoid battery depletion
Ispayshot %
Button
Set the Mode Dial to Tape Playback Mode
Set to Tape Playback Mode
Before Recording
Move the Joystick Control a to start playback
Playback Mode
Select the input channe on the TV set and recorder
Image and sound are reproduced
Player
Press the Button to start playback
With a PC
Follow the instructions on the computer
Function
Click the US8 Driver
OFunction
Memory
Driver is installed, please
To PC Mode
Camcorder
IMac
Windows XP ,, OK Windows XP Messenged
Ill For Macintosh
Send Receive
Windows OK Windows 2000 MSN
To use the Camcorder as a Web Camera,
Click Click here to sign
Select DVC in the Microphone menu
Interface
PV-GS59 Supplied Click Next
Quick Movie Magic
Other requirements
Click Finish when the Restarting
On Driver Provider
Start Quick Movie Magic or MotionDV
To start Quick Movie Magic
Mac OS X v 10 3-Xv Set the Camcorder to Tape Playback
Connect the Camcorder to your Macintosh
Click the JMovJe HD icon
Click Create in the Create Project
Misc
Basic indications
Iius
Textual Indications
Lens Cap
Set the OFF/ON Switch to OFF
After Use Take out the Cassette. pp ~19
Transmitters or high-voltage cables
Causes of Dirty Heads
Battery Characteristics
Cassette
LCD Monitor
Camcorder power is turned off automatically
III LCD MonitorlViewfinderlLens
PV-GS59 Only
Demo Mode
Camcorder cannot be operated though
Disappears
Page
Lens
LCD Monitor
Undo Grip Belt
Please use the Manual Focus Mode instead
Digital Camcorder
Dimensions
Power Consumption
Television System
PV-DDC9-K
PV-DAC14 CGR-DU06A/1B
PV-DDC9
BN-SDPC3E
AM-5 PM M-F, 6 AM-1030 AM SAT, Pacific Time
Visa
Credit Card #
20421 84th Avenue South Kent, WA
Page
Panasonic Video Products Limited
Product
Mail to E g n, e0123-9333
Limitations and Exclusions
Panasonic Product Limited Warranty
Warranty Service
Express or iMPLiED, iNCLUDiNG ANY Implied Warranties
EL Aparato no Tjene EN SU iNTERiOR PiEZAS
000o
Establezca el interruptor OFF/ON en on
@ para Iniciar la
Mueva
El joystick
Presione el bot6n Photo Shot
Customer Services
Camcorder Accessory
Charging Battery Cinema
Portrait Mode Quick Movie
SP/LP
Panasonic Canada Inc
L4W

