Enchufe el cable de CA.
• Para cambiar el canal de salida del VCR, consulte las instrucciones de “Canal de salida del VCR” en la página 12 de las operaciones avanzadas.
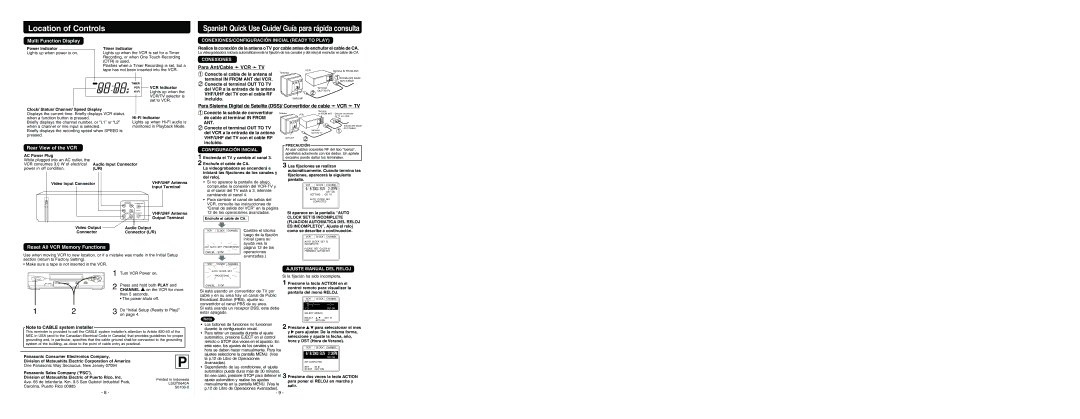
Location of Controls
Multi Function Display
Power Indicator | | Timer Indicator |
|
Lights up when power is on. | Lights up when the VCR is set for a Timer |
| | Recording, or when One Touch Recording |
| | (OTR) is used. |
| | Flashes when a Timer Recording is set, but a |
| | tape has not been inserted into the VCR. |
| | | | | | | | | VCR Indicator |
| | | | | | | | |
| | | | | | | | |
| | | | | | | | |
| | | | | | | | |
| | | | | | | | |
| | | | | | | | | Lights up when the |
| | | | | | | | | VCR/TV selector is |
| | | | | | | |
| | | | | | | | | set to VCR. |
| | | | | | | | |
Clock/ Status/ Channel/ Speed Display | | | | | | |
Displays the current time. Briefly displays VCR status | Hi-Fi Indicator |
when a function button is pressed. |
Briefly displays the channel number, or “L1” or “L2” | Lights up when Hi-Fi audio is |
when a channel or line input is selected. | monitored in Playback Mode. |
Briefly displays the recording speed when SPEED is | | | | | | |
pressed. | | | | | | |
Rear View of the VCR
AC Power Plug | | |
While plugged into an AC outlet, the | | |
VCR consumes 3.0 W of electrical | Audio Input Connector |
power in off condition. | (L/R) | |
Video Input Connector | VHF/UHF Antenna |
| | Input Terminal |
| AUDIO | IN FROM ANT. |
| R | |
| L | VHF/UHF |
Spanish Quick Use Guide/ Guía para rápida consulta
CONEXIONES/CONFIGURACIÓN INICIAL (READY TO PLAY)
Realice la conexión de la antena oTV por cable antes de enchufar el cable de CA.
La videograbadora iniciará automáticamente la fijación de los canales y del reloj al enchufar el cable de CA.
CONEXIONES
Para Ant/Cable ➛ VCR ➛ TV
| 1 Conecte el cable de la antena al | VCR | Terminal IN FROM ANT. |
| Televisor |
| |
| | 1 Entrada (IN) desde |
| terminal IN FROM ANT del VCR. | |
| | ANT./CABLE |
| 2 Conecte el terminal OUT TO TV | | |
| del VCR a la entrada de la antena | | Terminal |
| | 2 OUT TO TV |
| VHF/UHF del TV con el cable RF | |
incluido.VHF/UHF
Para Sistema Digital de Satelite (DSS)/ Convertidor de cable ➛ VCR ➛ TV
| 1 Conecte la salida de convertidor | Televisor | | | Terminal | |
| VCR | | IN FROM ANT. Estuche convertidor |
| | |
| de cable al terminal IN FROM | | | | | de TV por cable |
| | | | | |
| ANT. | | | | | |
| 2 Conecte el terminal OUT TO TV | | | | | Entrada (IN) desde |
| | | | Terminal | ANT./CABLE |
| del VCR a la entrada de la antena | | | | 1 |
| | | | OUT TO TV |
| VHF/UHF del TV con el cable RF | VHF/UHF | 2 | | |
| | | | |
| incluido. | PRECAUCIÓN | | |
| CONFIGURACIÓN INICIAL | | |
| Al usar cables coaxiales RF del tipo “tuerca”, |
| 1 Encienda el TV y cambie al canal 3. | apriételos solamente con los dedos. Un apriete |
| excesivo puede dañar los terminales. |
| 2 Enchufe el cable de CA. | 3 Las fijaciones se realizan |
| La videograbadora se encenderá e |
| | automáticamente. Cuando termina las |
| iniciará las fijaciones de los canales y | |
| | fijaciones, aparecerá la siguiente |
| del reloj. | |
| | pantalla. | | | |
| • Si no aparece la pantalla de abajo, | | | | |
| | | VCR | CLOCK | CHANNEL |
| compruebe la conexión del VCR-TV y | | |
| | | 6/08/ 2003 SUN | 2 : 20PM |
| si el canal del TV está a 3, intennte | | |
| | | | DST : ON |
| cambiando al canal 4. | | | SETT I NG : CH 10 |
| | | | AUTO CLOCK SET |
| | | | | COMPLETED | |
| VIDEO | OUT TO TV | VHF/UHF Antenna |
| |
| IN 1 OUT | | Output Terminal |
Video Output | Audio Output | |
Connector | Connector (L/R) |
Reset All VCR Memory Functions
Use when moving VCR to new location, or if a mistake was made in the Initial Setup section (return to Factory Setting).
VCR | CLOCK | CHANNEL |
CH AUTO SET PROCEEDING |
CANCEL | : STOP | |
Cambie el idioma luego de la fijación inicial (para su ayuda vea la página 12 de las operaciones avanzadas.)
Si aparece en la pantalla “ AUTO CLOCK SET IS INCOMPLETE (FIJACION AUTOMATICA DEL RELOJ ES INCOMPLETO)” , Ajuste el reloj como se describe a continuación.
AUTO CLOCK SET IS
INCOMPLETE
PLEASE SET CLOCK BY
PRESSING ACTION KEY
• Make sure a tape is not inserted in the VCR.
1 Turn VCR Power on.
2 Press and hold both PLAY and CHANNEL  on the VCR for more than 5 seconds.
• The power shuts off.
1 | 2 | Do “Initial Setup (Ready to Play)” |
3 on page 4. |
AUTO CLOCK SET
PROCEEDING
CANCEL : STOP
Si está usando un convertidor de TV por cable y en su area hay un canal de Public Broadcast Station (PBS), ajuste su convertidor al canal PBS de su area.
Si está usando un receptor DSS, este debe estar apagado.
Nota
AJUSTE MANUAL DEL RELOJ
Si la fijación ha sido incompleta.
1 Presione la tecla ACTION en el control remoto para visualizar la pantalla del menú RELOJ.
VCR | | CLOCK | CHANNEL |
1/ | / | | : |
| | | DST:ON |
SELECT MONTH | |
SELECT | : | SET : |
EXIT | | : ACT I ON | |
Note to CABLE system installer
This reminder is provided to call the CABLE system installer’s attention to Article 820-40 of the NEC in USA (and to the Canadian Electrical Code in Canada) that provides guidelines for proper grounding and, in particular, specifies that the cable ground shall be connected to the grounding system of the building, as close to the point of cable entry as practical.
| Panasonic Consumer Electronics Company, | | P |
| Division of Matsushita Electric Corporation of America | |
| One Panasonic Way Secaucus, New Jersey 07094 | |
| Panasonic Sales Company (“PSC”), | | |
| Division of Matsushita Electric of Puerto Rico, Inc. | Printed in Indonesia |
| Ave. 65 de Infantería. Km. 9.5 San Gabriel Industrial Park, |
| LSQT0640A |
| Carolina, Puerto Rico 00985 |
| S0103-0 |
•Los botones de funciones no funcionan durante la configuración inicial.
•Para retirar un cassette durante el ajuste automático, presione EJECT en el control remoto o STOP dos veces en el aparato. En este caso, los ajustes de los canales y la hora se deben hacer manualmente. Para los ajustes seleccione la pantalla MENU. (Vea la p.12 de Libro de Operaciones Avanzadas).
•Dependiendo de las condiciones, el ajuste automático puede durar más de 30 minutos. En ese caso, presione STOP para detener el ajuste automático y realice los ajustes manualmente en la pantalla MENU. (Vea la p.12 de Libro de Operaciones Avanzadas).
2 Presione 
 para seleccionar el mes y
  para ajustar. De la misma forma, seleccione y ajuste la fecha, año, hora y DST (Hora de Verano).
VCR CLOCK CHANNEL
6/08/ 2003 SUN 2 : 20PM
DST:ON
SET COMPLETED
3 Presione dos veces la tecla ACTION para poner el RELOJ en marcha y salir.