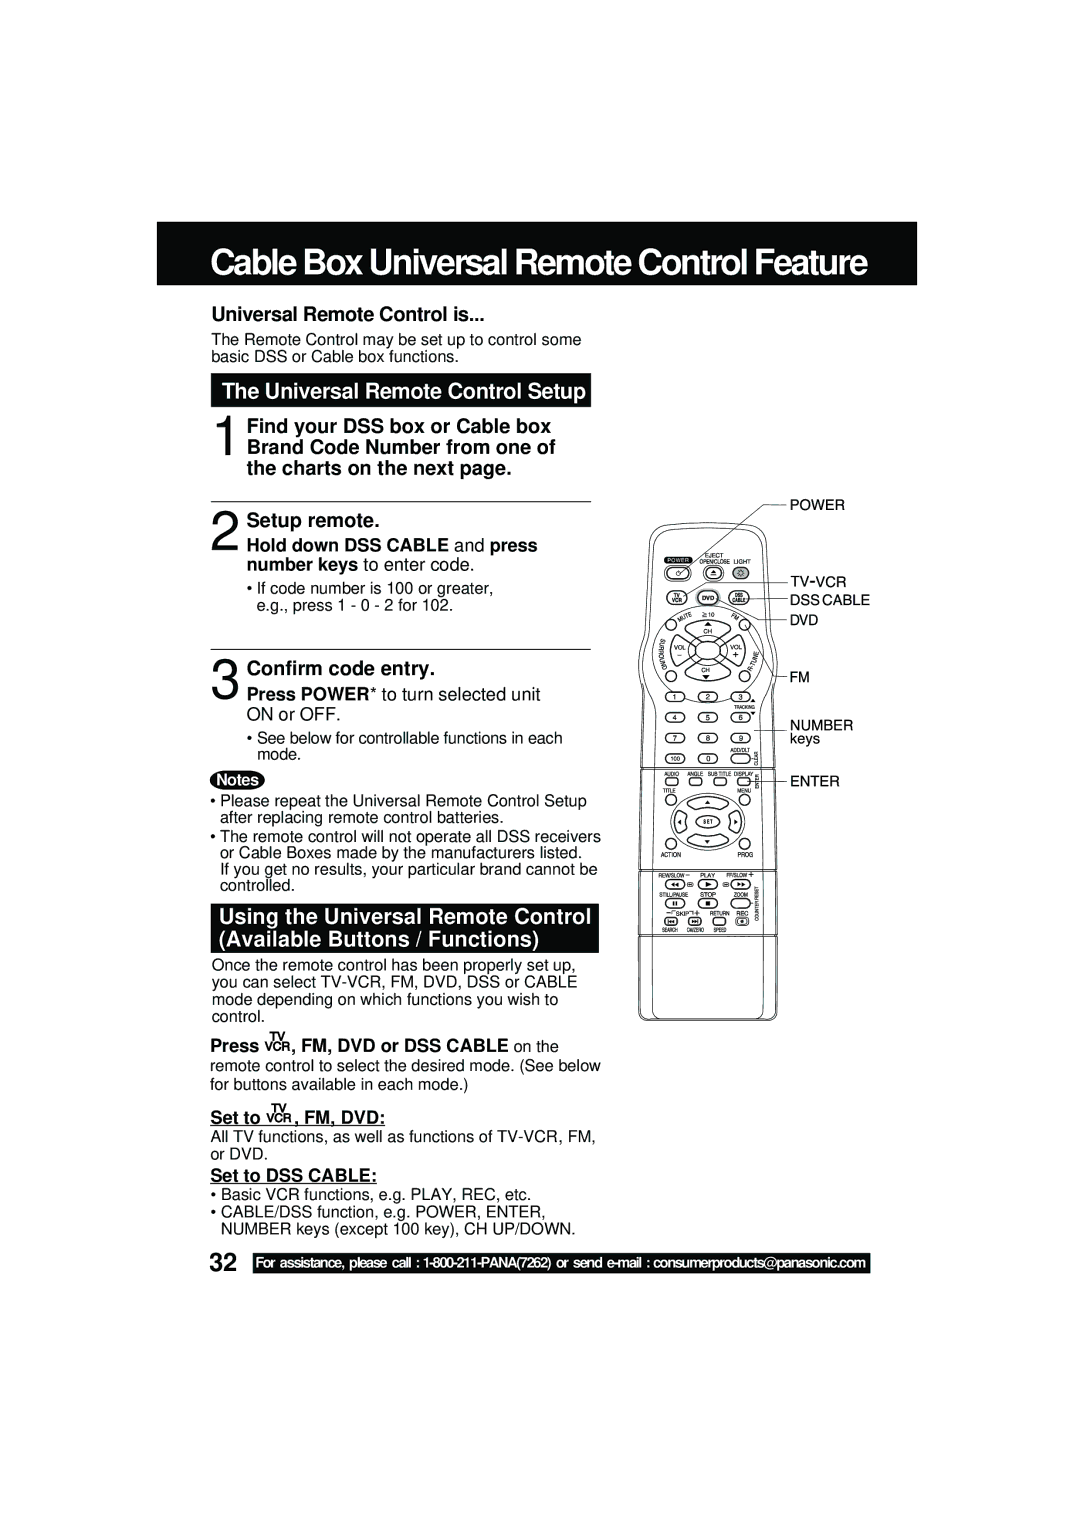
Initial Setup BasicOperation TV Operation Timer Operation
TV/DVD/VCR Combination
Model No. PV-DM2092
Advanced Operation
Important Safeguards and Precautions
INSTALLATION
OUTDOOR ANTENNA INSTALLATION
USING THE UNIT
Safety Precautions/Mesures de sécurité
The Region number
for this unit is
FCC NOTICE
Before Using
Accessories
Battery replacement caution
Remote Control LSSQ0302 Batteries 2 “AA”
Table of Contents
Initial Setup
Timer Operation
Initial Setup Basic Operation TV Operation Timer Operation
Head Cleaning
Specifications
Features for a Quality Picture
Information Unit, Cassette, Disc
Initial Setup
Definition of Terms
Disc formats supported by this unit
Video CD
Remote Control Buttons
POWER
VOLUME UP/DOWN
ZOOM/COUNTER RESET
Indicators on the Front Panel
Universal Light Tower Illuminated Remote Control
LIGHT button
EJECT/OPEN/CLOSE button
Location of Controls continued
Front View of the unit
CHANNEL UP/DOWN TRACKING UP/DOWN See page VOLUME UP/DOWN See page
If the disc cannot be removed
Connections
Rear View of the unit
For ANT./Cable Connect the cable from Antenna/Cable to the VHF/UHF
terminal on the unit
Ready Checklist
Enjoying digital audio output from the digital audio output connector
Notes on audio output from the optical digital audio output connector
output from connector
Notes on connecting an Optical digital audio cable optional
Caution for optical digital audio output connector
Unit Dolby Digital Decoder Amplifier Speaker or
Unit dts digital theater systems Decoder Amplifier Speaker
Initial Setup Ready to Play
Please make all cable or antenna connections before powering on
Plug the unit power cord into an AC wall outlet
Reset all unit Memory Functions
1 Turn the unit Power on
3 Perform “Initial Setup” on page
Note to CABLE system installer
Reset Language, Channels, Clock
2 1PressLanguage
Channels
Clock
Time Zone Adjust
Time Zone Adjust
3 Press to select “TIME ZONE ADJUST” and
5 Press ACTION twice to start the clock and exit this mode
Ready Checklist
Operation using unit buttons
3 SP
Playback a Tape
Playback Source
Recording Editing unit
Selecting Input Mode
Perform operation of steps 4 and 5 on both units at same time
Press POWER* on the remote or unit Insert a disc
Basic DVD Operation
1 Press OPEN/CLOSE
2 Place disc into disc tray
Auto-Power Off function
RESUME function
Still Pause Picture
Slow Motion picture DVD/Video CD
Press POWER
Using the 100 key
to adjust volume
1 on the remote or unit
the broadcast signal being received
MTS Broadcast/TV Stereo System
Receivable Broadcast Types
Audio Mode for TV Viewing
Closed Caption Mode Feature
display SET UP
Closed Caption System
Closed Caption is
Caption On Mute Feature
2 Press SET to
Press ACTION three times
TV Operation
TV Timer Features
ON-TIMER with Alarm
Sleep Timer
To Cancel ON-TIMER
TV/VCR Status & Clock Display
Blue Screen Display
Channel & Function Display
PLAY
FM Radio Setup
FM Antenna Setup
Make sure FM tuning is done correctly see FM Radio Setup
preset number
Using FM Radio
Audio Mode for FM Radio
key 1~9 to
Press AUDIO
Timer Recording
1 Press PROG* to display SET PROGRAM screen
1 Press to select
2 Press SET to display screen
Cancel a Timer Recording Recording is in progress
program contents
To Replace program
To Clear program
The Universal Remote Control Setup
Using the Universal Remote Control Available Buttons / Functions
Universal Remote Control is
Brand Code Number from one of the charts on the next page
Advanced Operation
DSS Brand Code Numbers
Cable Box Brand Code Numbers
To cancel, press PLAY or STOP
Tape Operation
Index Search
Search System is
To cancel press PLAY or STOP
Program End Search
Press FF
to start search
RESET at the
desired position to reset to “00000.”
Tape Operation continued
Repeat Play
Auto Operation Functions
Commercial Skip
Press CM/ZERO repeatedly to select skip time in Playback mode
OFF 1st Press 1 min skip 2nd Press 2 min skip 3rd Press 3 min skip
Special VCR Features
5 Press ACTION three times to end setup
Channel Caption
Channel Caption is
Remote Warning Feature
Weak Signal Display Feature
VCR Lock
1Press ACTION
V-Chip Control Feature
V-Chip Control Feature is
Process of V-Chip Control Feature Enter Code SetupBlocking
Enter Secret Code
US MOVIES Ratings
2 Press SET to set
Advanced
Operation
V-Chip Control Feature continued
Process of V-Chip Control Feature EnterCode SetupBlocking
US TV PROGRAMS Ratings
If LOCK menu is not displayed, do “Enter Secret Code” steps on page
ProcessofV-ChipControlFeature
EnterCode Setup
When V-Chip Control is activated
Blocking Message
Audio Features
With the proper audio mode setting, your unit can
Audio Mode for Playback
Audio Mode for Recording
DVD Volume Adjust
Press SURROUND. “SURROUND ON” is displayed To Cancel press SURROUND
Surround Sound System
Set Surround sound
5 Press ACTION three times to end setup
NORMAL Factory setting MOVIE
Video Menu
Audio Menu
Video / Audio Adjustment
Video Adjustment
Audio Adjustment
6 Press ACTION four times to end setup
Disc Operation
Subtitle Language DVD only
Audio Soundtrack Language DVD only
Press SUB TITLE
Multiple Angle Viewing DVD only
Picture Zoom DVD only
Press ANGLE in Play
Vocal selection for Karaoke discs DVD/Video CD
2 Press SET or PLAY to access
Disc Operation continued
Birds
Title menu DVD only
Program Play Video CD/CD
Program Repeat Play Video CD/CD
a Do steps 1 through 6 on this page
c Press DISPLAY again to display Unit Information screen
Random Play Video CD/CD
Press ACTION* in Stop mode to display
1 MAIN MENU
to select “DVD.”
3 1 Press to select the setting
press and SET repeatedly to move to error, then correct
1 Press DISPLAY in Play or Stop mode to display “On-Screen Display.”
2 1 Press or to select an item
Detailed Descriptions of Each On-Screen Display
Disc information screen for DVD
Disc information screen for Video CD/ CD
1. TITLE No
Unit information screen
a. Repeat Play
b. Play mode Video CD/ CD only See page 51 or
For your reference
MP3 Playback Operation
MP3 Playback
2 Press OPEN/CLOSE
Press OPEN/CLOSE to close
Perform DVD Lock setting in TV mode
DVD Lock Ratings DVD only
1 Press
2 Press SET to set
Settings for DVD Operation
DISC LANGUAGES DVD only
“AUDIO”selections
“SUBTITLE” selections
AUDIO OUTPUT
1 Do steps 1 and 2 on page
“AUDIO OUTPUT.”
repeatedly for output
Settings for DVD Operation continued
Pan & Scan Factory preset
STILL MODE
Selecting TV MODE
Language Code List
Code
Language
Code
Before Requesting Service
Power
Remote Control
Correction
DVD/Video CD/CD
Miscellaneous
Correction
Correction
Warning and Instruction Displays
Page
Realizando Configuración Inicial
Conexión para Ant./Cable
Ajuste Manual del Reloj
Conexión para Sistema Digital de Satelite DSS/Convertidor de cable
Spanish Quick Use Guide/Guía para rápida consulta
Operaciones básicas para la reproducción VCR
Grabación con temporizador
Operaciones básicas para la grabación
Operaciones básicas del DVD
Cambio del idioma de subtítulos DVD solamente
Cambio del idioma de la pista de sonido DVD solamente
2 Introducir un disco 1 Presione OPEN/CLOSE
Visión desde otro ángulo DVD solamente
Selección de vocal para los discos de Karaoke DVD/Video CD
Ampliación de la imagen DVD solamente
Utilización de un menú de títulos DVD solamente
Reproducción programada Vídeo CD/CD
Reproducción arbitraria Vídeo CD/CD
1 Presione ACTION en el modo paro STOP para visualizar MAIN MENU
1Presione
Funcionamiento del DVD utilizando visualizaciones en pantalla
Fijaciones iniciales
2Presione
SET para
Selección de SALIDA DE AUDIO
Selección de DETENER RASTREO
Selección de 4 3 PREFERENCIA
For Your Information
Limited Warranty
Limited Warranty
Panasonic/Quasar Video Products
Limited Warranty Coverage
Visa, MasterCard, Discover Card, American Express, Check
Customer Services Directory
For Your Information
Index
TV / VCR
W Warranty
DVD Lock Feature DVD
TV / VCR
For Your Information
Panasonic Consumer Electronics Company
Panasonic Sales Company “PSC”
Division of Matsushita Electric of Puerto Rico, Inc
Ave. 65 de Infantería, Km