Enjoying karaoke
(For Saudi Arabia, Kuwait, the Middle East, South Africa and Southeast Asia)
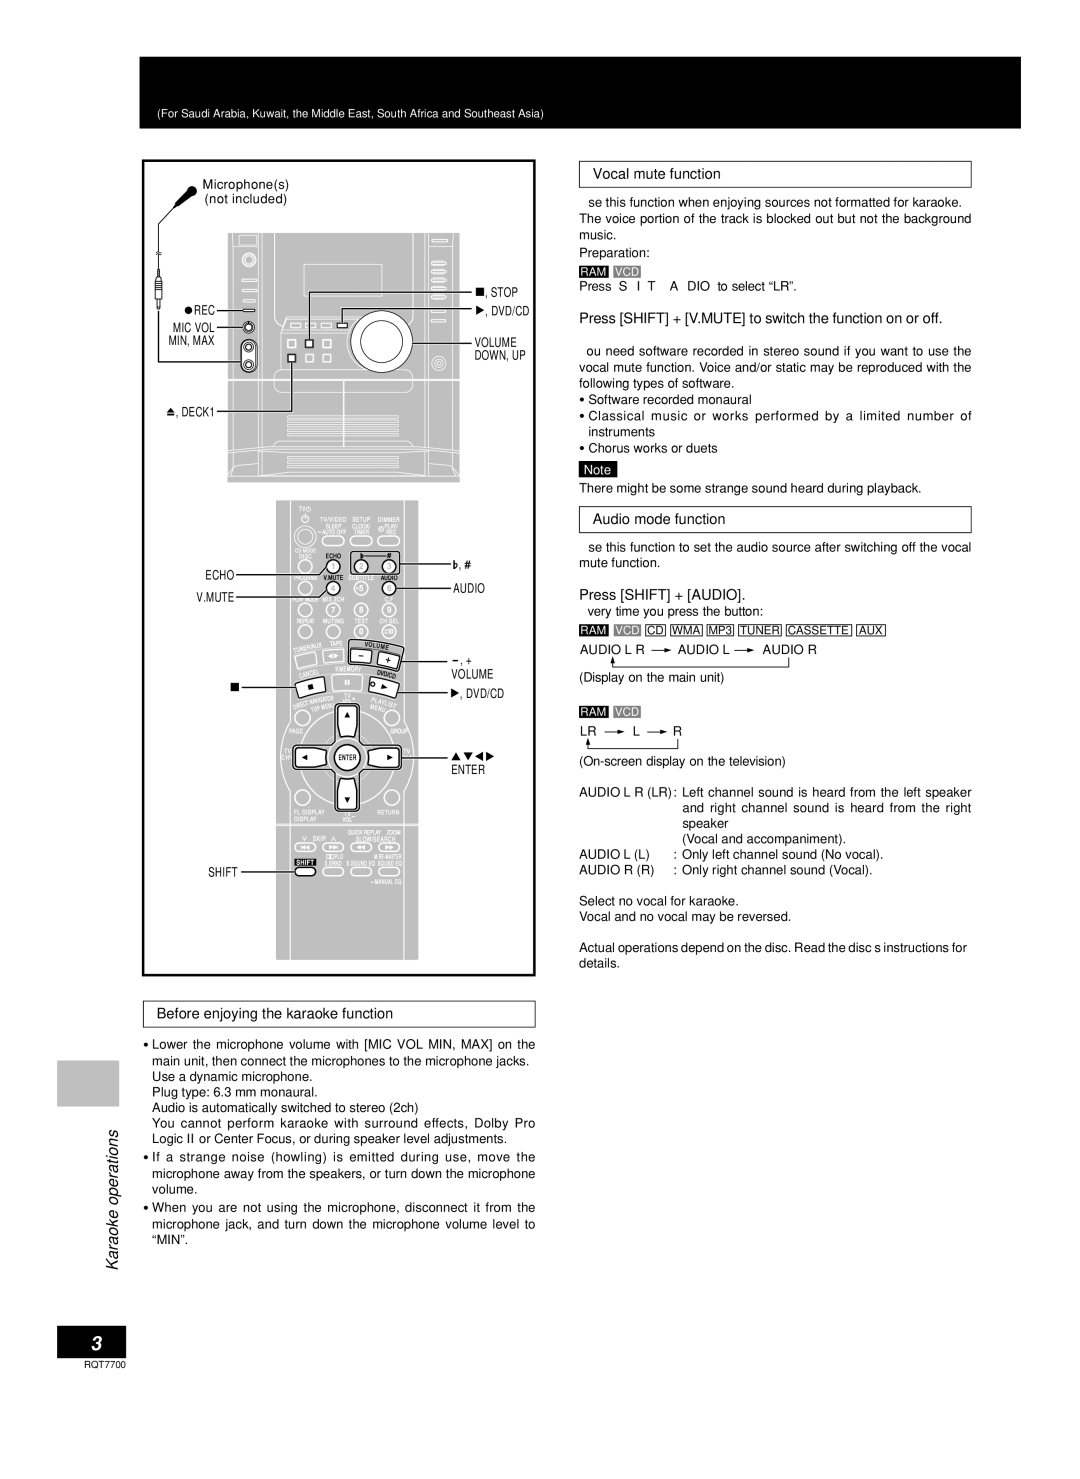
Microphone(s) |
| |
(not included) |
| |
| , STOP | |
REC | , DVD/CD | |
MIC VOL |
| |
MIN, MAX | VOLUME | |
| DOWN, UP | |
, DECK1 |
| |
ECHO | , | |
AUDIO | ||
V.MUTE | ||
| ||
| , + | |
| VOLUME | |
| , DVD/CD | |
| ENTER | |
SHIFT |
|
Vocal mute function
Use this function when enjoying sources not formatted for karaoke. The voice portion of the track is blocked out but not the background music.
Preparation:
RAM![]()
![]() VCD
VCD
Press [SHIFT]+[AUDIO] to select “LR”.
Press [SHIFT] + [V.MUTE] to switch the function on or off.
You need software recorded in stereo sound if you want to use the vocal mute function. Voice and/or static may be reproduced with the following types of software.
•Software recorded monaural
•Classical music or works performed by a limited number of instruments
•Chorus works or duets
Note
There might be some strange sound heard during playback.
Audio mode function
Use this function to set the audio source after switching off the vocal mute function.
Press [SHIFT] + [AUDIO].
Every time you press the button:
RAM![]()
![]() VCD
VCD![]()
![]() CD
CD ![]()
![]() WMA
WMA![]()
![]() MP3
MP3 ![]()
![]() TUNER
TUNER![]()
![]() CASSETTE
CASSETTE ![]()
![]() AUX
AUX
AUDIO L R  AUDIO L
  AUDIO R
(Display on the main unit)
RAM![]()
![]() VCD
VCD
LR ![]() L
L ![]() R
R
AUDIO L R (LR): Left channel sound is heard from the left speaker and right channel sound is heard from the right speaker
(Vocal and accompaniment).
AUDIO L (L) : Only left channel sound (No vocal).
AUDIO R (R) : Only right channel sound (Vocal).
Select no vocal for karaoke.
Vocal and no vocal may be reversed.
Actual operations depend on the disc. Read the disc’s instructions for details.
Karaoke operations
Before enjoying the karaoke function
•Lower the microphone volume with [MIC VOL MIN, MAX] on the main unit, then connect the microphones to the microphone jacks. Use a dynamic microphone.
Plug type: 6.3 mm monaural.
Audio is automatically switched to stereo (2ch)
You cannot perform karaoke with surround effects, Dolby Pro Logic II or Center Focus, or during speaker level adjustments.
•If a strange noise (howling) is emitted during use, move the microphone away from the speakers, or turn down the microphone volume.
•When you are not using the microphone, disconnect it from the microphone jack, and turn down the microphone volume level to “MIN”.
RQT7700
