SDR-H80
Information for Your Safety
Use only the recommended accessories
Indemnity concerning recording content
Carefully observe copyright laws
Cards that you can use with this unit
For the purposes of these operating instructions
Licenses
Contents
With a PC
Others
106
104
CD-ROM
Accessories
Optional accessories
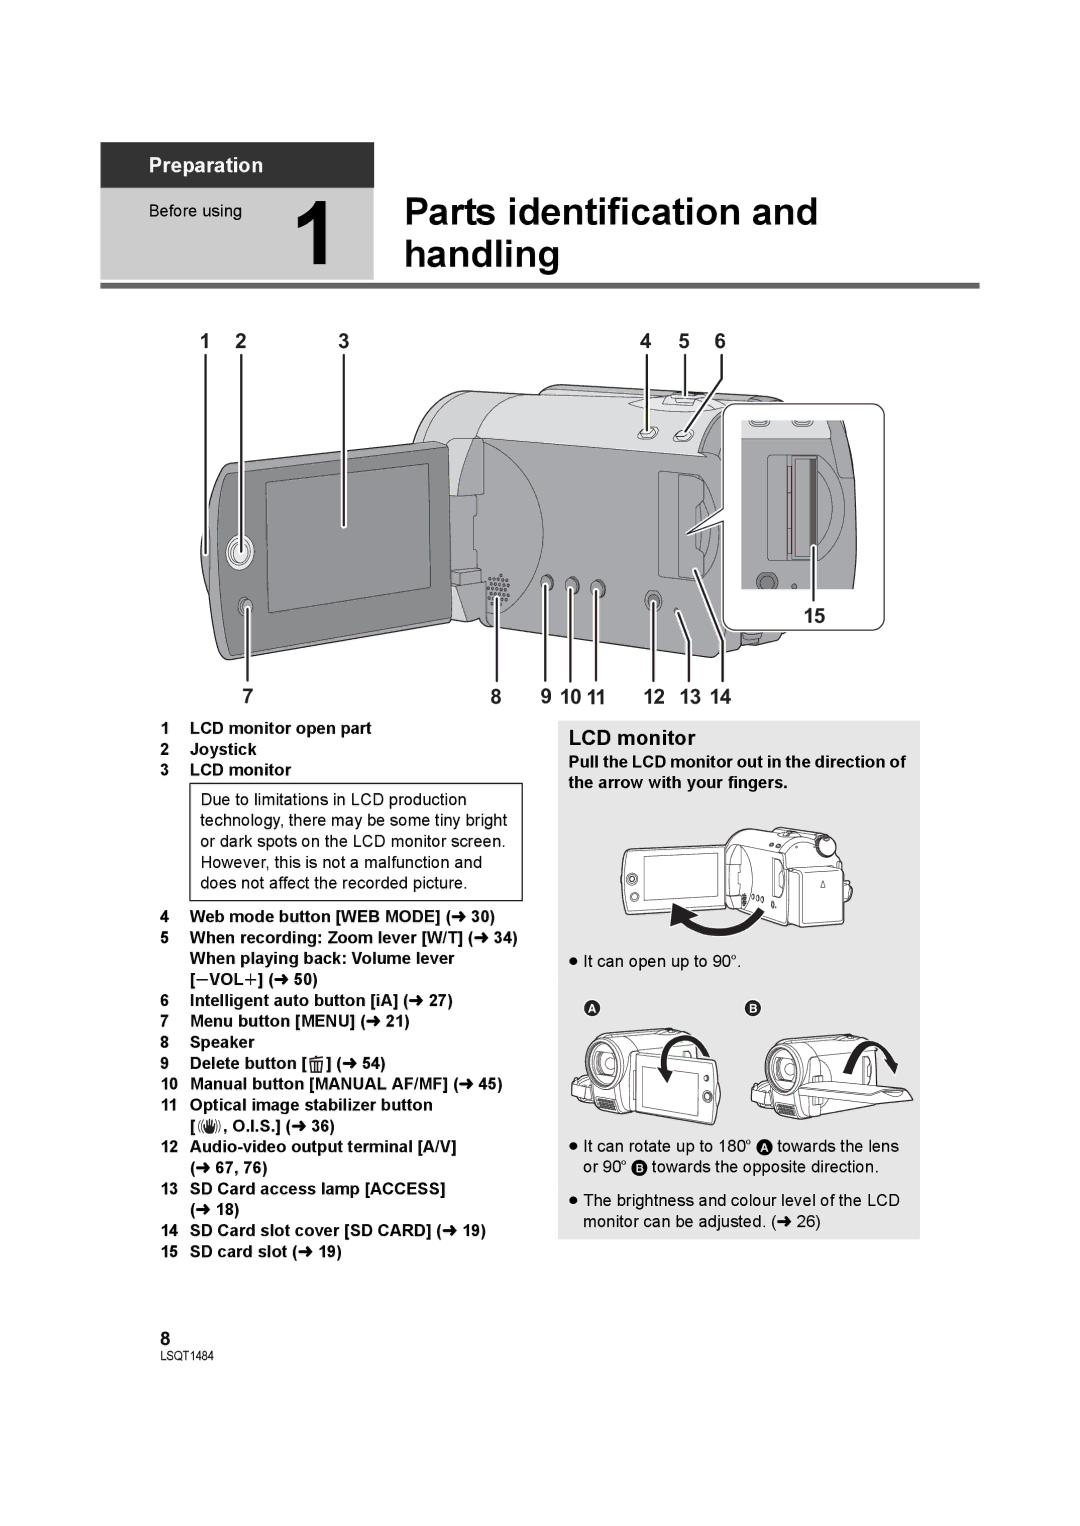
LCD monitor
Parts identification
Handling
Joystick
Lens cover
1819
Grip belt
USB terminal l 70, 77
Tripod receptacle Battery release lever Battery l
Tripod receptacle
Charging lamp Charge a
Charging the battery
About batteries that you can use with this unit
Inserting the battery
Battery model number
Charging time and recordable time
Charging time
Voltage Maximum Actual
Connecting to the AC outlet
Battery capacity indication
Before using 3 About HDD and SD cards
Internal HDD SD Memory Card
Display on the screen Indication in these
Instructions Capacity
About SD cards
Http//panasonic.jp/support/global/cs/ecam
SD card handling
Access lamp
HDD handling
Rotate the mode dial to OFF
Card
Inserting/removing an SD
Securely close the SD card slot cover
Selecting a mode
How to turn the power on and off with the LCD monitor
Turning the unit on/off
To turn on
Using the menu screen
Press the Menu button
To get back to the previous screen
To exit the menu screen
Motion picture recording menus
Language selection
Menu list
Still picture playback menus
Still picture recording menus
Motion picture playback menus
Setting date and time
Press the Menu button to finish the setting
Select the menu. l
Press the joystick to enter the selection
≥ When the destination is in summer time
Select Home and press the joystick
Select Destination and press the joystick
Basic # SET World Time # YES
Adjusting LCD monitor
Setup # LCD SET # YES
Setup # Power LCD # desired setting Auto
Brightness
Intelligent auto mode
Before recording
Basic camera positioning
Intelligent auto button
When the intelligent auto mode is set to off
Mode Scene/Effect
Recording motion pictures
Press the recording start/stop button to start recording
Screen indications
To end the recording
Press the WEB Mode button
Setup # Audio REC # Dolby or Mpeg Dolby Dolby AC-3
Record motion picture to be uploaded to YouTube
Audio recording modes
Recording mode
Recording modes and recordable time
HDD
High quality Normal Long play
Recording still pictures
Press the recording start/stop button
12345
Size of still pictures Selected recording destination
Basic # Picture Size # desired setting
Number of pixels
Recording with a shutter sound effect Select the menu. l
Advanced # Shtr Effect # on
Recording functions
Zoom in/out function
Move the zoom lever
Digital zoom function
Recording yourself
Quick start
Press the O.I.S. button
To cancel the optical image stabilizer function
Optical image stabilizer function
Select an icon with the joystick
Recording functions
Operation icons
Video recording mode
Operation icons
Picture recording mode
Backlight
Compensation
Fade
Help mode
Soft skin mode
To exit the help mode
Colour night view
PRE-REC
Self-timer
To stop the timer midway through
Face detection
Menus
Menus
Auto slow shutter mode
Manual mode
Manual focus mode
Manual recording functions
Press the Manual AF/MF button
Scene mode
Manual focus adjustment
To cancel the scene mode function
Select the manual mode. l Select the menu. l
Select the white balance mode with the joystick
Auto white balance adjustment
To restore to the automatic adjustment
White balance
Manual shutter speed/ aperture adjustment
Adjust the settings with the joystick
To restore to automatic adjustment
Select the manual mode. l Select or with the joystick
Motion picture playback
Select the scene to be played back, then press the joystick
Setup # Resume Play # on
To cancel the resume function
To change the playback speed
Resuming the previous playback Select the menu. l
Playing back motion pictures by date
Playing back a playlist
Select the playback operation with the joystick
Still picture playback
Select the file to be played back, then press the joystick
Photo Setup # Slide Interval # desired setting
About still picture compatibility
Short
Normal Approx sec Long Approx sec
Deleting scenes/files
Deleting scenes/files one at Time
Deleting multiple scenes/ files
Press the button during playback
Deleting the copied scenes collectively
Press the button
To continue deleting other scenes/files
To complete editing
To complete the settings
Editing scenes
Locking motion pictures
Select the scene to be protected, then press the joystick
Dividing a scene to delete
Select the scene to be divided, then press the joystick
Dividing a scene to delete
To continue dividing and deleting other scenes
Using playlists
Creating a new playlist
Editing a playlist
Deleting scenes
Adding scenes to playlist
Select the menu. l 21 Edit # ADD # YES
Moving scenes within a playlist
Scenes can be added to the created playlist
Select the file to be protected, then press the joystick
Editing still pictures
Locking still pictures
Dpof setting
To cancel all Dpof settings
Select the file to be copied, then press the joystick
Copying still picture files
Select Select or ALL then press the joystick
To continue copying other files
To cancel copying halfway
Copying still picture files
HDD and SD card
Management
Formatting HDD
Displaying HDD information
Playback on TV
Start playback on this unit
To display the on-screen information on the TV
Setup # EXT. Display # on
To watch images with a 169 aspect ratio on a regular TV
Data Motion pictures Still pictures Media
With a DVD burner
About discs that can be used
Connecting this unit to the DVD burner
Insert the disc in the DVD burner
Select menus with the following procedures
DVD Copy function
Copying all the scenes to discs
Copying added scenes to discs
Favourite Scenes function
Selecting the scenes to copy to 1 disc
Select the scenes to be copied and then press the joystick
Select START, then press the joystick
Select Date
Selecting the scenes by date to copy to discs
Selecting the scenes by playlist to copy to discs
Disc type Copy time
About the time it takes to copy
About playing back the discs
Playing back a disc inserted in the DVD burner
Using SD card slot or USB terminal of other video devices
When using a USB terminal
With other video devices
Dubbing images onto other video devices
Select PictBridge # HDD or SD Card then press the joystick
With a printer PictBridge
Connect this unit to a printer
Select Print # YES and press the joystick
Standard
Before using 1 What you can do with a PC
Operating environment
VideoCam Suite
CPU
RAM
SD card reader function mass storage
End User License Agreement
Article 8 Termination of License
Setup1 Installation
Installing VideoCam Suite
Check the contents, then close the window
Insert the CD-ROM into the PC
Uninstalling the software
Connection and recognition
About the PC display
Connect this unit to a PC
Select PC/RECORDER # HDD or SD Card then press the joystick
When accessing the card
To disconnect USB cable safely
Example folder structure
Double click the icon in task tray
Reading the operating instructions of the software
Using software 1 Using VideoCam Suite
When the operating instructions will not open
Upload to YouTube
If using a Macintosh
Recording indications
Playback indications
White
Green
10000
Card l
Indications when other products are connected
Confirmatory indications
HDD Backup Recommended
This Card Cannot Record in Video Mode
Error OCCURRED. Recording is Stopped
This Battery Cannot be Used
About recovery
Used simultaneously
Functions Conditions which Disable the functions
Functions that cannot be
Troubleshooting
Problem Check points
Problem
Operation arbitrarily stops
Scenes or files cannot be deleted or edited
Problem
With other products
With a PC
About this unit
When carrying the unit, do not drop or bump it
Cleaning
About the battery
About the AC adaptor
About condensation
Causes of condensation
Helpful hint
White balance adjustment
Explanation of terms
Automatic white balance
Auto focus
Recording a subject with little contrast
USB
Specifications
SD Card/Hard Disk Video Camera
Dimensions
Operating temperature
Mass
Mass in operation
Still pictures Recording media
Picture size
Number of recordable
Pictures
Number of recordable pictures
Picture size 640k480 640k360
GB SDR-H90
GB SDR-H80
110
111
Panasonic Corporation