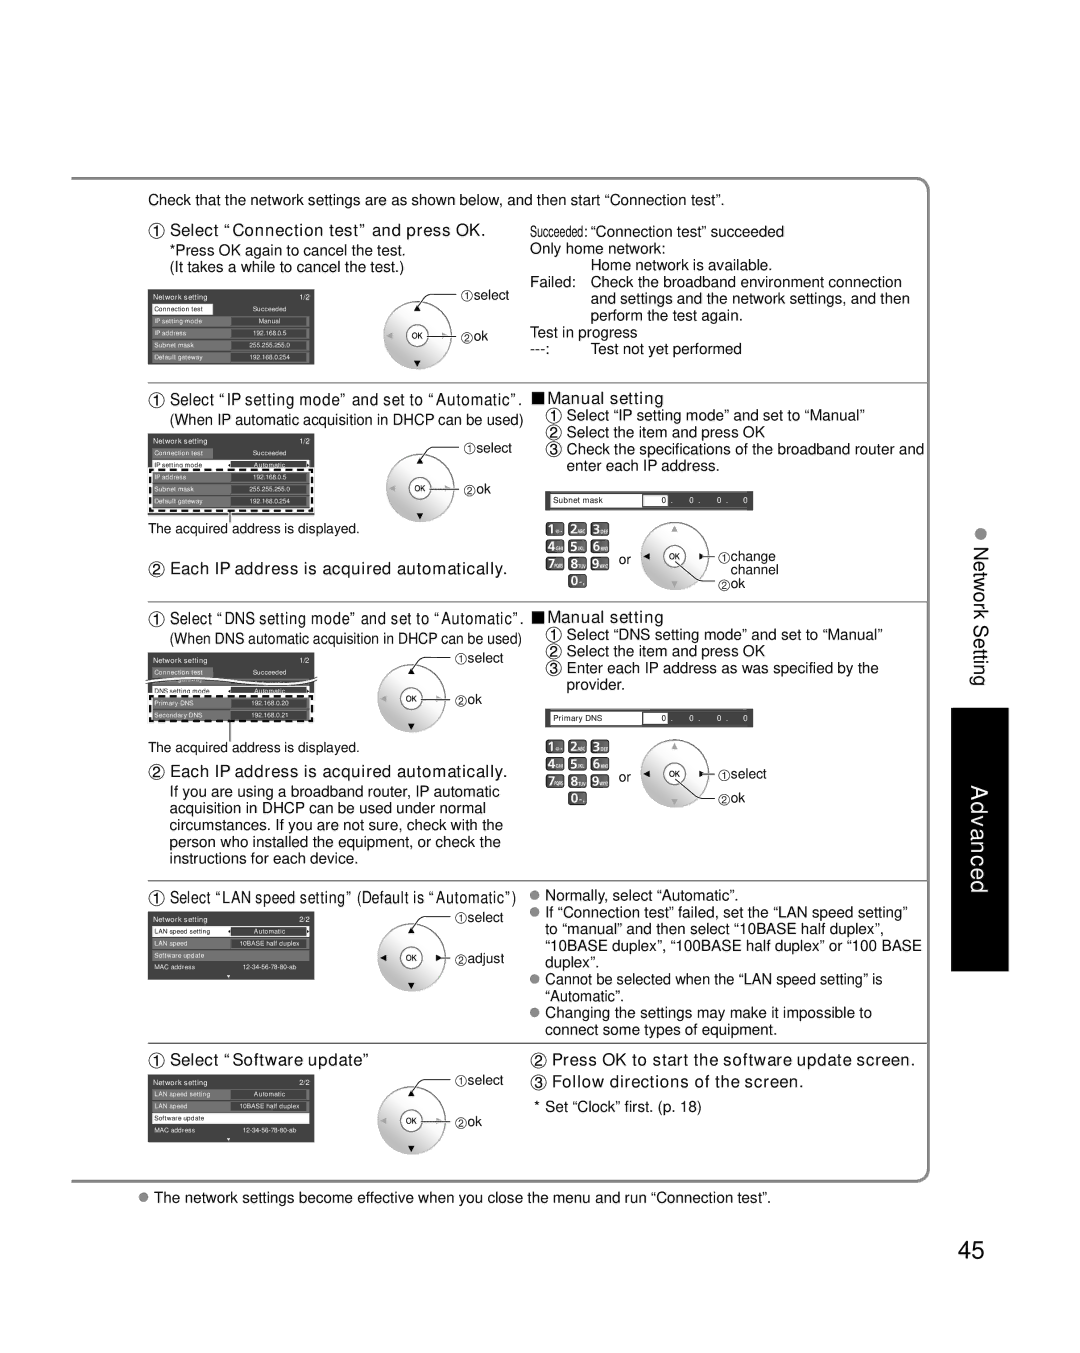
Check that the network settings are as shown below, and then start “Connection test”.

Select “Connection test” and press OK.

*Press OK again to cancel the test. (It takes a while to cancel the test.)

Network setting

1/2

select

Connection test

Succeeded


IP setting mode

Manual

ok

IP address

192.168.0.5


Subnet mask

255.255.255.0


Default gateway

192.168.0.254


Succeeded: “Connection test” succeeded Only home network:

Home network is available.

Failed: Check the broadband environment connection and settings and the network settings, and then perform the test again.

Test in progress

---: Test not yet performed

Select “IP setting mode” and set to “Automatic”.

(When IP automatic acquisition in DHCP can be used)

Network setting


1/2

select

Connection test

Succeeded


IP setting mode

Automatic


IP address

192.168.0.5


ok

Subnet mask

255.255.255.0


Default gateway

192.168.0.254


Manual setting

Select “IP setting mode” and set to “Manual”

Select the item and press OK

Check the specifications of the broadband router and enter each IP address.

Subnet mask

0

.

0 .

0 .

0


The acquired address is displayed.

Each IP address is acquired automatically.

or

change


channel


ok

Network

Select “DNS setting mode” and set to “Automatic”.

(When DNS automatic acquisition in DHCP can be used)

Network setting

1/2

select

Connection test

Succeeded


Default gateway

192.168.0.254


DNS setting mode

Automatic


Automatic

ok

Primary DNS

192.168.0.20

Secondary DNS

192.168.0.21


The acquired address is displayed.

Manual setting

Select “DNS setting mode” and set to “Manual”

Select the item and press OK

Enter each IP address as was specified by the provider.

Primary DNS

0

. 0 . 0 .

0

Setting

Each IP address is acquired automatically.

or

select

If you are using a broadband router, IP automatic


ok

acquisition in DHCP can be used under normal


circumstances. If you are not sure, check with the


person who installed the equipment, or check the


instructions for each device.


Advanced

Select “LAN speed setting” (Default is “Automatic”)


select

Network setting

2/2

LAN speed setting

Automatic


LAN speed

10BASE half duplex


Software update


adjust

MAC address

12-34-56-78-80-ab


Normally, select “Automatic”.

If “Connection test” failed, set the “LAN speed setting” to “manual” and then select “10BASE half duplex”, “10BASE duplex”, “100BASE half duplex” or “100 BASE duplex”.

Cannot be selected when the “LAN speed setting” is “Automatic”.

Changing the settings may make it impossible to connect some types of equipment.

Select “Software update”


Press OK to start the software update screen.


select

Follow directions of the screen.

Network setting

2/2


LAN speed setting

Automatic


* Set “Clock” first. (p. 18)

LAN speed

10BASE half duplex


Software update


ok


MAC address

12-34-56-78-80-ab


The network settings become effective when you close the menu and run “Connection test”.

45

Page 45
Image 45
Panasonic TC-P50G10, TC-P46G10, TC-P54G10 Select Connection test and press OK, Each IP address is acquired automatically

TC-P54G10, TC-P46G10, TC-P50G10 specifications

The Panasonic TC-P46G10, TC-P54G10, and TC-P50G10 are part of Panasonic's acclaimed G10 line of plasma televisions, celebrated for their vibrant image quality and advanced features. Released in the late 2000s, these models remain a popular choice among home theater enthusiasts for their impressive performance and value.

One of the most notable features of these models is their 1080p Full HD resolution, delivering stunning detail and clarity in every scene. With a pixel resolution of 1920 x 1080, these TVs provide an immersive viewing experience, making them perfect for watching high-definition movies or playing video games. The plasma technology used in these models offers deeper blacks and brighter colors compared to traditional LCD screens, resulting in a more dynamic and lifelike picture.

A key technological highlight of the G10 series is Panasonic's VIERA Image Viewer, which allows users to view photos and videos directly from an SD card or USB drive. This feature makes it easy to share memories with family and friends on the big screen. Additional picture-enhancing features, such as VIErA's Intelligent Scene Controller and 600Hz Sub-field Drive, help improve motion clarity by significantly reducing blur during fast-paced action scenes.

In terms of audio performance, these models are equipped with a built-in 2.1 channel sound system that delivers robust and clear audio. The integrated speakers, coupled with the TV’s audio processing technology, ensure that dialogues are crisp and soundtracks are rich, enhancing the overall viewing experience.

Connectivity options also play an important role in the appeal of the G10 series. These models come with multiple HDMI inputs, making it easy to connect various high-definition devices such as Blu-ray players, gaming consoles, and streaming devices. Additionally, they feature component and composite video inputs, ensuring compatibility with an array of media equipment.

Energy consumption has always been a consideration for consumers, and the G10 models boast improved energy efficiency, helping users reduce their environmental footprint while enjoying top-tier entertainment.

In conclusion, the Panasonic TC-P46G10, TC-P54G10, and TC-P50G10 TVs embody a combination of advanced technology, stunning visuals, and user-friendly features. Their exceptional picture quality, rich sound performance, and versatile connectivity options continue to appeal to those seeking a superior home theater experience.