Identifying Controls
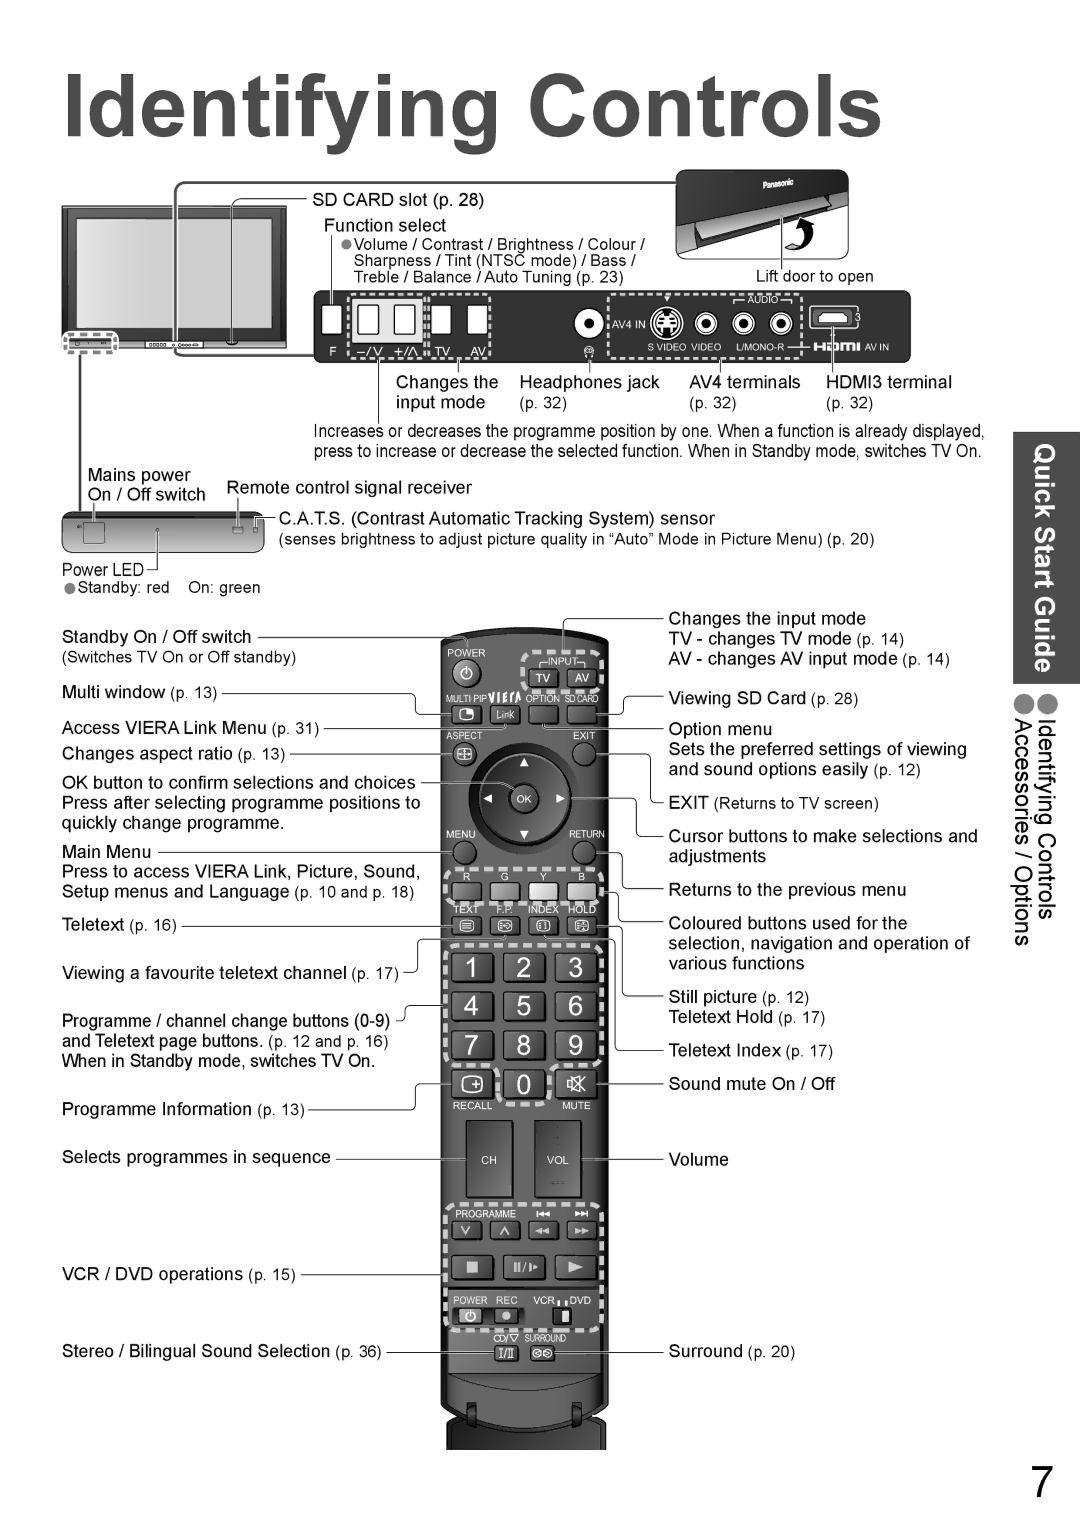
SD CARD slot (p. 28)
Function select |
|
|
Volume / Contrast / Brightness / Colour / |
|
|
•Sharpness / Tint (NTSC mode) / Bass / | Lift door to open | |
Treble / Balance / Auto Tuning (p. 23) | ||
| AUDIO |
|
AV4 IN |
|
|
S VIDEO VIDEO | AV IN | |
|
|
|
|
|
| Changes the | Headphones jack | AV4 terminals | HDMI3 terminal |
|
|
|
|
|
| input mode | (p. 32) | (p. 32) | (p. 32) |
|
|
|
|
|
| Increases or decreases the programme position by one. When a function is already displayed, | |||
| Mains power |
|
|
| press to increase or decrease the selected function. When in Standby mode, switches TV On. | ||||
| Remote control signal receiver |
|
|
| |||||
| On / Off switch |
|
|
| |||||
|
|
|
|
|
| C.A.T.S. (Contrast Automatic Tracking System) sensor |
| ||
|
|
|
| ||||||
|
|
|
|
|
|
| |||
|
|
|
|
|
| (senses brightness to adjust picture quality in “Auto” Mode in Picture Menu) (p. 20) | |||
Power LED |
|
|
|
|
|
|
| ||
•Standby: red On: green |
|
|
| ||||||
Quick Start
Standby On / Off switch
(Switches TV On or Off standby) | POWER | INPUT |
|
| |
Multi window (p. 13) | MULTI PIP | OPTION SD CARD |
Access VIERA Link Menu (p. 31) | ASPECT | EXIT |
Changes aspect ratio (p. 13) ![]()
![]()
OK button to confirm selections and choices![]() Press after selecting programme positions to
Press after selecting programme positions to ![]()
![]() quickly change programme.
quickly change programme.
RETURN
Main Menu |
| |
Press to access VIERA Link, Picture, Sound, | R G Y B | |
Setup menus and Language (p. 10 and p. 18) | F.P. | |
Teletext (p. 16) | ||
|
Viewing a favourite teletext channel (p. 17)
Programme / channel change buttons
Programme Information (p. 13) | RECALL | MUTE |
| ||
Selects programmes in sequence | CH | VOL |
VCR / DVD operations (p. 15)
POWER REC
Changes the input mode TV - changes TV mode (p. 14)
AV - changes AV input mode (p. 14)
Viewing SD Card (p. 28)
Option menu
Sets the preferred settings of viewing and sound options easily (p. 12)
EXIT (Returns to TV screen)
Cursor buttons to make selections and adjustments
Returns to the previous menu
Coloured buttons used for the selection, navigation and operation of various functions
Still picture (p. 12)
Teletext Hold (p. 17)
Teletext Index (p. 17)
Sound mute On / Off
Volume
Guide •Identifying Controls Accessories / Options
Stereo / Bilingual Sound Selection (p. 36)
SURROUND
Surround (p. 20)
7