RS485 SETUP

Use the following procedure to configure the RS485 setup when you want to use the system controller to control the camera (pan, tilt, etc.) via the camera's data port.

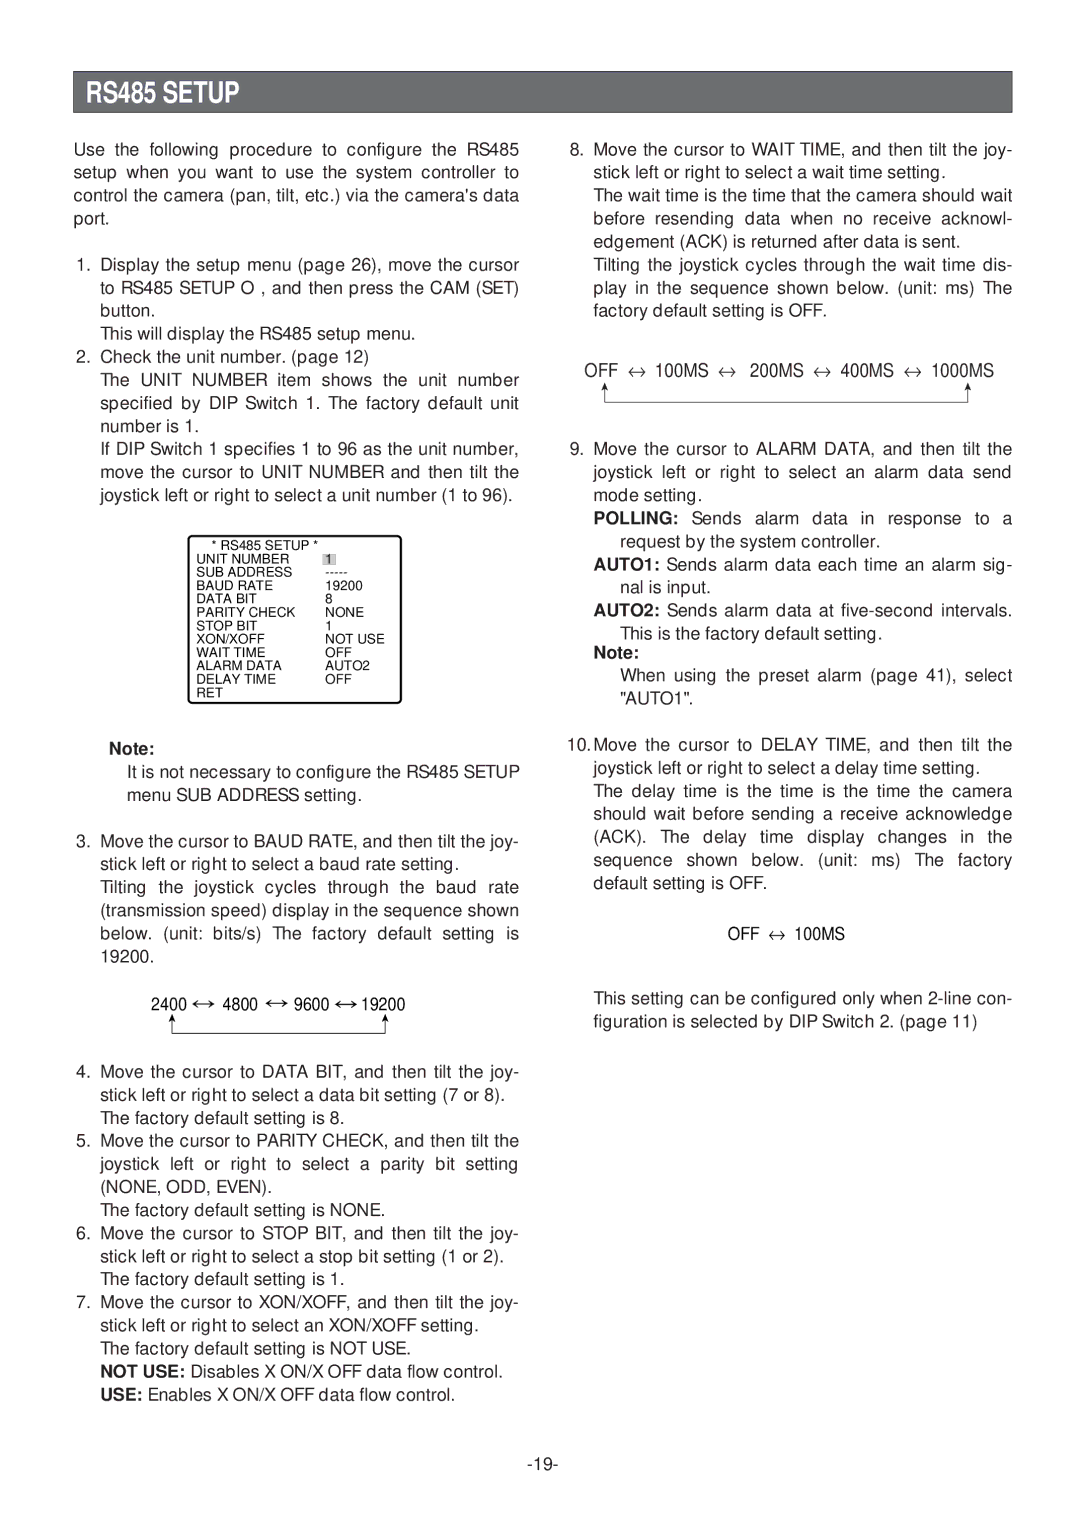
1.Display the setup menu (page 26), move the cursor to RS485 SETUP O, and then press the CAM (SET) button.

This will display the RS485 setup menu.

2.Check the unit number. (page 12)

The UNIT NUMBER item shows the unit number specified by DIP Switch 1. The factory default unit number is 1.

If DIP Switch 1 specifies 1 to 96 as the unit number, move the cursor to UNIT NUMBER and then tilt the joystick left or right to select a unit number (1 to 96).

* RS485 SETUP *

UNIT NUMBER

1


SUB ADDRESS

-----

BAUD RATE

19200

DATA BIT

8


PARITY CHECK

NONE

STOP BIT

1


XON/XOFF

NOT USE

WAIT TIME

OFF

ALARM DATA

AUTO2

DELAY TIME

OFF

RET


Note:

It is not necessary to configure the RS485 SETUP menu SUB ADDRESS setting.

3.Move the cursor to BAUD RATE, and then tilt the joy- stick left or right to select a baud rate setting.

Tilting the joystick cycles through the baud rate (transmission speed) display in the sequence shown below. (unit: bits/s) The factory default setting is 19200.

2400 4800 9600 19200

4.Move the cursor to DATA BIT, and then tilt the joy- stick left or right to select a data bit setting (7 or 8). The factory default setting is 8.

5.Move the cursor to PARITY CHECK, and then tilt the joystick left or right to select a parity bit setting (NONE, ODD, EVEN).

The factory default setting is NONE.

6.Move the cursor to STOP BIT, and then tilt the joy- stick left or right to select a stop bit setting (1 or 2). The factory default setting is 1.

7.Move the cursor to XON/XOFF, and then tilt the joy- stick left or right to select an XON/XOFF setting.

The factory default setting is NOT USE.

NOT USE: Disables X ON/X OFF data flow control.

USE: Enables X ON/X OFF data flow control.

8.Move the cursor to WAIT TIME, and then tilt the joy- stick left or right to select a wait time setting.

The wait time is the time that the camera should wait before resending data when no receive acknowl- edgement (ACK) is returned after data is sent.

Tilting the joystick cycles through the wait time dis- play in the sequence shown below. (unit: ms) The factory default setting is OFF.

OFF 100MS 200MS 400MS 1000MS

9.Move the cursor to ALARM DATA, and then tilt the joystick left or right to select an alarm data send mode setting.

POLLING: Sends alarm data in response to a request by the system controller.

AUTO1: Sends alarm data each time an alarm sig- nal is input.

AUTO2: Sends alarm data at five-second intervals. This is the factory default setting.

Note:

When using the preset alarm (page 41), select "AUTO1".

10.Move the cursor to DELAY TIME, and then tilt the joystick left or right to select a delay time setting. The delay time is the time is the time the camera should wait before sending a receive acknowledge (ACK). The delay time display changes in the sequence shown below. (unit: ms) The factory default setting is OFF.

OFF 100MS

This setting can be configured only when 2-line con- figuration is selected by DIP Switch 2. (page 11)

-19-

Page 19
Image 19
Panasonic WV-CS574 operating instructions RS485 Setup, OFF ↔ 100MS ↔ 200MS ↔ 400MS ↔ 1000MS

WV-CS574 specifications

The Panasonic WV-CS574 is a sophisticated surveillance camera renowned for its advanced features and versatile technologies designed to enhance security applications. This camera is particularly well-suited for both indoor and outdoor use, making it a popular choice for monitoring public spaces, commercial properties, and other critical areas.

One of the standout features of the WV-CS574 is its exquisite image quality. Equipped with a high-resolution 1/4-inch CCD sensor, the camera delivers clear and crisp images at a resolution of 480 TV lines. This ensures that even in challenging lighting conditions, the camera can maintain its performance, providing reliable surveillance footage for security personnel.

The WV-CS574 incorporates a powerful 18x optical zoom lens combined with a 12x digital zoom, allowing for detailed close-ups of objects or individuals that may be far from the camera. This flexibility is crucial for identifying faces and license plates from a considerable distance. The camera also supports automatic focus, which simplifies the process of capturing sharp images, minimizing the chances of blurry footage.

Panasonic ensures that the WV-CS574 can adapt to a variety of environmental conditions through features like automatic backlight compensation and digital noise reduction. These technologies work together to optimize the camera's performance in varying light situations, whether it’s bright sunlight or dimly lit areas. Additionally, the camera’s wide dynamic range (WDR) capability helps balance the exposure levels in scenes with both bright and dark areas, resulting in clear images without loss of detail.

The WV-CS574 is designed with ease of use in mind, featuring a user-friendly interface that simplifies configuration and operation. Its pan-tilt-zoom (PTZ) capabilities offer a comprehensive monitoring solution, allowing operators to remotely control the camera's movement for real-time surveillance. The camera can pan 360 degrees and tilt 90 degrees, providing extensive coverage of the monitored area.

Moreover, the Panasonic WV-CS574 is built to withstand harsh environments, with an IP66 rating for weather resistance. This makes it suitable for outdoor installations where exposure to rain, dust, and extreme temperatures is a concern.

The camera supports various video formats, ensuring compatibility with different surveillance systems. Additionally, features like alarm inputs and outputs facilitate integration with other security devices, enhancing overall monitoring capabilities. With its combination of high-quality imaging, robust design, and versatile functionality, the Panasonic WV-CS574 stands out as an exceptional choice for any surveillance needs.