Scanning Functions
Operation of the scanning functions depends on the kind of receiver or pan/tilt mechanism you have and the operating mode of your keyboard (CM6700 or Direct Mode).
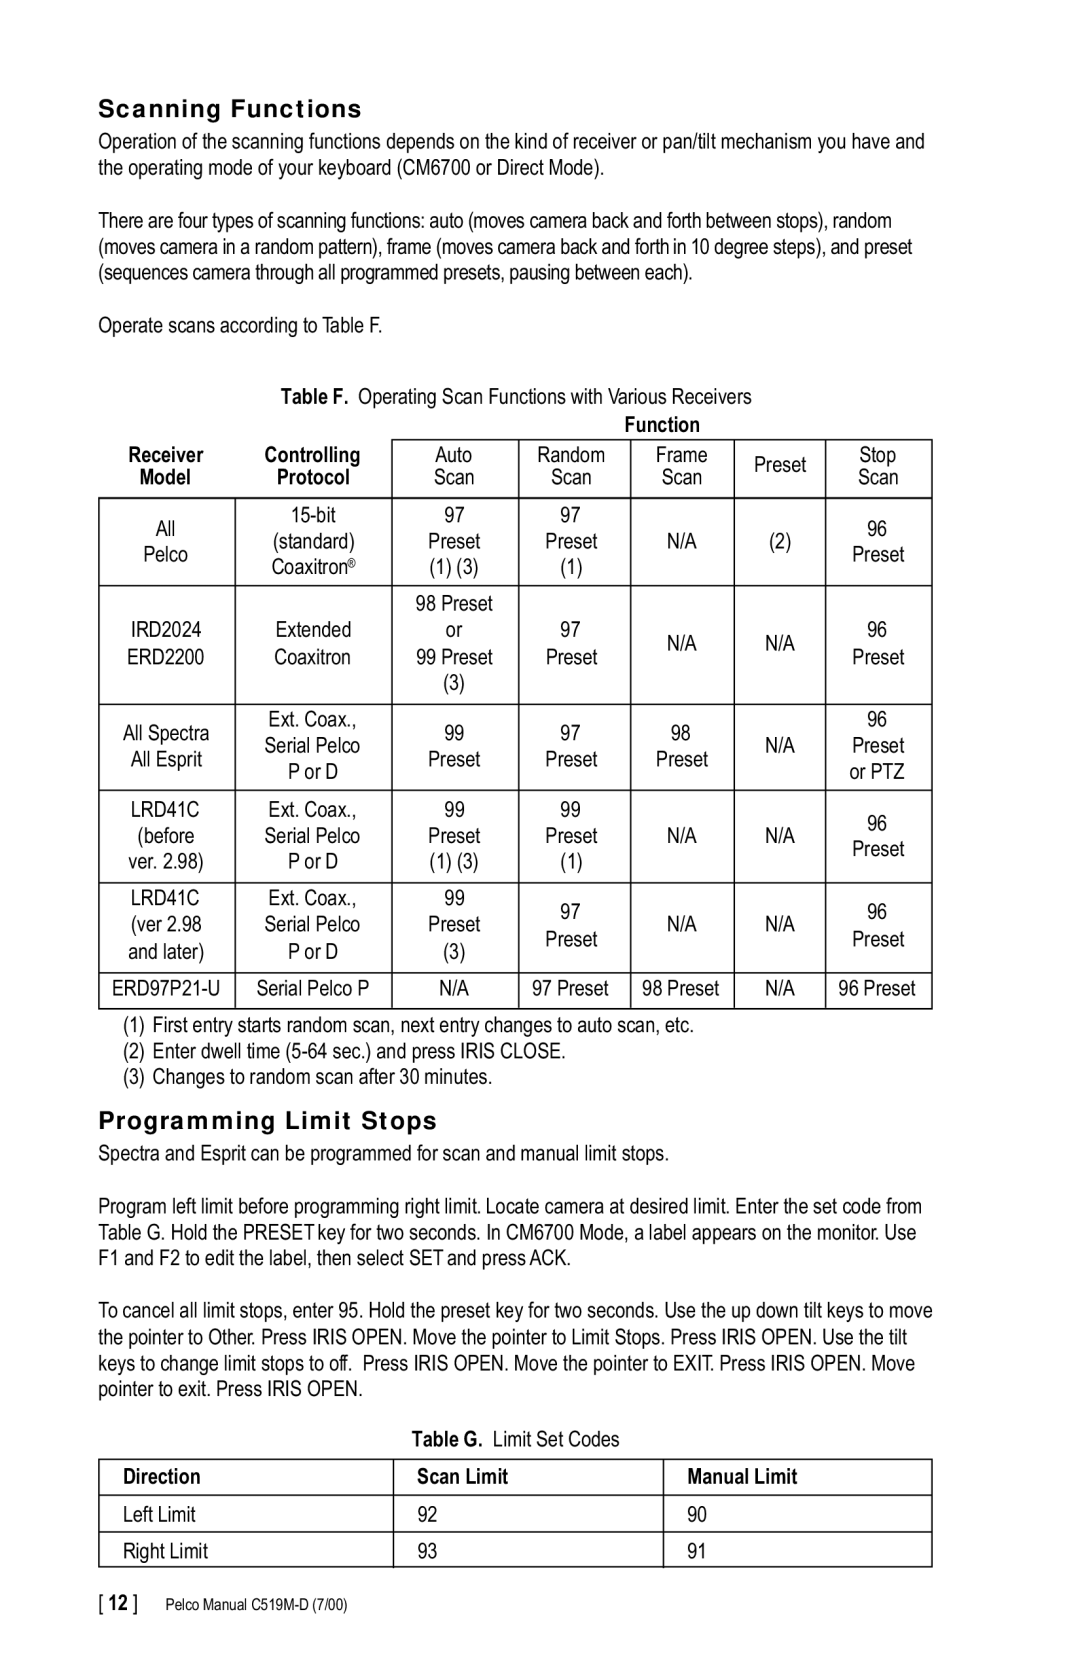
There are four types of scanning functions: auto (moves camera back and forth between stops), random (moves camera in a random pattern), frame (moves camera back and forth in 10 degree steps), and preset (sequences camera through all programmed presets, pausing between each).
Operate scans according to Table F.
| Table F. Operating Scan Functions with Various Receivers |
|
| |||||
|
|
|
| Function |
|
| ||
Receiver | Controlling | Auto | Random |
| Frame |
| Preset | Stop |
Model | Protocol | Scan | Scan |
| Scan |
| Scan | |
|
|
| ||||||
|
|
|
|
|
|
|
|
|
All | 97 | 97 |
|
|
|
| 96 | |
(standard) | Preset | Preset |
| N/A |
| (2) | ||
Pelco |
|
| Preset | |||||
Coaxitron¨ | (1) (3) | (1) |
|
|
|
| ||
|
|
|
|
|
| |||
|
| 98 Preset |
|
|
|
|
|
|
IRD2024 | Extended | or | 97 |
| N/A |
| N/A | 96 |
ERD2200 | Coaxitron | 99 Preset | Preset |
|
| Preset | ||
|
|
|
| |||||
|
| (3) |
|
|
|
|
|
|
|
|
|
|
|
|
|
|
|
All Spectra | Ext. Coax., | 99 | 97 |
| 98 |
|
| 96 |
Serial Pelco |
|
| N/A | Preset | ||||
All Esprit | Preset | Preset |
| Preset |
| |||
P or D |
|
|
| or PTZ | ||||
|
|
|
|
|
|
| ||
|
|
|
|
|
|
|
|
|
LRD41C | Ext. Coax., | 99 | 99 |
|
|
|
| 96 |
(before | Serial Pelco | Preset | Preset |
| N/A |
| N/A | |
|
| Preset | ||||||
ver. 2.98) | P or D | (1) (3) | (1) |
|
|
|
| |
|
|
|
|
| ||||
|
|
|
|
|
|
|
|
|
LRD41C | Ext. Coax., | 99 | 97 |
|
|
|
| 96 |
(ver 2.98 | Serial Pelco | Preset |
| N/A |
| N/A | ||
Preset |
|
| Preset | |||||
and later) | P or D | (3) |
|
|
|
| ||
|
|
|
|
|
| |||
|
|
|
|
|
|
|
|
|
Serial Pelco P | N/A | 97 Preset |
| 98 Preset |
| N/A | 96 Preset | |
|
|
|
|
|
|
|
|
|
(1)First entry starts random scan, next entry changes to auto scan, etc.
(2)Enter dwell time
(3)Changes to random scan after 30 minutes.
Programming Limit Stops
Spectra and Esprit can be programmed for scan and manual limit stops.
Program left limit before programming right limit. Locate camera at desired limit. Enter the set code from Table G. Hold the PRESET key for two seconds. In CM6700 Mode, a label appears on the monitor. Use F1 and F2 to edit the label, then select SET and press ACK.
To cancel all limit stops, enter 95. Hold the preset key for two seconds. Use the up down tilt keys to move the pointer to Other. Press IRIS OPEN. Move the pointer to Limit Stops. Press IRIS OPEN. Use the tilt keys to change limit stops to off. Press IRIS OPEN. Move the pointer to EXIT. Press IRIS OPEN. Move pointer to exit. Press IRIS OPEN.
Table G. Limit Set Codes
Direction | Scan Limit | Manual Limit |
|
|
|
Left Limit | 92 | 90 |
|
|
|
Right Limit | 93 | 91 |
|
|
|
[ 12 ] Pelco Manual