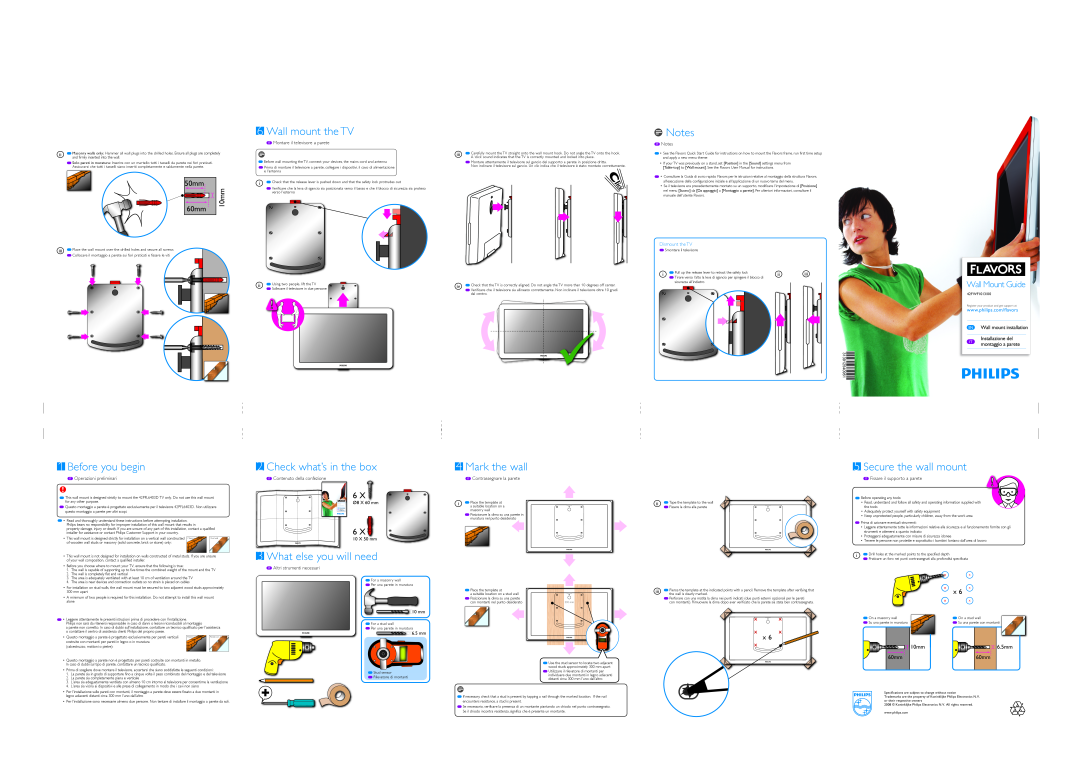
ii![]() Masonry walls only: Hammer all wall plugs into the drilled holes. Ensure all plugs are completely and firmly inserted into the wall.
Masonry walls only: Hammer all wall plugs into the drilled holes. Ensure all plugs are completely and firmly inserted into the wall.
![]() Solo pareti in muratura: Inserire con un martello tutti i tasselli da parete nei fori praticati. Assicurarsi che tutti i tasselli siano inseriti completamente e saldamente nella parete.
Solo pareti in muratura: Inserire con un martello tutti i tasselli da parete nei fori praticati. Assicurarsi che tutti i tasselli siano inseriti completamente e saldamente nella parete.
50mm | 10mm | |
60mm | ||
|
iii![]() Place the wall mount over the drilled holes and secure all screws
Place the wall mount over the drilled holes and secure all screws
![]() Collocare il montaggio a parete sui fori praticati e fissare le viti
Collocare il montaggio a parete sui fori praticati e fissare le viti
6 Wall mount the TV
IT Montare il televisore a parete
![]() Before wall mounting the TV, connect your devices, the mains cord and antenna Prima di montare il televisore a parete, collegare i dispositivi, il cavo di alimentazione
Before wall mounting the TV, connect your devices, the mains cord and antenna Prima di montare il televisore a parete, collegare i dispositivi, il cavo di alimentazione
el'antenna
i![]() Check that the release lever is pushed down and that the safety lock protrudes out
Check that the release lever is pushed down and that the safety lock protrudes out
![]() Verificare che la leva di sgancio sia posizionata verso il basso e che il blocco di sicurezza sia proteso verso l'esterno
Verificare che la leva di sgancio sia posizionata verso il basso e che il blocco di sicurezza sia proteso verso l'esterno
ii | Using two people, lift the TV |
| Sollevare il televisore in due persone |
iii![]() Carefully mount the TV straight onto the wall mount hook. Do not angle the TV onto the hook. A ‘click’ sound indicates that the TV is correctly mounted and locked into place.
Carefully mount the TV straight onto the wall mount hook. Do not angle the TV onto the hook. A ‘click’ sound indicates that the TV is correctly mounted and locked into place.
![]() Montare attentamente il televisore sul gancio del supporto a parete in posizione dritta.
Montare attentamente il televisore sul gancio del supporto a parete in posizione dritta.
Non inclinare il televisore sul gancio. Un clic indica che il televisore è stato montato correttamente.
iv![]() Check that the TV is correctly aligned. Do not angle the TV more than 10 degrees off center.
Check that the TV is correctly aligned. Do not angle the TV more than 10 degrees off center.
![]() Verificare che il televisore sia allineato correttamente. Non inclinare il televisore oltre 10 gradi dal centro.
Verificare che il televisore sia allineato correttamente. Non inclinare il televisore oltre 10 gradi dal centro.
Notes
IT Notes
![]() • See the Flavors Quick Start Guide for instructions on how to mount the Flavors frame, run first time setup and apply a new menu theme
• See the Flavors Quick Start Guide for instructions on how to mount the Flavors frame, run first time setup and apply a new menu theme
•If your TV was previously on a stand, set [Position] in the [Sound] settings menu from
![]() • Consultare la Guida di avvio rapido Flavors per le istruzioni relative al montaggio della struttura Flavors, all'esecuzione della configurazione iniziale e all'applicazione di un nuovo tema del menu.
• Consultare la Guida di avvio rapido Flavors per le istruzioni relative al montaggio della struttura Flavors, all'esecuzione della configurazione iniziale e all'applicazione di un nuovo tema del menu.
•Se il televisore era precedentemente montato su un supporto, modificare l'impostazione di [Posizione] nel menu [Suono] da [Da appoggio] a [Montaggio a parete]. Per ulteriori informazioni, consultare il manuale dell'utente Flavors.
| Dismount the TV |
|
| ||
| Smontare il televisore |
|
| |
i | Pull up the release lever to retract the safety lock | ii | iii | |
Tirare verso l'alto la leva di sgancio per spingere il blocco di | ||||
|
|
| ||
sicurezza all'indietro
Wall Mount Guide | ||
42FWF1013/00 | ||
Register your product and get suppor t at | ||
| www.philips.com/flavors | ||
EN | Wall mount installation | |
IT | Installazione del | |
| montaggio a parete | ||
| ||
1 Before you begin
2 Check what’s in the box
4 Mark the wall
5 Secure the wall mount |
IT Operazioni preliminari
![]() This wall mount is designed strictly to mount the 42PFL6403D TV only. Do not use this wall mount for any other purpose.
This wall mount is designed strictly to mount the 42PFL6403D TV only. Do not use this wall mount for any other purpose.
![]() Questo montaggio a parete è progettato esclusivamente per il televisore 42PFL6403D. Non utilizzare questo montaggio a parete per altri scopi.
Questo montaggio a parete è progettato esclusivamente per il televisore 42PFL6403D. Non utilizzare questo montaggio a parete per altri scopi.
![]() • Read and thoroughly understand these instructions before attempting installation. Philips bears no responsibility for improper installation of this wall mount that results in
• Read and thoroughly understand these instructions before attempting installation. Philips bears no responsibility for improper installation of this wall mount that results in
property damage, injury or death. If you are unsure of any part of this installation, contact a qualified installer for assistance or contact Philips Customer Support in your country.
• This wall mount is designed strictly for installation on a vertical wall constructed | Masonry wall | Stud wall |
of wooden wall studs or masonry (solid concrete, brick or stone) only: |
|
|
IT Contenuto della confezione
Wall Mount Guide |
www.philips.com/flavors |
Wall mount installation |
Installazione del |
montaggio a parete |
6 X![]()
![]()
Ø8 X 60 mm
6 X ![]()
10 X 50 mm
IT Contrassegnare la parete
i![]() Place the template at a suitable location on a masonry wall
Place the template at a suitable location on a masonry wall
![]() Posizionare la dima su una parete in muratura nel punto desiderato
Posizionare la dima su una parete in muratura nel punto desiderato
|
| IT Fissare il supporto a parete |
ii |
| Before operating any tools: |
Tape the template to the wall | • Read, understand and follow all safety and operating information supplied with | |
| Fissare la dima alla parete | the tools |
|
| • Adequately protect yourself with safety equipment |
|
| • Keep unprotected people, particularly children, away from the work area |
|
| Prima di azionare eventuali strumenti: |
|
| • Leggere attentamente tutte le informazioni relative alla sicurezza e al funzionamento fornite con gli |
|
| strumenti e attenersi a quanto indicato |
|
| • Proteggersi adeguatamente con misure di sicurezza idonee |
|
| • Tenere le persone non protette e soprattutto i bambini lontano dall'area di lavoro |
•This wall mount is not designed for installation on walls constructed of metal studs. If you are unsure of your wall composition, contact a qualified installer.
•Before you choose where to mount your TV, ensure that the following is true:
1.The wall is capable of supporting up to five times the combined weight of the mount and the TV
2.The wall is completely flat and vertical
3.The area is adequately ventilated with at least 10 cm of ventilation around the TV
4.The area is near devices and connection outlets so no strain is placed on cables
•For installation on stud walls, the wall mount must be secured to two adjacent wood studs approximately
300mm apart
•A minimum of two people is required for this installation. Do not attempt to install this wall mount alone
![]() • Leggere attentamente le presenti istruzioni prima di procedere con l'installazione.
• Leggere attentamente le presenti istruzioni prima di procedere con l'installazione.
Philips non sarà da ritenersi responsabile in caso di danni o lesioni riconducibili al montaggio
a parete non corretto. In caso di dubbi sull'installazione, contattare un tecnico qualificato per l'assistenza o contattare il centro di assistenza clienti Philips del proprio paese.
• Questo montaggio a parete è progettato esclusivamente per pareti verticali | Parete in muratura | Parete con montanti |
costruite con montanti per pareti in legno o in muratura |
|
|
(calcestruzzo, mattoni o pietre): |
|
|
•Questo montaggio a parete non è progettato per pareti costruite con montanti in metallo. In caso di dubbi sul tipo di parete, contattare un tecnico qualificato.
•Prima di scegliere dove montare il televisore, accertarsi che siano soddisfatte le seguenti condizioni:
1.La parete sia in grado di supportare fino a cinque volte il peso combinato del montaggio e del televisore
2.La parete sia completamente piana e verticale
3.L'area sia adeguatamente ventilata con almeno 10 cm intorno al televisore per consentirne la ventilazione
4.L'area sia vicina ai dispositivi e alle prese di collegamento in modo che i cavi non siano
•Per l'installazione sulle pareti con montanti, il montaggio a parete deve essere fissato a due montanti in legno adiacenti distanti circa 300 mm l'uno dall'altro
•Per l'installazione sono necessarie almeno due persone. Non tentare di installare il montaggio a parete da soli.
3 What else you will need
IT Altri strumenti necessari
![]() For a masonry wall
For a masonry wall
![]() Per una parete in muratura
Per una parete in muratura
![]()
![]()
![]()
![]() 10 mm
10 mm
![]() For a stud wall
For a stud wall
![]() Per una parete in muratura
Per una parete in muratura
![]() 6.5 mm
6.5 mm
![]() Stud sensor
Stud sensor
![]() Rilevatore di montanti
Rilevatore di montanti
i | Drill holes at the marked points to the specified depth |
| Praticare un foro nei punti contrassegnati alla profondità specificata |
Place the template at |
| iii | Pierce the template at the indicated points with a pencil. Remove the template after verifying that | x 6 | |||
a suitable location on a stud wall |
| the wall is clearly marked. | |||||
Posizionare la dima su una parete |
|
| Perforare con una matita la dima nei punti indicati (due punti esterni opzionali per le pareti |
| |||
con montanti nel punto desiderato | 300 mm |
| con montanti). Rimuovere la dima dopo aver verificato che la parete sia stata ben contrassegnata. |
| |||
|
|
|
|
|
|
|
|
|
|
|
|
|
|
|
|
|
|
|
|
|
|
|
|
On a masonry wall | On a stud wall |
Su una parete in muratura | Su una parete con montanti |
| x 6 |
|
| 10mm | 6.5mm |
Use the stud sensor to locate two adjacent | 60mm | 60mm |
|
| |
wood studs approximately 300 mm apart |
|
|
Utilizzare il rilevatore di montanti per |
|
|
individuare due montanti in legno adiacenti |
|
|
distanti circa 300 mm l'uno dall'altro |
|
|
If necessary, check that a stud is present by tapping a nail through the marked location. If the nail | Specifications are subject to change without notice |
|
Trademarks are the property of Koninklijke Philips Electronics N.V. | ||
encounters resistance, a stud is present. | or their respective owners |
|
Se necessario, verificare la presenza di un montante piantando un chiodo nel punto contrassegnato. | 2008 © Koninklijke Philips Electronics N.V. All rights reserved. |
|
|
| |
Se il chiodo incontra resistenza, significa che è presente un montante. | www.philips.com |
|