User Manual BDL6531E
• ENABLE: Choose to enable or disable the TILING function. If enabled, the display will apply the settings in H MONITORS, V MONITORS, POSITION, and FRAME COMP.
Note: PIP function is disabled when TILING is enabled.
HEAT STATUS
This function allows you to check the thermal status of the display at any time. The accuracy of the temperature indicated is + 5 degrees.
Press the SET button to view the heat status. Press the EXIT button to return to the previous menu.
DATE AND TIME
Adjust current date and time for the display’s internal clock.
Press the PLUS button to open the submenu. Press the UP/DOWN button to toggle between the YEAR, MONTH, DAY, HOUR, MINUTE, and DAYLIGHT SAVING TIME settings, and then press the PLUS/MINUS button to adjust.
SCHEDULE
Note: We recommend setting up current date and time in DATE AND TIME before using the SCHEDULE function.
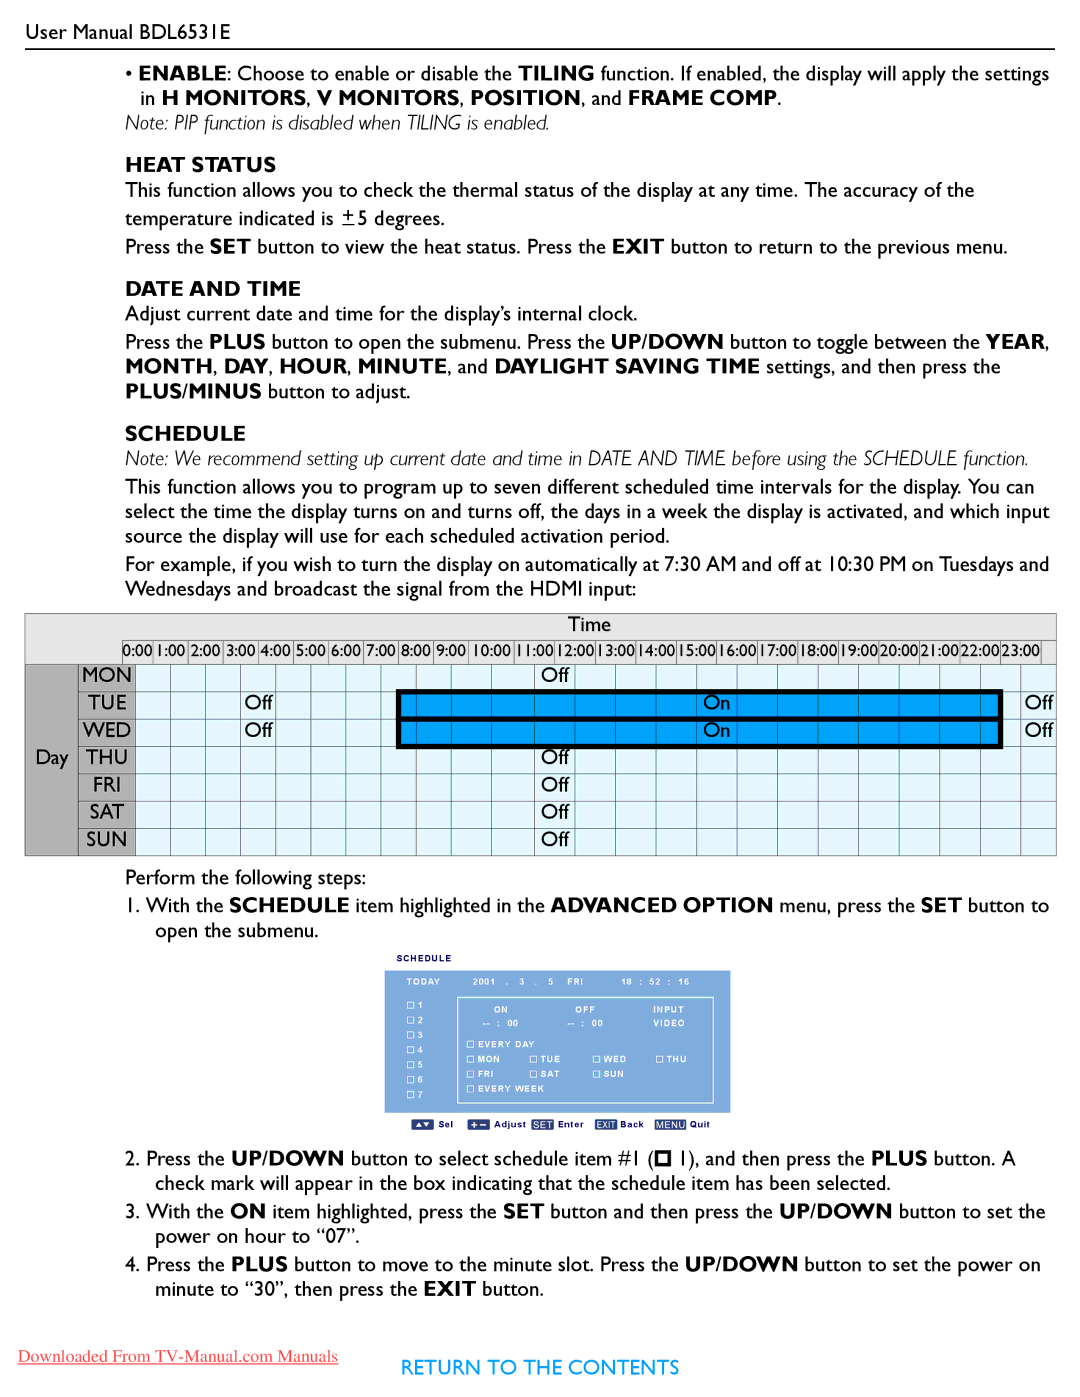
This function allows you to program up to seven different scheduled time intervals for the display. You can select the time the display turns on and turns off, the days in a week the display is activated, and which input source the display will use for each scheduled activation period.
For example, if you wish to turn the display on automatically at 7:30 AM and off at 10:30 PM on Tuesdays and Wednesdays and broadcast the signal from the HDMI input:
Time
0:00 1:00 2:00 3:00 4:00 5:00 6:00 7:00 8:00 9:00 10:00 11:0012:0013:0014:0015:0016:0017:0018:0019:0020:0021:0022:0023:00
MON |
| Off |
|
TUE | Off | On | Off |
WED | Off | On | Off |
Day THU |
| Off |
|
FRI |
| Off |
|
SAT |
| Off |
|
SUN |
| Off |
|
Perform the following steps:
1.With the SCHEDULE item highlighted in the ADVANCED OPTION menu, press the SET button to open the submenu.
SCHEDULE
TODAY
![]()
![]() 1
1
![]()
![]() 2
2
![]()
![]() 3
3
![]()
![]() 4
4
![]()
![]() 5
5
![]() 6
6 ![]()
![]() 7
7
2001 | . 3 . 5 | FRI | 18 : | 52 : 16 |
ON | OFF | INPUT | ||
00 | 00 | VIDEO | ||
EVERY DAY |
|
|
| |
MON | TUE |
| WED | THU |
FRI | SAT |
| SUN |
|
![]()
![]() EVERY WEEK
EVERY WEEK
Sel |
|
|
|
|
| Adjust | Enter | Back | Quit |
|
|
| |||||||
|
|
| |||||||
|
|
|
|
| |||||
|
|
|
|
| |||||
|
|
|
|
|
|
|
|
|
|
2.Press the UP/DOWN button to select schedule item #1 (![]() 1), and then press the PLUS button. A check mark will appear in the box indicating that the schedule item has been selected.
1), and then press the PLUS button. A check mark will appear in the box indicating that the schedule item has been selected.
3.With the ON item highlighted, press the SET button and then press the UP/DOWN button to set the power on hour to “07”.
4.Press the PLUS button to move to the minute slot. Press the UP/DOWN button to set the power on minute to “30”, then press the EXIT button.
Downloaded From
RETURN TO THE CONTENTS
