Digital Video Disc Recorder
Precautions
Returning the enclosed card guar
Antees that your date of purchase
Entitled, including special money
Important Safety Instructions
Precautions cont’d
Installation Location
Avoid the Hazards of Electrical Shock and Fire
Moisture Condensation Warning
About Copyright
Maintenance
Dolby Digital Recording
Table of contents
Features
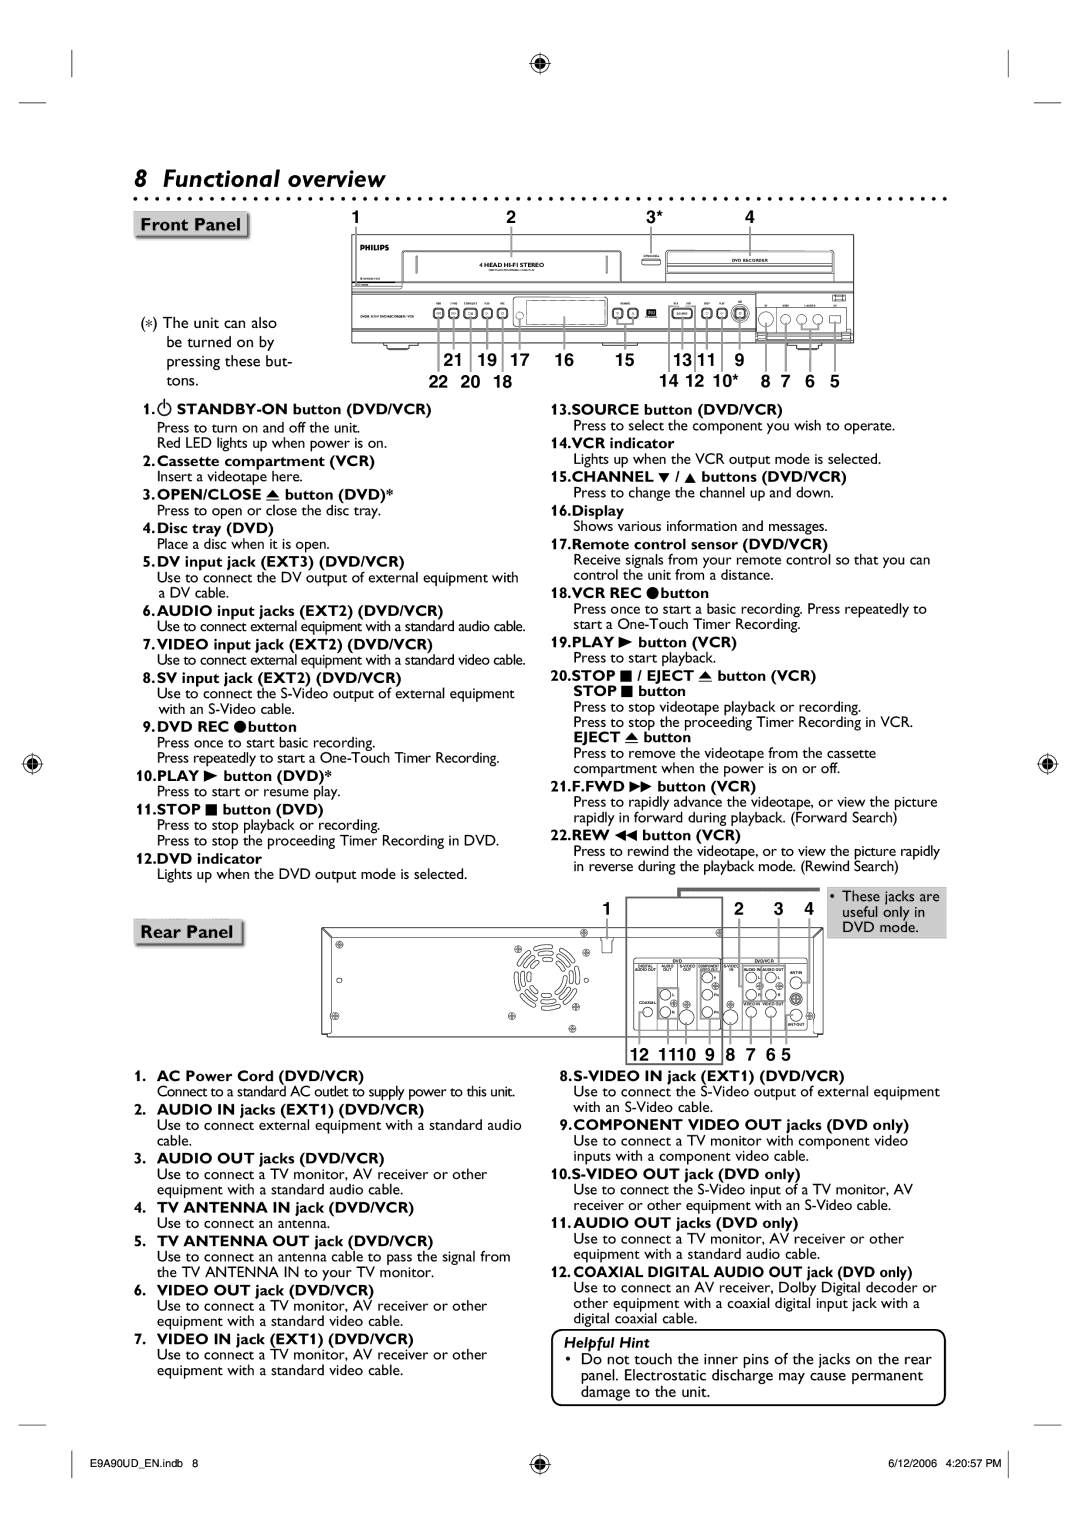
Functional overview
Front Panel
Unit can also be turned on by pressing these but- tons
Rear Panel
Remote Control
Functional overview cont’d
Installing batteries in the remote control
Using a remote control
VCR/DVD recorder switching
Keep in mind the following when using the remote control
Setup menus
Display menu
Press DVD first
Press VCR first
Press Display to display the On Screen display
Front Panel Display Guide
Basic Audio Good picture Method Better picture
Connection to a TV
Method
Connection to a TV cont’d
Connection to a cable box or satellite box
To set progressive scan mode, refer to
To select channels of the cable box or satellite box
Connection to an Audio System
Audio
Remote Control
Easy DVD recording
Instructions continue on the next
Select the input to which the unit is connected on your TV
Easy DVD recording cont’d
Stop the recording
Initial setting
Unit will start getting channels available in your area
Channel setting
Getting channels automatically
Channel setting cont’d
Press Setup Using K / L, select Channel. Press OK
Using K / L, select Manual Channel Preset. Press OK
Adding/deleting channels
Guide channel setting
Press Setup Using K / L, select Channel
Using K / L, select Guide Channel Setting Press OK
Remember
Using K / L, select a channel number. Press OK
SAP Secondary Audio Program
UsingStereoK / L, select Stereo or SAP. Press OK
Selecting the TV stereo or SAP
Setting the clock
Auto Clock Setting
Setting will be activated
Auto Clock Setting function will be canceled
Setting the clock cont’d
Manual Clock Setting
Setting the Daylight Saving Time
Press Setup Using K / L, select Clock. Press OK
Selecting the TV aspect ratio
If you have a standard TV
Recording mode
Information on DVD recording
Information
Recordable disc
Information on DVD recording cont’d
DVD+R Finalizing
Setting for Auto Chapter
Using K / L, select on or OFF. Press OK Press Setup to exit
Before recording
Replacing disc menu
Basic recording
Press
Press DVD first Press OPEN/CLOSE a
Press OPEN/CLOSE a to close the disc tray
Recording will start
One-touch Timer Recording
You cannot pause a One-touch Timer Recording
Timer Recording
Timer Recording cont’d
Timer Programming list will
Each error number means
Appear
Press Clear to erase the selected program
Hints for Timer Recording
Priority of overlapped settings
Timer recording using VCR Plus+ system
Using K / L, select a title to be overwritten. Press OK
Turn on the unit
Overwriting an existing title cont’d
Overwriting in the middle of the title
Hints for Overwriting
Video If you want to use SV input jack, select S-Video
Settings for an external source
Connection to an external source
Settings for an external source cont’d
Remote control, or Channel L / K on the front panel
Select a recording mode by pressing REC Mode
Recording from an external source
DV dubbing
Guide to DV and On-Screen Display
Using K / L, then press OK
Press Play B to find the point where you wish to begin
DV dubbing cont’d
DVC to DVD dubbing
To stop recording, press VCR then press Stop C
DVC to VCR dubbing
Hints for DV dubbing
Finalizing a disc
Setting a disc to protect
Playing the discs in other DVD players
Playing the discs in other DVD players cont’d
Finalizing is completed
Using K / L, select Disc Full or End of Timer Rec
Auto finalizing
Make sure
Dubbing Mode
Using K / L, select Dubbing Mode. Press OK
Dubbing Mode cont’d
Using K / L, select VCR DVD. Press OK
Press Setup to exit. Press DVD first
Using K / L, select DVD VCR. Press OK
Information on DVD play
Playable discs
Color systems
Region codes
Playback
Structure of disc contents
Basic playback
Press Stop C to stop playback
Using K / L, select a desired title. Press OK
Basic playback cont’d
Press OPEN/CLOSE a to open the disc tray
Press Play To start playback
Hints for MP3, Windows Media Audio and Jpeg files
When selecting the folder
Playing MP3, Windows Media Audio, Jpeg disc
Playing back a DivX
Basic playback contd
Hints
Playing discs using the disc menu
Playing discs using the title menu
Special playback
Pause
Resume play
Press Play B to resume play
Skipping TV commercials during play
During playback, press FFW D or REW E
During playback, press Commercial Skip
Press Commercial Skip once
Step by step playback
Special playback cont’d
Rapid play
Using K / L, select a desired zoom factor to zoom. Press OK
Using K / L / / B, select a desired zoom position. Press OK
Zoom
During playback, press Pause F. Then press FFW D or
Marker Setup
Using / B, select Press OK
Marker setup menu will appear
Later
Using Prev or Next
Using Display
Search
Title/Chapter search
Time search
Search cont’d
Track search
Repeat playback
Slide Show
Repeat/Random/Program playback/Slide Show cont’d
Program playback
DivX Subtitle
DivX
DivX VOD
Selecting the format of audio and video
Switching subtitles
Switching audio soundtrack
Switching virtual surround system
Selecting the format of audio and video cont’d
Virtual Surround menu will appear
Select Virtual Surround OFF in a case sound is distorted
Switching camera angles
Your setting will be activated
During playback, press DISPLAY. Display menu will appear
Menu will appear
Editing discs Setup menu
Information on disc editing
Guide to a title list
Editing discs
Using K / L, select Edit. Press OK. Edit menu will appear
Editing discs
Deleting titles
Press DVD first Press Title
Title list will appear Example DVD+RW/DVD-RW
Using K/ L, select Title Delete. Press OK
Editing discs contd
Editing discs cont’d
Putting names on titles
Follow steps 1 to 3 on page 73 to display the Edit menu
Character set
Setting chapter marks
Press Play B and then Pause F to decide the point
At which you will create a new chapter mark
It is convenient to use Prev or Next , REW E
Clearing chapter marks
Using K / L, select Current Chapter. Press OK
Using Prev or Next , Play B and Pause F
Using K / L, select Hidden. Press OK
Editing discs cont’d Hiding chapters
Setting pictures for thumbnails
Dividing a title
You can divide one title into two new titles
At which you will divide the title
FFW D for finding the point to be divided
Editing discs Setup menu
Using K / L, select Edit Disc Name. Press OK
Putting name on disc
Example DVD-RW
Setting disc to protect Press DVD first
Editing discs Setup menu cont’d
Setting or releasing disc protect
Editing discs Setup menu cont’d83
Erasing disc
Making edits compatible
Tour of the Setup menu
Setup Items highlight is the default Contents
Language setting
Language setting cont’d
Display setting
Display setting cont’d
Audio setting
Dynamic Range Control Default on
Audio setting cont’d
When playing disc with copyright protection
Video setting
Progressive Scan Default OFF
Using K / L, select Still Mode. Press OK
Using K / L, select a setting. Press OK
Settings for Parental lock level
Using K / L, select Parental Lock. Press OK
Using K / L, select the desired level. Press OK
Parental Lock Default All
Settings for Parental lock level cont’d
Settings for PBC Playback Control
Playback
Recording
Recording and One-touch Timer Recording cont’d
One-touch Timer Recording
Other operations
Index search
Troubleshooting
SET
Troubleshooting cont’d
Not work
Recording Error
Parental Lock On
100 RF output switch
Press TV/VIDEO on the remote control
Glossary
Select channel 3 on your TV
Language code
Language Code
Frequently Asked Questions
Specifications
Limited Warranty
This Limited Warranty does not cover
Meet Philips at the Internet
8239 300