|
|
|
|
|
|
|
|
|
|
|
|
| Connections | |||||||
|
|
|
|
|
|
|
|
|
|
|
|
|
|
|
|
|
|
|
|
|
| Step 3: Connecting speakers |
|
|
|
|
|
|
|
|
|
|
| ||||||||
|
| Step 4: Connecting the control | ||||||||||||||||||
|
|
| and subwoofer |
|
|
| cable | |||||||||||||
|
|
|
|
|
|
|
|
|
|
|
|
|
|
|
|
|
|
|
|
|
|
|
|
|
|
|
|
|
|
|
|
|
|
|
|
|
|
|
|
|
|
|
|
|
|
|
|
|
|
|
|
|
|
|
|
|
|
|
|
|
|
|
|
|
|
|
|
|
|
|
|
|
|
|
|
|
|
|
|
|
|
|
|
|
|
|
|
|
|
|
|
|
|
|
|
|
|
|
|
|
|
|
|
|
|
|
|
|
|
|
|
|
|
|
|
|
|
|
|
|
|
|
|
|
|
|
|
|
|
|
|
|
|
|
|
|
|
|
|
|
|
|
|
|
|
|
|
|
|
|
|
|
|
|
|
|
|
|
|
|
|
|
|
|
|
|
|
|
|
|
|
|
|
|
|
|
|
|
|
|
|
|
|
|
|
|
|
|
|
|
|
|
|
|
|
|
|
|
|
|
|
|
|
|
|
|
|
|
|
|
|
|
|
|
|
|
|
|
|
|
|
|
|
|
|
|
|
|
|
|
|
|
|
|
|
|
|
|
|
|
|
|
|
|
|
|
|
|
|
|
|
|
|
|
|
|
|
|
|
|
|
|
|
|
|
|
|
|
|
|
|
|
English
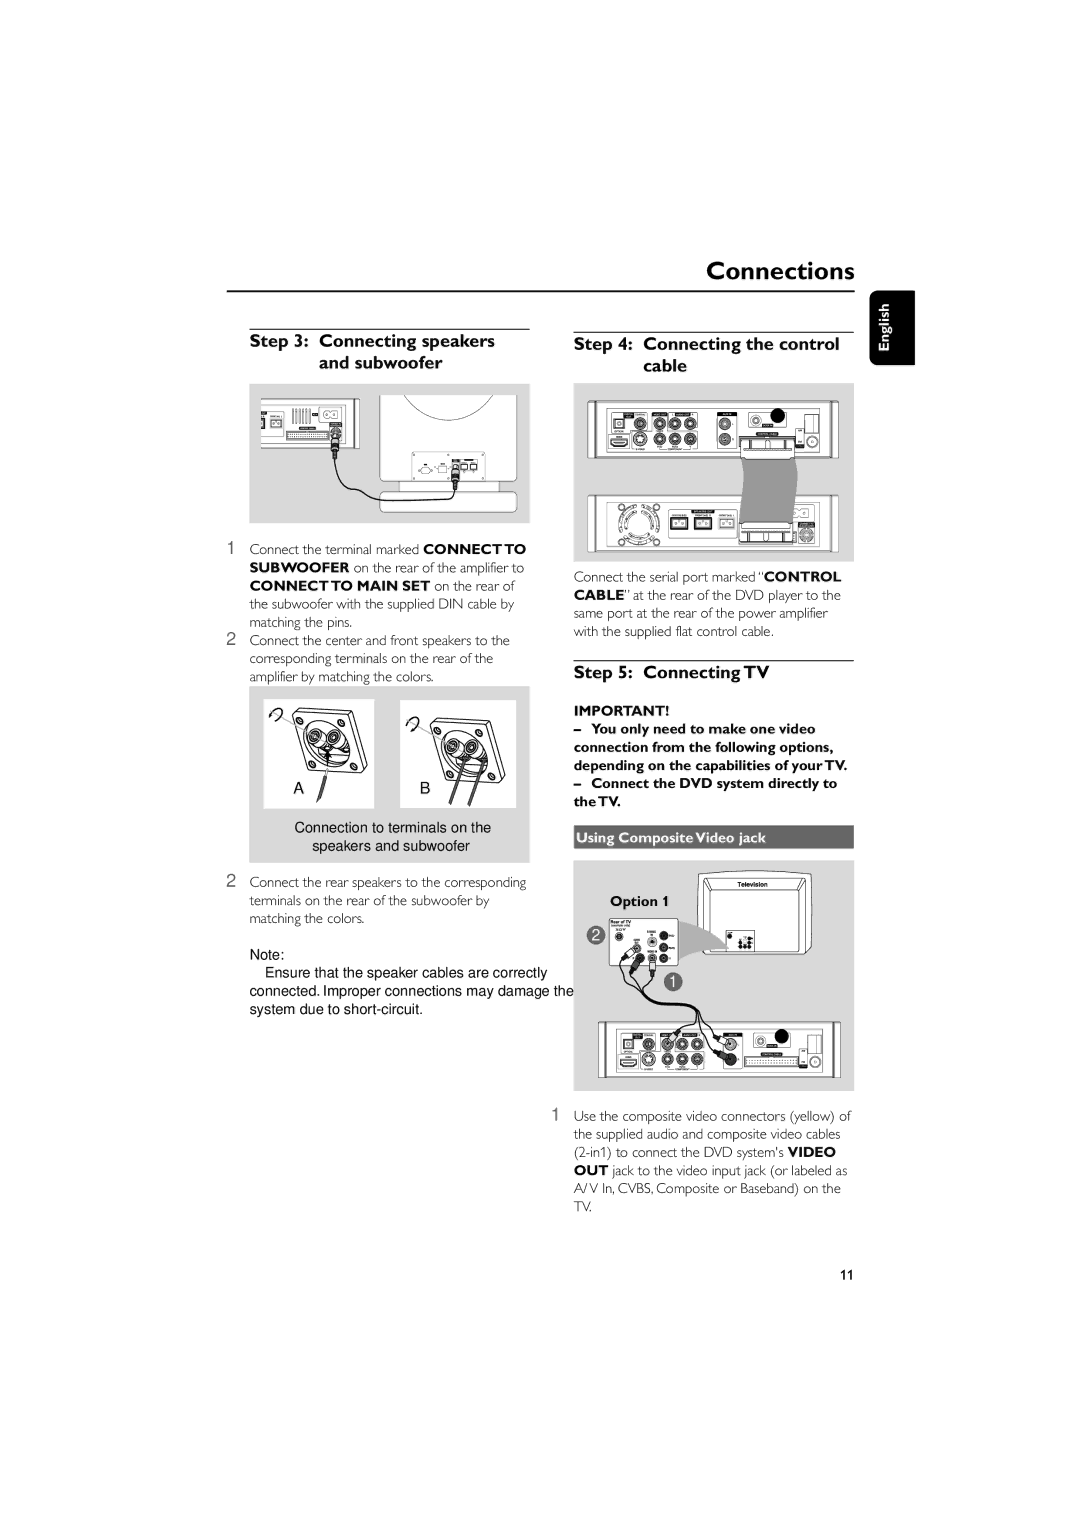
1Connect the terminal marked CONNECT TO SUBWOOFER on the rear of the amplifier to CONNECT TO MAIN SET on the rear of the subwoofer with the supplied DIN cable by
matching the pins.
2Connect the center and front speakers to the corresponding terminals on the rear of the amplifier by matching the colors.
A ![]() B
B
Connection to terminals on the
speakers and subwoofer
2Connect the rear speakers to the corresponding terminals on the rear of the subwoofer by matching the colors.
Note:
– Ensure that the speaker cables are correctly connected. Improper connections may damage the system due to
●Connect the serial port marked “CONTROL CABLE” at the rear of the DVD player to the same port at the rear of the power amplifier with the supplied flat control cable.
Step 5: Connecting TV
IMPORTANT!
–You only need to make one video
connection from the following options, depending on the capabilities of your TV.
–Connect the DVD system directly to the TV.
Using Composite Video jack
Option 1
2
1
1Use the composite video connectors (yellow) of the supplied audio and composite video cables
11
