CONNECTIONS

I


Compact

Disc Player


L?-Th


only)

JCD_

SYNCHRO

Recording

t


CD' DECK SYNCHRO

jack


cord


control cord


connection


cord


_

d REC PLAY I _Y" /

Io0oO_l


Stereo Amplifier

TAPE REC/PLAY jacks

Read through the operating instructions of the stereo compo- nents which you intend to connect to this unit.

Turn the power on only after making all the connections.

Make sure that all of the connection plugs are inserted secure-

ly, as improper connections may generate noise.

CONNECTING

THE RECORDING AND

I

I

PLAYBACK

CORDS

I

CONTROL OUT jack

NO TES:

Keep the input and output jacks connected between the ampli-

fier and this unit, otherwise, the CD•DECK SYNCHRO record- ing cannot be carried out.

Even when the CD player is connected to the amplifier with an optical fiber cable, connect the CD player to the amplifier or this unit with the input and output cords with pin plug.

PIONEER SYSTEM REMOTE CONTROL

(CT-W703RS/CT-W603RS only)

Left channel

(_

White

plug

Right channel

Red plug

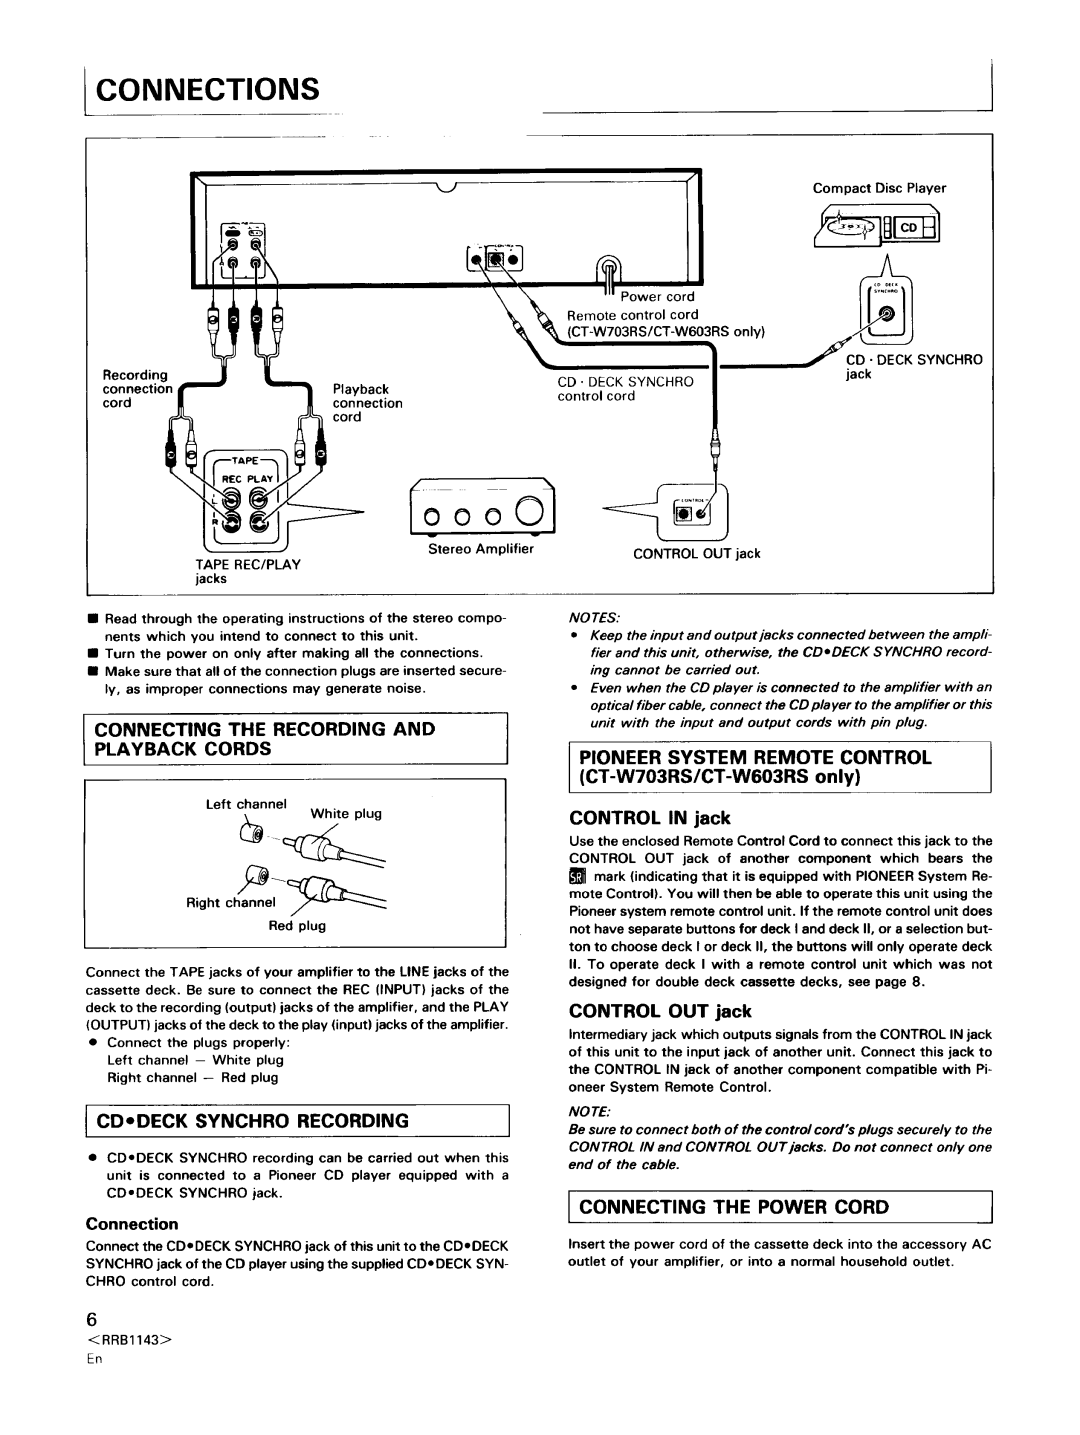
Connect the TAPE jacks of your amplifier to the LINE jacks of the cassette deck. Be sure to connect the REC (INPUT) jacks of the deck to the recording (output) jacks of the amplifier, and the PLAY (OUTPUT) jacks of the deck to the play (input) jacks of the amplifier.

Connect the plugs properly: Left channel -- White plug Right channel --Red plug

i CDoDECK SYNCHRO RECORDING

1

CDoDECK SYNCHRO recording can be carried out when this

unit is connected to a Pioneer CD player equipped with a

CDoDECK SYNCHRO jack.

CONTROL IN jack

Use the enclosed Remote Control Cord to connect this jack to the

CONTROL OUT jack of another component which bears the mark (indicating that it is equipped with PIONEER System Re-

mote Control). You will then be able to operate this unit using the Pioneer system remote control unit. If the remote control unit does not have separate buttons for deck I and deck II, or a selection but- ton to choose deck I or deck II, the buttons will only operate deck

I1. To operate deck I with a remote control unit which was not designed for double deck cassette decks, see page 8.

CONTROL OUT jack

Intermediary jack which outputs signals from the CONTROL IN jack of this unit to the input jack of another unit. Connect this jack to

the CONTROL IN jack of another component compatible with Pi- oneer System Remote Control.

NO TE:

Be sure to connect both of the control cord's plugs securely to the

CONTROL IN and CONTROL OUT jacks. Do not connect only one end of the cable.

Connection

Connect the CDoDECK SYNCHRO jack of this unit to the CDoDECK

SYNCHRO jack of the CD player using the supplied CDo DECK SYN- CHRO control cord.

I CONNECTING THE POWER CORD

I

Insert the power cord of the cassette deck into the accessory AC

outlet of your amplifier, or into a normal household outlet.

6

<RRB1143>

En

Page 6
Image 6
Pioneer CT-W803RS, CT-W603RS Connecting Recording Playback Cords, Pioneer System Remote Control, Connecting the Power Cord

CT-W603RS, CT-W803RS specifications

The Pioneer CT-W803RS and CT-W603RS cassette decks are celebrated models in the world of audio equipment, renowned for their exceptional sound quality and robust features tailored for audio enthusiasts. Both models represent Pioneer's commitment to high-fidelity sound reproduction, blending cutting-edge technology with user-friendly interfaces.

The CT-W803RS, the flagship of the duo, boasts advanced dual cassette recording capabilities, allowing users to effortlessly transfer music from one cassette to another while maintaining high audio fidelity. One of its standout features is the Double-Dolby system, which includes Dolby B and C noise reduction, significantly minimizing background noise and enhancing the overall listening experience. This model is also equipped with a high-quality quartz PLL (Phase-Locked Loop) digital control system, ensuring precise tape speed and playback accuracy.

Another significant feature of the CT-W803RS is its automatic tape selection function, which detects the type of cassette inserted—normal, chrome, or metal—and adjusts the playback settings accordingly. This automatic optimization ensures that listeners experience the best possible sound, regardless of the tape's formulation. The deck includes a built-in timer that enables users to record from various sources, making it ideal for preserving precious audio moments.

The CT-W603RS, while a step down from the 803 model, does not compromise on quality. It features similar noise reduction technology and automatic tape detection, delivering excellent sound fidelity and user comfort. The 603 model is designed with a compact form factor, making it an attractive choice for those who require high performance without the bulk.

Both models come with programmable features, allowing users to create custom playlists for audio enjoyment. They also support standard features like auto-reverse capability, making it easy to listen to both sides of a tape without interruptions.

In terms of connectivity, both cassette decks offer line-level inputs and outputs, ensuring compatibility with various audio systems. The design aesthetic of both models reflects Pioneer's quality with durable construction and sleek, intuitive controls.

In summary, the Pioneer CT-W803RS and CT-W603RS cassette decks exemplify the pinnacle of analog audio technology. With their advanced recording features, noise reduction systems, and automatic tape detection, they cater to a wide audience from casual listeners to serious audiophiles, making them worthy components in any audio setup.