DEH-P730 DEH-P630
Contents
English Español Deutsch Français Italiano Nederlands
To establish a safe level
Once you have established a comfortable sound level
Decibel Level Example
Key Finder
Head Unit
Steering Remote Controller for DEH-P730
Remote Controller for DEH-P630
About This Product
Before Using This Product
About the Demo Mode
About This Manual
When using the 50-Disc Type Multi-CD Player
Precaution
After-sales Service for Pioneer Products
7U.S.A
About the XM Ready Mark
Battery
Remote Controller and Care
Using the Steering Remote Controller for DEH-P730
Install the Lithium Battery
Replacing the Lithium Battery
Remove the lithium battery
Using the Remote Controller for DEH-P630
Replacing the Lithium Battery
Detaching the Front Panel
Detaching and Replacing the Front Panel
Theft Protection
Replacing the Front Panel
To Listen to Music
Remote Controller
Basic Operation
Head Unit
Raise or lower the volume
Rolling the Volume changes the volume level
Turn the source OFF
Play Time Indicator Track Search and Fast Forward/Reverse
Switching the Display
Track Number Indicator
Basic Operation of Built-in CD Player
Disc Loading Slot
Preset Tuning
Manual and Seek Tuning
Preset Number Indicator Band Indicator
Basic Operation of Tuner
Track Number Indicator Disc Number Indicator
Basic Operation of Multi-CD Player
This product can control a Multi-CD player sold separately
Corresponding Display Indications and Buttons
Entering the Function Menu
7Head Unit 7Steering Remote 7Remote 7Display Controller
Function Menu Functions
Operate a mode e.g. Repeat Play
Cancel the Function Menu
7Tuner
7Built-in CD Player
Entering the Detailed Setting Menu
Enter the Detailed Setting Menu
7Multi-CD Player
Detailed Setting Menu Functions
Operate a mode Cancel the Detailed Setting Menu
Best Stations Memory BSM
Local Seek Tuning Local
Tuner Operation
FM Local 1 Ô Local 2 Ô Local 3 Ô Local AM Local 1 Ô Local
Random Play RDM
Using the Built-in CD Player
Repeat Play RPT
Scan Play T.SCAN
Pause Pause
Disc Title Input Title
Pause pauses the currently playing track
Multi-CD player Repeat = One- track Repeat = Disc Repeat
Using Multi-CD Players
Repeat Play Pmode
Play range Display
Scan Play Scan
ITS Instant Track Selection
ITS Programming ITS
ITS Play ITS-P
Erase a Track Program
Erase a Disc Program
Select the desired character Type with button
Select letters, numbers Symbols with the 5/∞ buttons
Disc Title
Move the box left and right with the 2/3 buttons Overleaf
Selecting Discs by Disc Title List T.LIST
Play the selected disc with Button
Compression and DBE Comp
COMP/DBE ON/OFF Switching
Switch the Disc Title Display With the Display button
Displaying Disc Title
Title Scroll
Title Display Switching
CD Text Function for CD Text compatible type
Select the desired title display with the Display button
Select the desired Sfeq mode
Audio Adjustment
Setting the Sound Focus Equalizer Sfeq
About the Sound Focus Equalizer Sfeq
About the Custom Curves
You can switch between Equalizer curves
Selecting the Equalizer Curve
Select the desired Equalizer curve
Operate a mode Cancel the Audio Menu
Balance Adjustment Fad
Select the desired mode in the Audio Menu
Entering the Audio Menu
Equalizer Curve Adjustment EQ Low/EQ Mid/EQ High
Adjust left/right speaker bal- ance with the 2/3 buttons
Boost or attenuate the selected band with the 5/∞ buttons
Equalizer Curve Fine Adjustment
Select the desired Q factor with the 5/∞ buttons
2N += 1N += 1W += 2W
Boost or attenuate the bass level with the 5/∞ buttons
Bass Adjustment Bass
Treble Adjustment Treble
Boost or attenuate the treble level with the 5/∞ buttons
Loudness Adjustment Loud
Subwoofer Output Sub-W1
Low += Mid += High
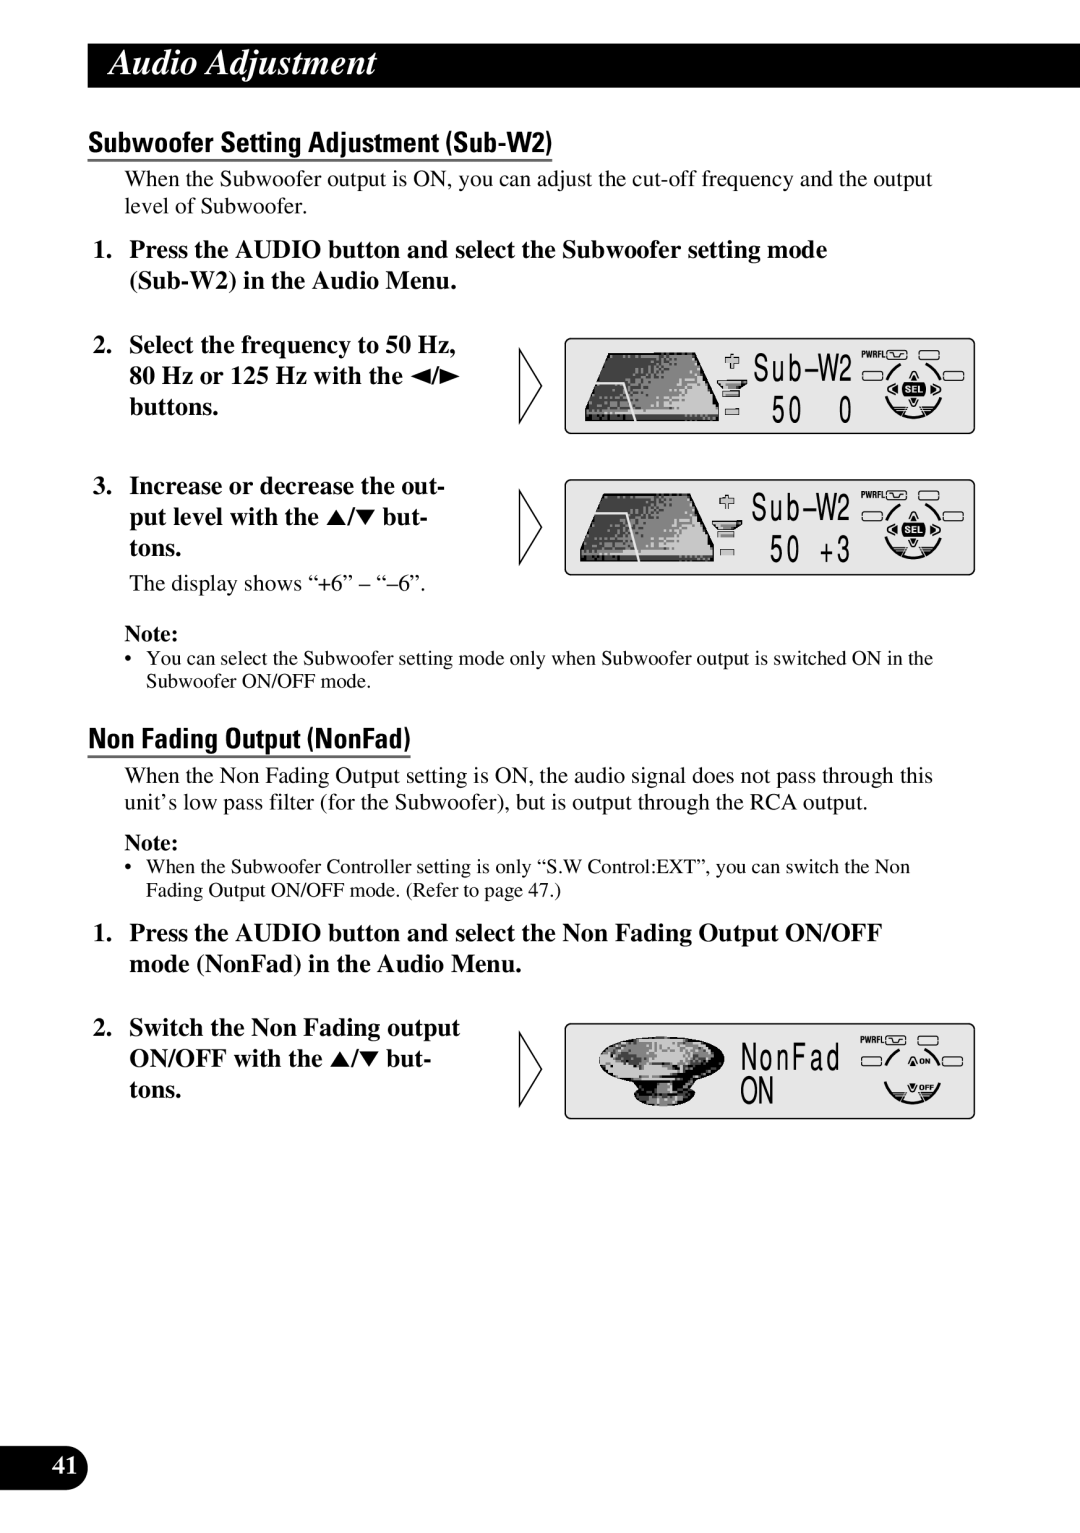
Subwoofer Setting Adjustment Sub-W2
Non Fading Output NonFad
Non Fading Output Level Adjustment NonFad
High Pass Filter HPF
50 += 80 += 125 Hz
Display shows +4
Source Level Adjustment SLA
Automatic Sound Levelizer ASL Function for DEH-P730
Low Ô Lo-Mid Ô Mid Mid-Hi Ô High
Turn the source OFF Enter the Initial Setting Menu
Initial Setting
Entering the Initial Setting Menu
Select a desired mode
Setting the Warning Tone Warn
Initial Setting Menu Functions
Setting the Time Clock
Initial Setting Menu features the following functions
Switching the AUX Mode AUX
Setting the Dimmer DIM
Selecting the Brightness Bright
Setting the Rear Output and Subwoofer Controller SW
Change the Subwoofer Controller with the 2/3 but- tons
Switching the Handsfree Telephoning TEL 1 for DEH-P730
Switching the Telephone Standby TEL 2 for DEH-P730
Switching the Motion Screen Disp
Displaying the Time
Switching the Entertainment Display
Other Functions
To turn the time display on
AUX Title Input Title
Using the AUX Source
Selecting the AUX Source
Select AUX. Refer to
Telephone Muting/Attenuation Function
Handsfree Telephoning Function
About This Product’s Indications
When using the DAB Digital Audio Broadcasting Tuner
Indications that light when Function is switched on
DAB Status Indications
Operating Announcements with the Function Menu
Operation
Changing the Label
Area Weather Flash Weather
Searching the PTY
DAB receives the desired PTY Service
Available PTY Function
Select one from among the PTY
Dynamic Label Display
Enter the Dynamic Label mode
Dynamic Label Function
Scroll the Dynamic Label
Recalling Preset Dynamic Label
Switch to the Dynamic Label mode
Storing Dynamic Label in Memory
CD Player and Care
Built-in CD Player’s Error Message
Message Possible cause Recommended action
Specifications
Table des matières
Utilisation des lecteurs de CD à
Réglages du son
Pour établir un niveau sûr
Lorsque vous avez établi un niveau sonore confortable
Tableau des commandes
Élément central
Télécommande monté sur le volant pour le DEH-P730
Télécommande pour le DEH-P630
Quelques mots concernant cet appareil
Quelques mots concernant ce mode d’emploi
Avant d’utiliser cet appareil
Quelques mots sur la démonstration
Service après-vente des produits Pioneer
Précaution
Propos de la marque XM Ready
Pile
Remarques concernant le boîtier de télécommande
Installation de la pile au lithium
Précaution
Remplacement de la pile au lithium
Retirez la pile au lithium
Utilisation du boîtier de télécommande pour le DEH-P630
Remplacement de la pile au lithium
Protection contre le vol
Tonalité d’alarme
Dépose et pose de la face avant
Dépose de la face avant
Pour écouter de la musique
Télécommande
Opérations de base
Élément central
Mettez la source hors service
Rouler la commande VOLUME, change le niveau d’écoute
Augmentez ou diminuez le niveau d’écoute
Ouverture
Opérations de base sur le lecteur de CD intégré
Choix des indications affichées
Numéro de plage musicale
Fente pour le disque
Numéro de présélection Gamme
Opérations de base sur le syntoniseur
Accord manuel et accord automatique
Fréquence
Opérations de base sur les lecteurs de CD à chargeur
Numéro de plage musicale Numéro de disque
Affichage du menu des fonctions
7Élément central
7Syntoniseur
Fonctions du menu des fonctions
Abandonnez le menu des fonctions
Fonction Indication affichée Touche Résultat
7Lecteur de CD à chargeur
Affichage du menu des réglages détaillés
7Lecteur de CD intégré
Affichez le menu des réglages détaillés
Fonctions du menu des réglages détaillés
Lecteur de CD à chargeur
Utilisation du syntoniseur
Accord automatique sur les seules stations puissantes Local
Mémoire des meilleures stations BSM
Lecture au hasard RDM
Utilisation du lecteur de CD intégré
Répétition de la lecture RPT
Examen rapide du disque T.SCAN
Frappe du titre d’un disque Title
Possibilité de lecture Indication affichée
Utilisation des lecteurs de CD à chargeur
Répétition de la lecture Pmode
Indication affichée Possibilité de lecture
Examen rapide des disques Scan
ITS Programmation en temps réel
Programmation en temps réel ITS
Lecture ITS ITS-P
Pour effacer un numéro de plage musicale
Pour effacer un numéro de disque
Titre d’un disque
Choisissez le caractère Souhaité avec la touche
Pour taper une espace, choisissez le curseur clignotant
Commandez la lecture du disque en appuyant sur la touche
Choix d’un disque sur la liste des titres T.LIST
Affichage du titre du disque
Mise en/hors service de la fonction COMP/DBE
Compression et DBE Comp
Vous pouvez afficher le titre du disque en cours de lecture
Défilement du titre
Fonction CD Text pour les disques compatibles CD Text
Affichage, ou non, du titre
Choisissez l’affichage conven- able avec la touche Display
Réglage de l’égaliseur de focalisation sonore Sfeq
Choisissez le mode Sfeq désirée
Réglages du son
Propos de l’égaliseur de focalisation sonore Sfeq
Choisissez la courbe d’égalisation désirée
Choix de la courbe d’égalisation
Propos des courbes personnalisées
Vous pouvez choisir la courbe d’égalisation
Affichage du menu des réglages sonores
Paramètres du menu des réglages sonores
Réglage de l’équilibrage Fad
Réglage de la courbe d’égalisation EQ Low/EQ Mid/EQ High
’affichage indique +6
Réglage fin de la courbe d’égalisation
Réglage des graves Bass
Réglage des aigus Treble
5K Ô 4K Ô 6,3K Ô 10K Hz
Mise en service de la correction physiologique Loud
Sortie vers le haut-parleur d’extrêmes graves Sub-W1
Sortie de ligne préamplifiée NonFad
Filtre passe-haut HPF
Réglage du niveau de la source sonore SLA
’affichage indique +4
Choisissez le mode de fonctionnement désiré
Réglages initiaux
Affichage du menu des réglages initiaux
Réglage de la tonalité d’alarme Warn
Paramètres du menu des réglages initiaux
Réglage de l’heure Clock
Utilisation, ou non, de la source auxiliaire AUX
Réglage de la luminosité DIM
Choix de la luminosité Bright
Remarque
English Français Deutsch Français
Utilisation, ou non, de l’affichage du fond Disp
Choix des indications affichées
Autres fonctions
Consultation de l’heure
Pour afficher l’heure
Frappe du nom de l’entrée AUX Title
Utilisation de l’entrée AUX
Choix de l’entrée AUX
Choisissez l’entrée AUX. Reportez-vous à la
Fonction de sourdine/atténuation audio téléphonique
Fonction de téléphone mains libres
Indication Fonction
Quelques mots sur les indications affichées
Indications d’état DAB
Indication Etat
Fonctionnement
Changement d’étiquette
Traitement des annonces à partir du menu des fonctions
Fonction des PTY disponibles
Commandez la recherche PTY
Le DAB reçoit le service PTY désiré
Recherche PTY
Affichage des étiquettes dynamiques
Adoptez le mode étiquette dynamique
Fonction d’étiquette dynamique
Faites défiler l’étiquette dynamique
Choisissez le mode d’étiquette dynamique
Mise en mémoire de l’étiquette dynamique
Rappel d’une étiquette dynamique prédéfinie
Lecteur de CD et entretien
Messages d’erreur fournis par le lecteur de CD
Messages Causes possibles Actions correctives
Caractéristiques techniques
Page
Page
Pioneer Corporation