DV-S733A DV-47A
Page
Important Notice H006AEn
For U.S. model
Operating Environment H045 En
Table Of Contents
Graphical Setup Navigator
What is Super VCD? DV-S733A only
Video Adjust
TruSurround*3
Before You Start
Putting the batteries in the remote control
Using the remote control
What’s in the box
DVD-R compatibility DV-S733A only
DVD Video compatibility
DVD Audio compatibility
DVD-RW compatibility DV-S733A only
DVD Video regions
MP3 compatibility information
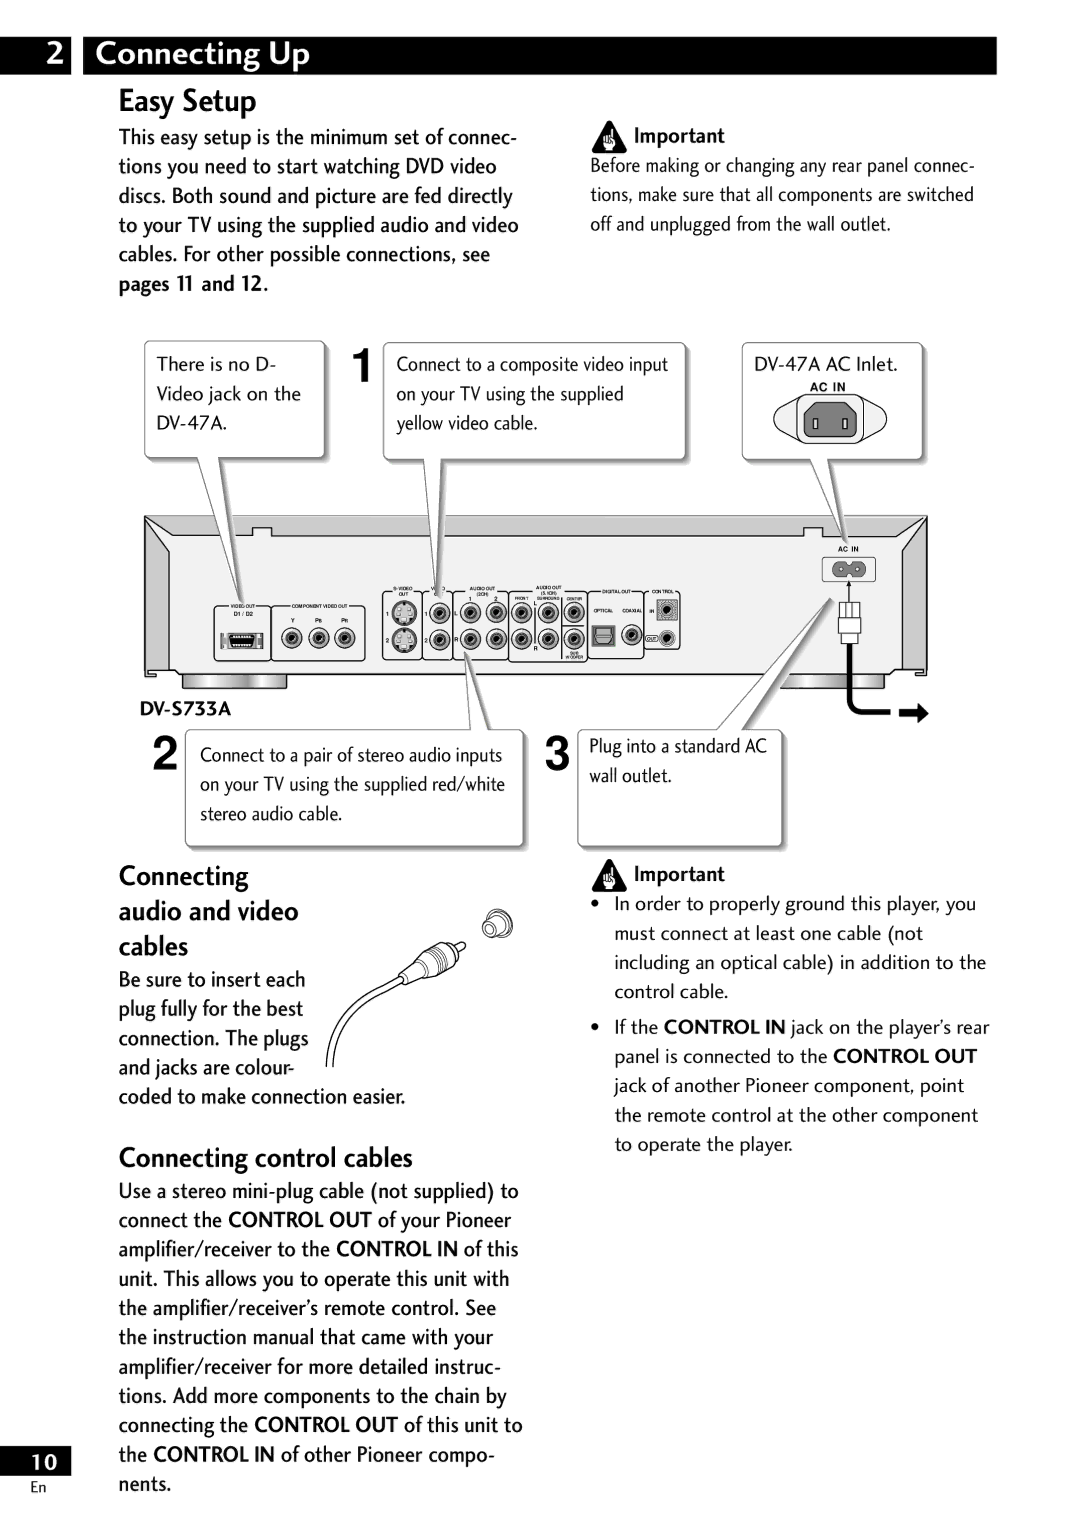
Connecting audio and video cables
Connecting Up
Easy Setup
Connecting control cables
Video or composite video?
Connecting D Video and S-Video cables
Home theater video connections
DV-47A AC Inlet
Connecting coaxial cables
Connecting analog audio cables
Connecting optical cables
Home theater audio connections
Display
Controls & Displays
Character display
Remote control
Display Remote control sensor
Preset Code List
Legato PRO indicator
Front panel
About MOD. Modulation PAL
Display indicates the new setting
Getting Started
TV system changes as follows
Press Setup
Using the Setup Navigator
Press STANDBY/ON to switch on
Select ‘Start’
Select the type of TV you have
Choose an OSD menu language
Taiwanese model English
Congratulations, set up is complete
Press Setup to exit
Settings
Select ‘Save Changes’ to make
Press 0 to open the disc tray Load a disc
Switch the player on
Playing discs
Press 3 to start playback
DVD-Video, DVD-R/RW and Super VCD/ Video CD only
Basic playback controls
DVD-Video and DVD-R/RW only
Use the 4 and ¢ to see the previous/ next
Navigating DVD-RW discs menus
Press Menu
To display this disc menu during playback, press Menu
Introduction
Press Search Mode repeatedly to choose between
Playing Discs
Finding what you want on a disc
Using the Multi Dial
To switch the camera angle, press Angle
Switching camera angles
Switching subtitles
Current subtitle language is shown on-screen
To switch the audio channel, press Audio repeatedly
Switching audio language
Switching audio channel
To set audio language preferences, see
Press Program
Making a program list
Enter the title/chapter numbers for your program list
Programming tips
Enter the track numbers for your program list
Random Title/Group
Using random play
Press Random repeatedly to select a random play mode
DVD only Press Enter or 3 to start random play
Looping a section of a disc
Using repeat play
Press Repeat during playback to select a repeat mode
To resume normal playback, press Clear Tip
To resume playback, load the disc and press Last Memory
Bookmarking a place in a disc
DV-47A U.S. model
Press 7 if you want to stop playback here
Memorizing disc settings
Condition Memory
To use the shortcut menu
Using setup menu shortcuts
To add a menu item to the shortcut list
To delete an item from the shortcut menu
Displaying disc information
To show/switch the information displayed, press DIS- Play
Example
Playing MP3s
Playing MP3s
Press 3 to start playing the first MP3 track on the disc
Searching for folders and tracks
Displays when playing
Displays when stopped
Displaying MP3 information
Total number of Track
Using the MP3 Navigator
Navigate using the following controls
Menu Exit the MP3 Navigator
Use the number buttons to enter a three- digit track number
Making a program list of MP3 tracks
Press Program to enter the MP3 Program screen
Program Exit the MP3 Program screen
Setup Menu Mode
DVD Setup Menu
Using the Setup menu
Default setting Expert
On Screen Display
Audio settings
OSD Language
Audio DRC
DTS Out
Default Dolby Digital
Dolby Digital Out
Linear PCM Out
Sacd Playback
Mpeg Out
Digital Out
Virtual Surround
Audio Out
About source audio output
Sub On Surround Large Distance all 3.0m
Speaker Setting
This setting does not apply to Sacd play- back
Subwoofer SW can only be set to On or Off
Legato PRO
Default setting Fix
Gain Settings
CD Digital Direct
Video Out
Video settings
TV Screen
Frame Search
Compatibility of this unit with progressive- scan TVs
Background
Component Video
Plasma Display U.S. model
You can also access these settings by pressing V. ADJ
Selecting a preset
Select a preset
Select ‘Video Memory Select’
Select ‘Video Setup’
Creating your own setting
Press Enter to save your changes
Select ‘Video Setup’ Press Display
Angle Indicator
Still Picture
Audio Language
Default Setting English
Subtitle Language
Auto Language
Subtitle Language settings
Default Setting w/Subtitle Language
DVD Language
Subtitle Display
General settings
Setup Navigator
Subtitle Off
Changing your password
Registering a new password
Setting/changing the Parental Lock level
Bonus Group
Default setting Single
Auto Disc Menu
Group Playback
Additional Information
Moving the player
Hints on installation
Power cord caution
Don’t
Glossary
Optical digital output
Mpeg video
Multi-session
Packed PCM DVD-Audio only
Troubleshooting
Picture disturbance during playback or dark
Remote control doesnt seem to work
No audio, or audio is distorted
Cannot output 192kHz or 176.4kHz digital audio
Cannot play multi-channel audio
No digital audio output
Cannot output 96kHz or 88.2kHz digital audio
Resetting the Player
All settings will have been cleared
Country Code List
Language code list
Additional Information
When viewing on a standard TV or monitor
Specifications
General
We Want You Listening For a Lifetime
Additional Information
TWKZW/01J00000 Printed