MIDI SETTINGS
MIDI SETTINGS
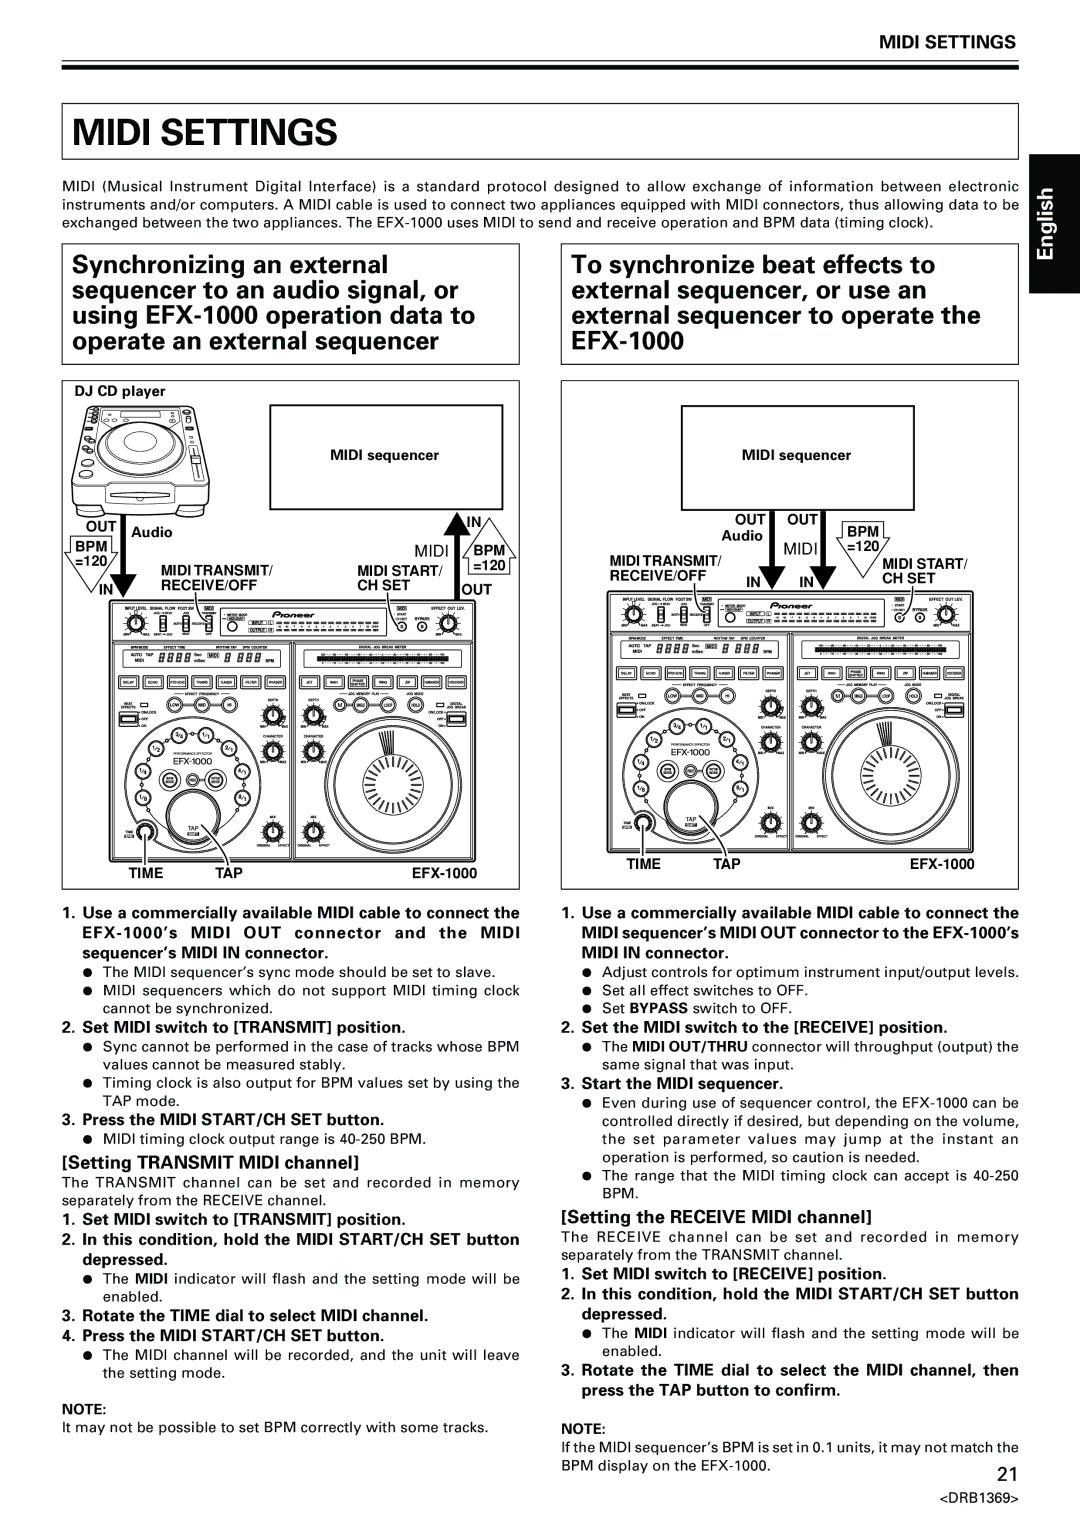
MIDI (Musical Instrument Digital Interface) is a standard protocol designed to allow exchange of information between electronic instruments and/or computers. A MIDI cable is used to connect two appliances equipped with MIDI connectors, thus allowing data to be exchanged between the two appliances. The
Synchronizing an external |
| To synchronize beat effects to |
sequencer to an audio signal, or |
| external sequencer, or use an |
using |
| external sequencer to operate the |
operate an external sequencer |
| |
|
|
|
English
DJ CD player |
|
|
| |
|
|
| MIDI sequencer |
|
OUT | Audio |
|
| IN |
|
|
| ||
BPM |
|
|
| |
|
| MIDI | BPM | |
=120 | MIDI TRANSMIT/ | MIDI START/ | =120 | |
|
| |||
IN | RECEIVE/OFF | CH SET | OUT | |
|
|
| ||
| TIME | TAP | ||
1.Use a commercially available MIDI cable to connect the
¶The MIDI sequencer’s sync mode should be set to slave.
¶MIDI sequencers which do not support MIDI timing clock cannot be synchronized.
| MIDI sequencer | ||
| OUT | OUT | BPM |
| Audio | MIDI | |
MIDI TRANSMIT/ | =120 | ||
| MIDI START/ | ||
RECEIVE/OFF | IN | IN | CH SET |
TIME | TAP |
| |
1.Use a commercially available MIDI cable to connect the MIDI sequencer’s MIDI OUT connector to the
¶Adjust controls for optimum instrument input/output levels.
¶Set all effect switches to OFF.
¶Set BYPASS switch to OFF.
2.Set MIDI switch to [TRANSMIT] position.
¶Sync cannot be performed in the case of tracks whose BPM values cannot be measured stably.
¶Timing clock is also output for BPM values set by using the TAP mode.
3.Press the MIDI START/CH SET button.
¶MIDI timing clock output range is
[Setting TRANSMIT MIDI channel]
The TRANSMIT channel can be set and recorded in memory separately from the RECEIVE channel.
1.Set MIDI switch to [TRANSMIT] position.
2.In this condition, hold the MIDI START/CH SET button depressed.
¶The MIDI indicator will flash and the setting mode will be enabled.
3.Rotate the TIME dial to select MIDI channel.
4.Press the MIDI START/CH SET button.
¶The MIDI channel will be recorded, and the unit will leave the setting mode.
NOTE:
It may not be possible to set BPM correctly with some tracks.
2.Set the MIDI switch to the [RECEIVE] position.
¶The MIDI OUT/THRU connector will throughput (output) the same signal that was input.
3.Start the MIDI sequencer.
¶Even during use of sequencer control, the
¶The range that the MIDI timing clock can accept is
[Setting the RECEIVE MIDI channel]
The RECEIVE channel can be set and recorded in memory separately from the TRANSMIT channel.
1.Set MIDI switch to [RECEIVE] position.
2.In this condition, hold the MIDI START/CH SET button depressed.
¶The MIDI indicator will flash and the setting mode will be enabled.
3.Rotate the TIME dial to select the MIDI channel, then press the TAP button to confirm.
NOTE:
If the MIDI sequencer’s BPM is set in 0.1 units, it may not match the
BPM display on the | 21 |
|
<DRB1369>
