GM-X574 GM-X374
Contents
Composition of Manual
Before Using This Product
Case of trouble
Input Select Switch
Setting the Unit
Gain Control
BFC Beat Frequency Control Switch
Power Indicator
LPF Low-Pass Filter/HPF High-Pass Filter Select Switch
GM-X574 Speaker Channel Speaker Type Power
Connecting the Unit
To prevent damage
GM-X374 Speaker Channel Speaker Type Power
Connection Diagram
Connecting the Speaker Output
Connecting the Power Terminal
Terminals
Connections when using the speaker input
Using the Speaker Input
Four-channel mode
Connecting the Speaker wires
Three-channel mode
Terminal a Terminal B
Two-channel mode Mono
Two-channel mode Stereo
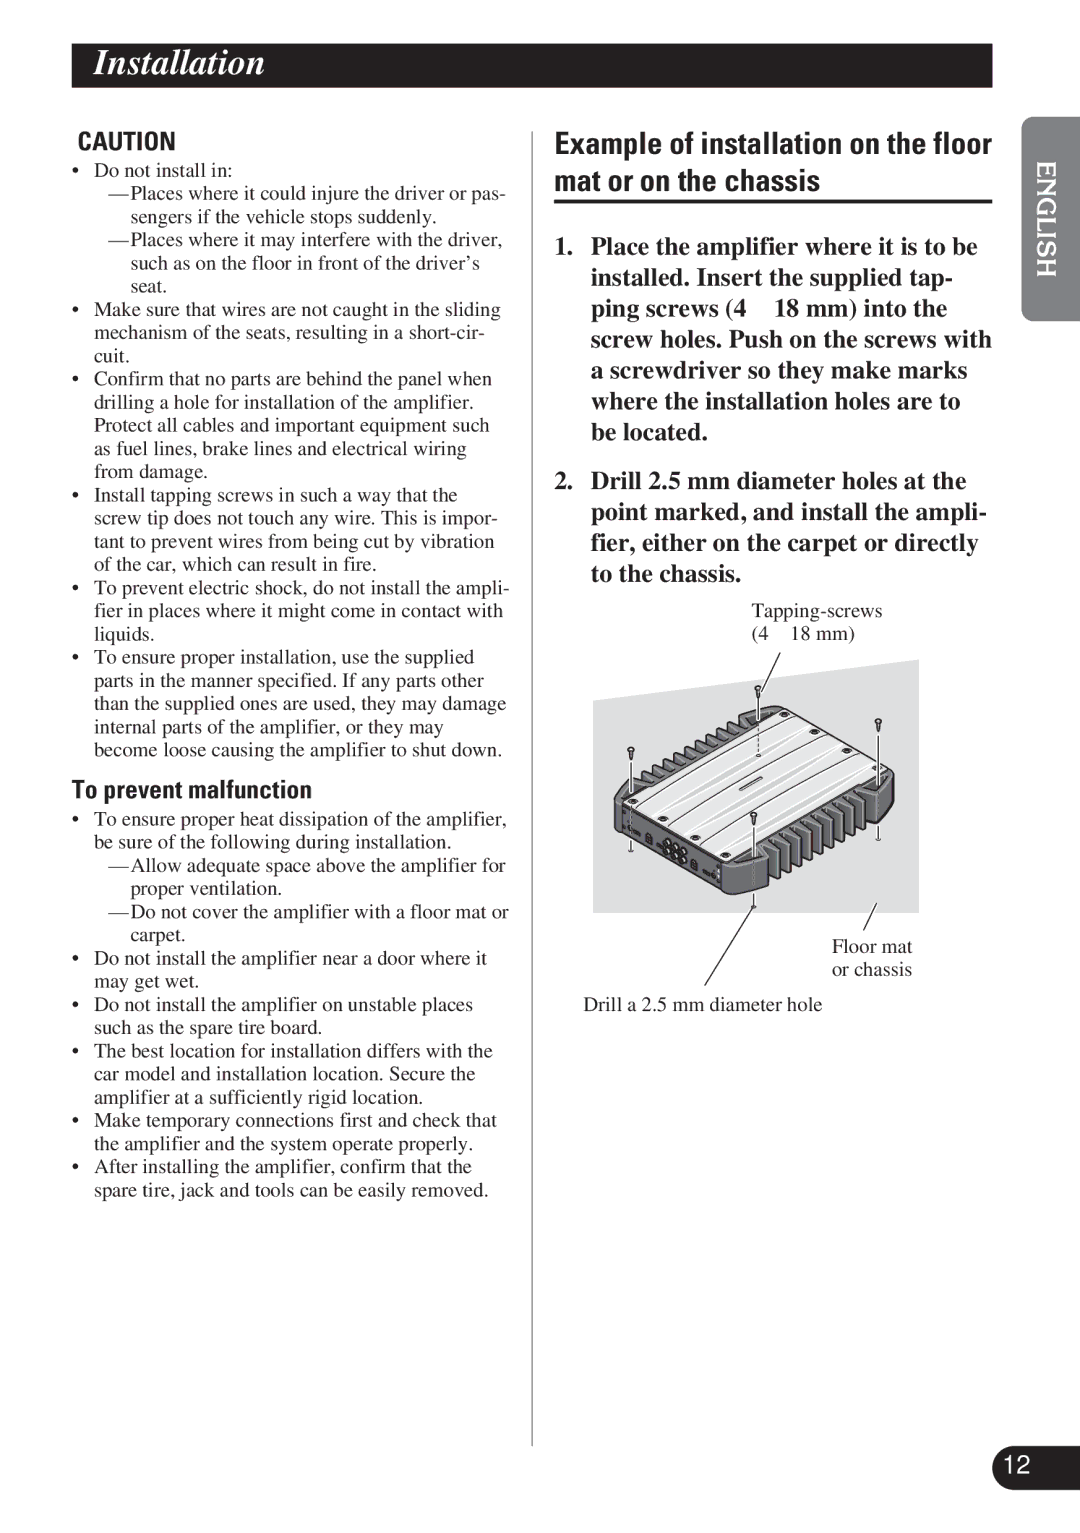
Example of installation on the floor mat or on the chassis
Installation
To prevent malfunction
GM-X574
Specifications
Average current drawn
10.9 a 4 Ω for two channels
GM-X374
30 a
265 W ⋅ 50 H ⋅ 237 D mm
Interruptor de selección LPF Filtro de paso
Contenido
Ejemplo de instalación en la alfombra del
Composición de manual
Antes de usar este producto
En caso de desperfectos
Verifique las conexiones del suministro de
Control de ganancia
Ajuste de esta unidad
Interruptor de selección de entrada
Interruptor BFC Control de la frecuencia de batido
Indicador de alimentación
Para prevenir de daños
Conexión de la unidad
GM-X574
Tipo de altavoz Alimentación
GM-X374
Diagrama de conexión
Conexión del terminal de salida de altavoz
Conexión del terminal de alimentación
Conexiones cuando se usa la entrada de altavoz
Uso de la entrada de altavoz
Modo de cuatro canales
Conexión de los cables de altavoces
Modo de tres canales
Modo de dos canales mono
Modo de dos canales estéreo
Para evitar fallas del funcionamiento
Instalación
Nota
Especificaciones
Consumo de corriente promedio
10,9 a 4 Ω para dos canales
19,2 a potencia continua, 4 Ω
An ⋅ 50 Al ⋅ 237 Pr mm
45 W ⋅ 4 / 100 W ⋅ 2 DIN45324, +B = 14,4
LPF Tiefpaßfilter/HPF Hochpaßfilter
Inhaltsverzeichnis
Anschluß der Lautsprecher-Ausgang
Aufbau der Anleitung
Vor Gebrauch dieses Produkts
Im Störungsfall
Verstärkungsregelung
Einstellen dieses Geräts
Eingangswahlschalter
Interferenzschutzschalter BFC
Stromanzeige
LPF Tiefpaßfilter/HPF Hochpaßfilter-Wahlschalter
Um Schäden zu vermeiden
Anschluß der Einheit
GM-X574 Lautsprecherkanal Lautsprechertyp Stromversorgung
GM-X374 Lautsprecherkanal Lautsprechertyp Stromversorgung
Sicherung 30 a Tülle
Auschlußschema
Lautsprecher-Eingangs Fortseite RCA-Ausgangsbuchsen
RCA-Eingangsbuchsen a Rückseite
Anschluß der Lautsprecher- Ausgang-Klemmen
Anschluß der Stromversorgung
Klemmenschraube
Benutzung des Lautsprecher- Eingangs
Lautsprecher Ausgangklemme Lautsprecherkabel
Vier-Kanal-Modus
Anschließen der Lautsprecherkabel
Drei-Kanal-Modus
Zwei-Kanal-Modus Mono
Zwei-Kanal-Modus Stereo
Lautsprecher Rechts
Verhindern von Fehlfunktionen
Einbau
Hinweis
Technische Daten
Durchschnittliche Stromentnahme
10,9 a 4 Ω für Zwei-Kanal
19,2 a bei gleichbleibendem Strom, 4 Ω
265 B ⋅ 50 H ⋅ 237 T mm
Exemple d’installation sur le tapis de sol ou
Interrupteur BFC Commande de fréquence
Table des matières
Sélecteur LPF Filtre passe-bas
Composition du manuel
Avant d’utiliser cet appareil
En cas d’anomalie
Réglage de l’appareil
Commande du gain
Sélecteur d’entrée
Sélecteur LPF Filtre passe-bas/HPF Filtre passe-haut
Témoin d’alimentation
Sélecteur Gamme des fréquences Type de haut Remarques
Disponibles en sortie Parleur
Pour éviter toute anomalie
Raccordement de l’appareil
GM-X574 Voie de sortie Type de haut-parleur Puissance
GM-X374 Voie de sortie Type de haut-parleur Puissance
De prises d’entrée
Schéma de raccordement
Câbles de liaison munis de prises Cinch Cinch RCA
Prises Cinch RCA
Raccordement des bornes de
Raccordement de la borne d’alimentation
Sortie vers les haut-parleurs
Usage de l’entrée de haut-parleur
Mode trois voies
Mode quatre voies
Connexion des câbles des haut-parleurs
Droite Sortie haut-parleur B Gauche
Mode deux voies mono
Mode deux voies stéréo
Haut-parleur Droite Haut-parleur Mono
’installez pas l’appareil
Exemple d’installation sur le tapis de sol ou sur le châssis
Remarque
Caractéristiques techniques
Consommation moyenne de courant
10,9 a 4 Ω pour deux voies
19,2 a à la puissance continue, 4 Ω
265 L ⋅ 50 H ⋅ 237 P mm
Indice
Esempio dell’installazione sul pavimento
Come collegare il terminale
Come collegare il terminale di uscita degli
Composizione del manuale di istruzioni
Prima di usare questo prodotto
Caso di difficotà
Comando del guadagno
Regolazione di questa unità
Selettore di ingresso
Selettore LPF filtro passa-basso/HPF filtro passa-alto
Indicatore dell’alimentazione
Commutatore BFC Comando della frequenza di battimento
Per evitare danne
Come collegare l’unità
Tipo di altoparlanti Alimentazione
Ingresso nominale Minimo 100 W
Schema di collegamento
Uscita degli altoparlanti
Come collegare il terminale di
Come collegare il terminale dell’alimentazione
Collegamento quando serve ingresso altoparlante
’uso di ingresso dell’altoparlante
Uscita altoparlante
Modo a quattro canali
Collegamento dei cavi d’altoparlanti
Modo a tre canali
Modo a due canali mono
Modo a due canali stereo
Dell’altoparlante
Connettore di ingresso Dell’altoparlante
Per evitare disfunzioni
Installazione
Corrente media consumata
Caratteristiche
7A 4 Ω per quattro canali
19,2 a ad alimentazione continua, 4 Ω
10,9 a 4 Ω per due canali
265 L ⋅ 50 a ⋅ 237 P mm
Inhoudsopgave
Voorbeeld van installatie op de vloermat
Schakelaar voor de regeling van de
LPF lage-doorlaatfilter/HPF hoge
Alvorens gebruik
Bij problemen
Versterkingsregelaar
Instellen van dit toestel
Ingangskeuzeschakelaar
Schakelaar voor de regeling van de slagfrequentie BFC
Spanningsindicator
Die u gebruikt
Om beschadiging te voorkomen
Aansluiten van het toestel
GM-X574 Luidsprekerkanaal Luidsprekertype Vermogen
GM-X374 Luidsprekerkanaal Luidsprekertype Vermogen
Aansluitschema
Uitgangsaansluitingen
Verbinden van de luidspreker
Aansluiten van het spanningsaansluitpunt
Geval van Luidsprekeringangs de verbinding gebruiken
Het gebruik van luidsprekeringang
Vier-kanalen functie
Aansluiten van de luidsprekerdraden
Drie-kanalen functie
Ingangskeuzeschakelaar
Twee-kanalen functie mono
Twee-kanalen functie stereo
Voorbeeld van installatie op de vloermat of op het chassis
Installatie
Om slechte werking te voorkomen
Opmerking
Technische gegevens
Gemiddeld stroomverbruik
10,9 a 4 Ω voor twee kanalen
19,2 a met continu spanning, 4 Ω
265 B ⋅ 50 H ⋅ 237 D mm
Page
Page
Pioneer Corporation