Manuals
/
Pioneer
/
Home Audio
/
Stereo Receiver
Pioneer
VSX-516 The System Setup menu, The Input Assign menu, Speaker Distance
Models:
VSX-516
1
29
80
80
Download
80 pages
59.49 Kb
26
27
28
29
30
31
32
33
Troubleshooting
Specifications
Install
Speaker placement diagrams
Choosing the input signal
03Connecting up Chapter
Warranty
Menu de configuration Other
Problem
Saving station presets
Page 29
Image 29
Page 28
Page 30
Page 29
Image 29
Page 28
Page 30
Contents
Operating Instructions Mode demploi
VSX-516
AUDIO/VIDEO MULTI-CHANNEL RECEIVER
RECEPTEUR AUDIOVISUEL A VOIES MULTI-CANAUX
the equipment
Wash hands after handling
Information to User
RISK OF ELECTRIC SHOCK DO NOT OPEN
03 Connecting up
Contents
06 The System Setup menu
07 Using the tuner
Installing the receiver
Operating range of remote control unit
Before you start
Before you start Chapter
5 minute guide
See Connecting the speakers on page
025 minute guide Chapter
Introduction to home theater
Italiano
5 minute guide Using the Quick Setup
Deutsch
Français
03Connecting up Chapter
Connecting up
Making cable connections
Digital audio cables
This receiver
Connecting up Connecting a TV and DVD player
English
Connecting the multichannel analog outputs
03Connecting up
This receiver
The example shows an optical connection to
Connecting other audio components
Connecting up
About the WMA9 Pro decoder
This receiver
Using the component video jacks
Connecting other video components
03Connecting up
This receiver
Using external antennas
Connecting antennas
To improve FM reception
To improve AM reception
Twist exposed wire strands together
03Connecting up Connecting the speakers
The speaker terminals also accept single
banana plugs
Speaker placement diagrams
Hints on speaker placement
3-Dview of 6.1 channel speaker setup
Speaker terminals
Overhead view of speaker setup
3-Dview of 7.1 channel speaker setup
AC outlet
03Connecting up
Front panel
Controls and displays
Controls and displays Chapter
Display
See Using the Quick Setup on page
04Controls and displays
Controls and displays
04Controls and displays Remote control
Controls and displays
05Listening to your system Chapter
Listening to your system
Auto playback
Listening in surround sound
Setting the effect options
Using the Advanced surround effects
Setting
Listening to your system
Using surround back channel processing
Choosing the input signal
05Listening to your system
Listening in stereo
Listening to your system
Using Virtual Surround Back VSB
English Deutsch Français Italiano
Nederlands Español
Using the Sound Retriever
Using Midnight and Loudness
Using the tone controls
Enhancing dialog
The System Setup menu Chapter
The System Setup menu
Using the System Setup menu
Surround back speaker setting
Speaker setting
06The System Setup menu
Crossover network
Channel level
The Input Assign menu
The System Setup menu
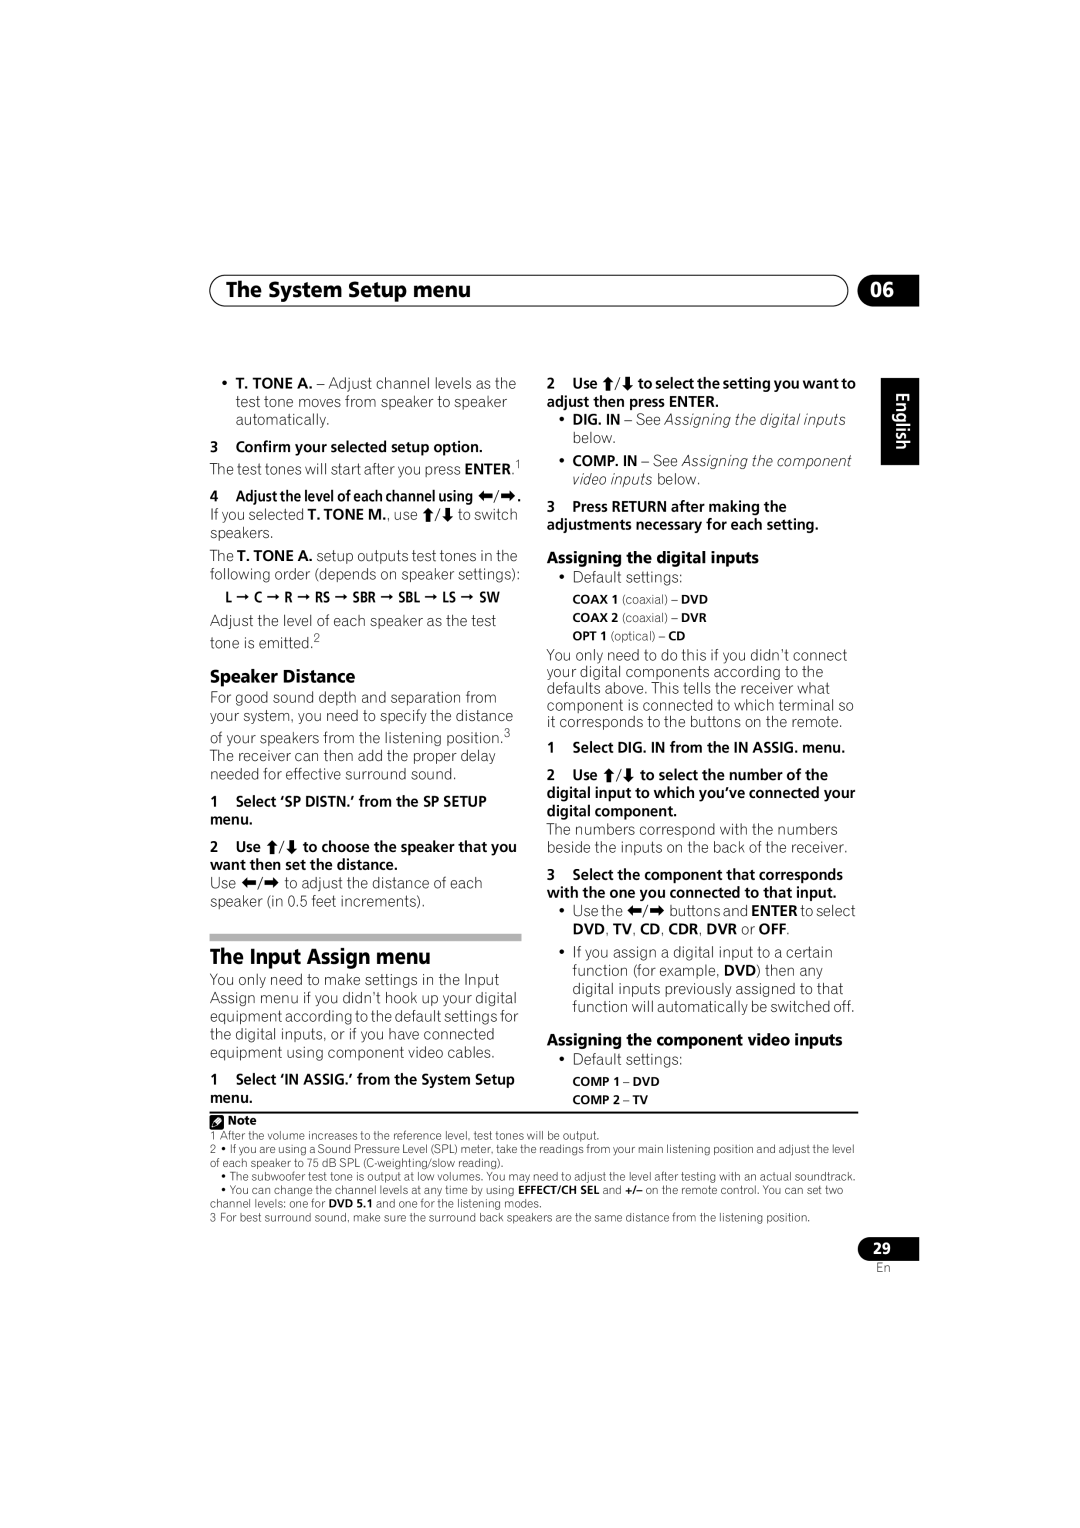
Speaker Distance
Assigning the digital inputs
Dynamic Range Control Setup
The Other setup menu
Dual Mono Setup
LFE Attenuator Setup
Using the tuner Chapter
Using the tuner
Saving station presets
Naming station presets
Making an audio or a video recording
Making recordings
08Making recordings Chapter
Switching the speaker system
Second Zone speaker B setup
Other connections
Other connections Chapter
09Other connections Bi-ampingyour front speakers
Bi-wiringyour speakers
Front left
speaker
Problem
Troubleshooting
Connecting up on page
Additional information
10Additional information
Resetting the main unit
Problem
1Switch the receiver into standby
Specifications
Power cord caution
Switching the speaker impedance
Additional information
Video Section
Cleaning the unit
Component video section
AM Tuner Section
Additional information
We Want You Listening For A Lifetime
NOTE IMPORTANTE SUR LE CABLE D’ALIMENTATION
“DTS”,“DTS-ES”,“DTS96/24” et
06 Menu de configuration du système
04 Commandes et affichages
Table des matières
01 Préparatifs
08 Pour faire un enregistrement
07 Utilisation du tuner
09 Autres raccordements
10 Information complémentaire
Installation du récepteur
Portée de la télécommande
Préparatifs
Chapitre
Présentation de l’appareil de cinéma à domicile
Guide en 5 minutes
Ecoute en son surround
Chapitre
1Si le récepteur est éteint, appuyez sur
Raccordements des câbles
Raccordements
Câbles audio numériques
Câbles audio analogiques
récepteur
English Deutsch Français Italiano Nederlands
Le son pourra alors être émis par le
syntoniseur intégré de votre téléviseur. Utilisez
Raccordement des sorties numériques multicanaux
décodeur numérique
optique vers l’entrée
Ce récepteur
A propos du décodeur WMA9 Pro
Raccordement d’autres appareils audio
Ce récepteur
Raccordement d’autres appareils vidéo
Pour améliorer la réception AM
Raccordement des antennes
Deutsch
3 Refermez la borne
Raccordement des enceintes
1Torsadez ensemble les brins de fil dénudés
Schéma de disposition des enceintes
Conseils d’installation des enceintes
Bornes d’enceinte
Prise secteur
Vue d’ensemble de la configuration des enceintes
Panneau frontal
Commandes et affichages
Chapitre
English Deutsch Français Italiano
Affichage
ANALOG
Télécommande
ANALOG ATT
Lecture en mode Auto
Écoute de sources à l’aide de votre système
Écoute d’une source en son surround
Chapitre
Réglage des options d’effet
Utilisation des effets surround avancés
English Deutsch Français
Italiano Nederlands Español
Réglage Fonction
Choix du signal d’entrée
Écoute en mode stéréo
Nederlands Español
English Deutsch Français Italiano
SB OFF - Lecture 5.1 au plus
Midnight et Loudness
Utilisation des commandes de tonalité
Mode Dialog enhancement
Utilisation de la fonction Sound Retriever
Réglage de l’enceinte surround arrière
Utilisation du menu de configuration du système
Réglage manuel des enceintes
Menu de configuration du système
Réseau de recouvrement
Réglage des enceintes
Niveau des canaux
1Sélectionnez SP SET à partir du menu SP SETUP
Distance des enceintes
Menu d’affectation d’entrée
Affectation des entrées numériques
DIG. IN - Consultez Affectation des entrées
Configuration du contrôle de la plage dynamique
Menu de configuration Other
Réglage mono double
Réglage de l’atténuateur LFE
Pour écouter la radio
Utilisation du tuner
Mémorisation de stations préréglées
Pour nommer les stations préréglées
Chapitre
Pour faire un enregistrement
Faire un enregistrement audio ou vidéo
Autres raccordements
Configuration de l’enceinte B Second Zone
Permutation du système d’enceintes
Chapitre
Bi-câblagede vos enceintes
Bi-amplificationde vos enceintes avant
Guide de dépannage
Information complémentaire
Problème éventuel
Réparation possible
Problème éventuel
Réinitialisation de l’appareil principal
Réparation possible
LFEATT
Précautions d’usage pour le cordon d’alimentation
Permutation de l’impédance des enceintes
Spécifications
Section amplificateur
Section vidéo
Nettoyage de l’appareil
Section appareil vidéo
Section tuner AM
Español
Français
Nederlands
English
WARRANTY
LIMITED WARRANTY
PRODUCT WARRANTY PERIOD
WHAT IS NOT COVERED
PIONEER ELECTRONICS USA INC
SERVICE
GARANTIE LIMITÉE
GARANTIE
PIONEER ELECTRONICS USA INC
PIONEER CORPORATION
PIONEER ELECTRONICS OF CANADA, INC
PIONEER EUROPE NV
Top
Page
Image
Contents