07The System Setup menu

Using Professional Acoustic Calibration EQ

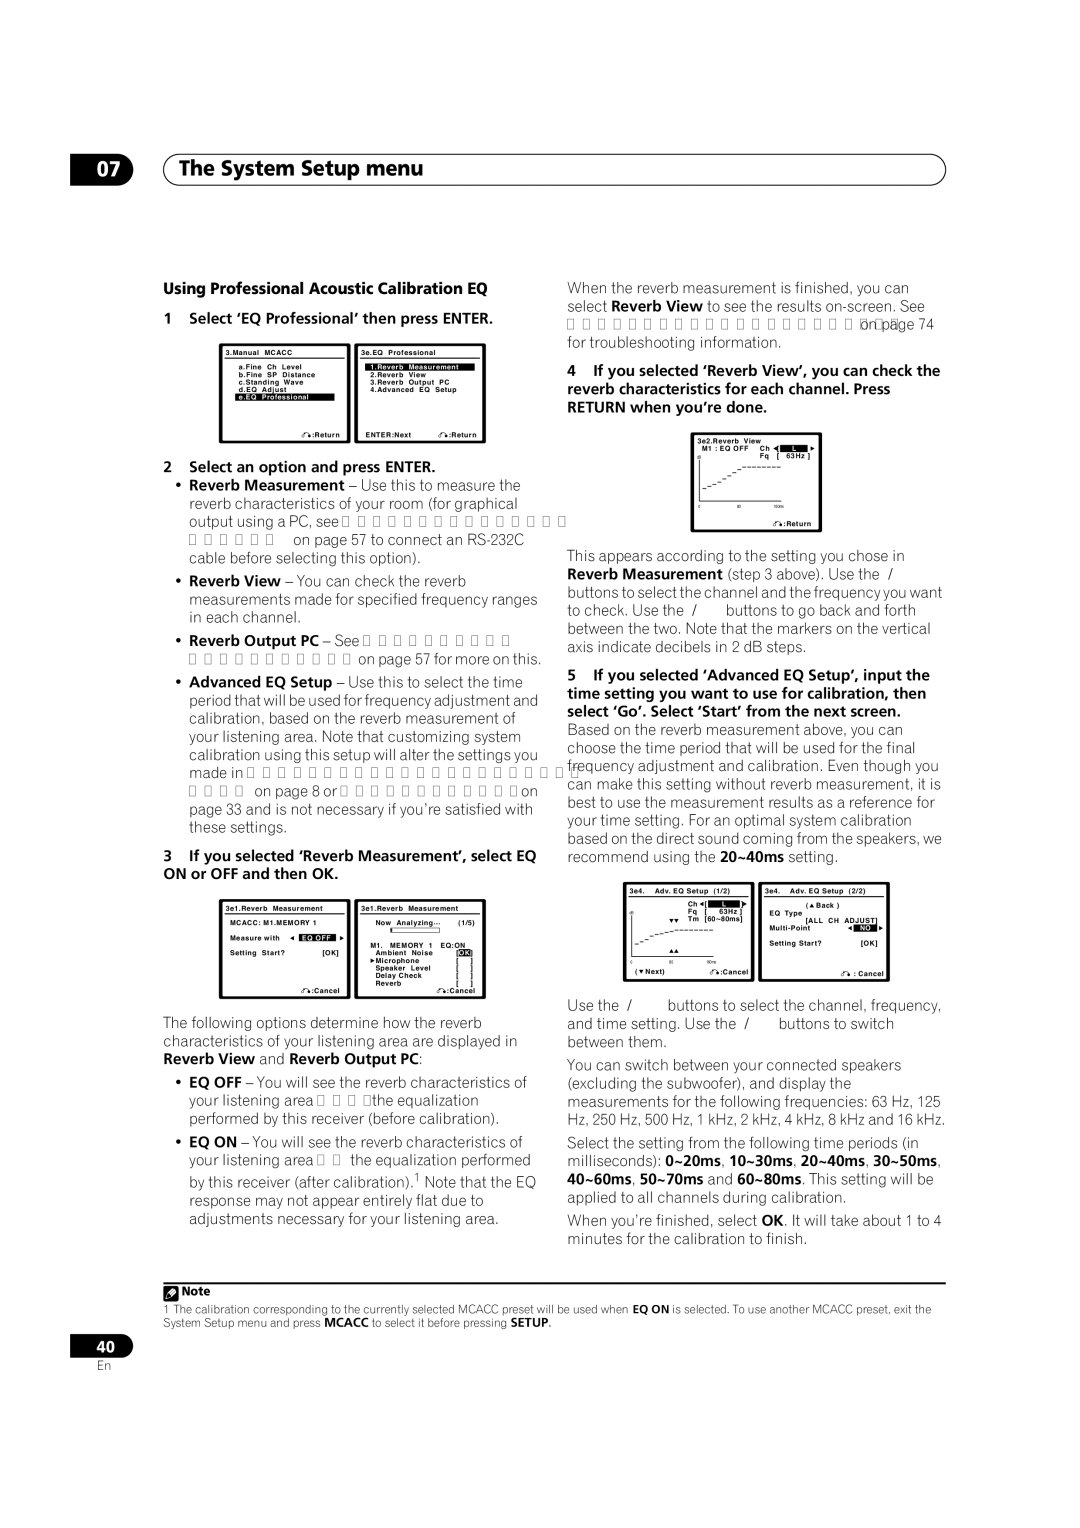
1 Select ‘EQ Professional’ then press ENTER.


3.Manual

MCACC


3e.EQ Professional


a.Fine

Ch

Level


1.Reverb

Measurement


b.Fine

SP

Distance


2.Reverb

View


c.Standing

Wave


3.Reverb

Output

PC


d.EQ

Adjust


4.Advanced EQ

Setup


e.EQ

Professional


:Return


ENTER:Next

:Return


2Select an option and press ENTER.

Reverb Measurement – Use this to measure the reverb characteristics of your room (for graphical output using a PC, see Connecting a PC for Advanced MCACC output on page 57 to connect an RS-232C cable before selecting this option).

Reverb View – You can check the reverb measurements made for specified frequency ranges in each channel.

Reverb Output PC – See Connecting a PC for Advanced MCACC output on page 57 for more on this.

Advanced EQ Setup – Use this to select the time period that will be used for frequency adjustment and calibration, based on the reverb measurement of your listening area. Note that customizing system calibration using this setup will alter the settings you made in Automatically setting up for surround sound (MCACC) on page 8 or Automatic MCACC (Expert) on page 33 and is not necessary if you’re satisfied with these settings.

3If you selected ‘Reverb Measurement’, select EQ ON or OFF and then OK.


3e1.Reverb Measurement


3e1.Reverb Measurement


MCACC: M1.MEMORY 1


Now Analyzing…


(1/5)


Measure with


EQ OFF


M1. MEMORY 1 EQ:ON


Setting Start?

[OK]


Ambient Noise

[

OK

]


Microphone

[


]


Speaker Level

[

]


Delay Check

[

]


:Cancel


Reverb

[

]


:Cancel


The following options determine how the reverb characteristics of your listening area are displayed in Reverb View and Reverb Output PC:

EQ OFF – You will see the reverb characteristics of your listening area without the equalization performed by this receiver (before calibration).

EQ ON – You will see the reverb characteristics of your listening area with the equalization performed by this receiver (after calibration).1 Note that the EQ response may not appear entirely flat due to adjustments necessary for your listening area.

When the reverb measurement is finished, you can select Reverb View to see the results on-screen. See Professional Calibration EQ graphical output on page 74 for troubleshooting information.

4If you selected ‘Reverb View’, you can check the reverb characteristics for each channel. Press RETURN when you’re done.

3e2.Reverb View


M1 : EQ OFF Ch

[

L ]


dB

Fq

[

63Hz

]


0

80

160ms


:Return


This appears according to the setting you chose in Reverb Measurement (step 3 above). Use the buttons to select the channel and the frequency you want

to check. Use the buttons to go back and forth between the two. Note that the markers on the vertical axis indicate decibels in 2 dB steps.

5If you selected ‘Advanced EQ Setup’, input the time setting you want to use for calibration, then select ‘Go’. Select ‘Start’ from the next screen.

Based on the reverb measurement above, you can choose the time period that will be used for the final frequency adjustment and calibration. Even though you can make this setting without reverb measurement, it is best to use the measurement results as a reference for your time setting. For an optimal system calibration based on the direct sound coming from the speakers, we recommend using the 20~40ms setting.


3e4.

Adv. EQ Setup (1/2)


3e4. Adv. EQ Setup (2/2)


Ch

[


]


L


( Back )


dB

Fq

[


63Hz ]


EQ Type


Tm

[60~80ms]


[ALL CH

ADJUST]


Multi-Point


NO


Setting Start?


[OK]


0

80

160ms


(

Next)


:Cancel


: Cancel


Use the

buttons to select the channel, frequency,

and time setting. Use the


buttons to switch

between them.


You can switch between your connected speakers (excluding the subwoofer), and display the measurements for the following frequencies: 63 Hz, 125 Hz, 250 Hz, 500 Hz, 1 kHz, 2 kHz, 4 kHz, 8 kHz and 16 kHz.

Select the setting from the following time periods (in milliseconds): 0~20ms, 10~30ms, 20~40ms, 30~50ms, 40~60ms, 50~70ms and 60~80ms. This setting will be applied to all channels during calibration.

When you’re finished, select OK. It will take about 1 to 4 minutes for the calibration to finish.

Note

1The calibration corresponding to the currently selected MCACC preset will be used when EQ ON is selected. To use another MCACC preset, exit the System Setup menu and press MCACC to select it before pressing SETUP.

40

En

Page 40
Image 40
Pioneer VSX-9110TXV-K Using Professional Acoustic Calibration EQ, Select ‘EQ Professional’ then press Enter, Eq Off

VSX-9110TXV-K specifications

The Pioneer VSX-9110TXV-K is a high-performance AV receiver designed to cater to the demanding needs of home theater enthusiasts. Combining advanced technology with versatile features, this model stands as a solid choice for anyone looking to enhance their audio-visual experience.

One of the standout features of the VSX-9110TXV-K is its robust power output capability. With 7.1 channels, the receiver delivers a substantial 100 watts per channel, ensuring that movies, music, and games come to life with pristine clarity and impactful sound. The robust amplification not only provides a powerful output but also ensures that every audio detail is captured, from the softest whispers to the loudest explosions.

In terms of connectivity, the VSX-9110TXV-K boasts multiple HDMI inputs, allowing users to connect various devices such as Blu-ray players, gaming consoles, and streaming devices with ease. It supports 4K Ultra HD video pass-through, ensuring compatibility with the latest high-definition sources. The receiver also features advanced audio decoding technologies, including Dolby Atmos and DTS:X, which create an immersive surround sound environment that transports users right into the center of the action.

The receiver also incorporates Pioneer’s proprietary technologies, such as MCACC (Multi-Channel Acoustic Calibration System), which analyzes the acoustics of the room and automatically adjusts the speaker settings for optimal sound. This ensures a balanced listening experience, tailored specifically to the user’s environment.

The intuitive user interface and comprehensive remote control simplify navigation through the receiver's extensive features. With easy access to streaming services and a variety of input options, users can effortlessly switch between different audio and video sources.

Moreover, the VSX-9110TXV-K is equipped with advanced zone control, allowing users to enjoy audio in multiple rooms simultaneously. This feature enhances the versatility of the receiver, making it perfect for entertaining guests or simply enjoying music throughout the home.

In summary, the Pioneer VSX-9110TXV-K blends power, innovation, and user-friendly features, making it a standout choice for creating a captivating home theater experience. With its rich array of capabilities, it caters to both casual viewers and audiophiles alike, ensuring that every audio and visual experience is nothing short of exceptional.