01Quick start guide

Connecting your TV and DVD player

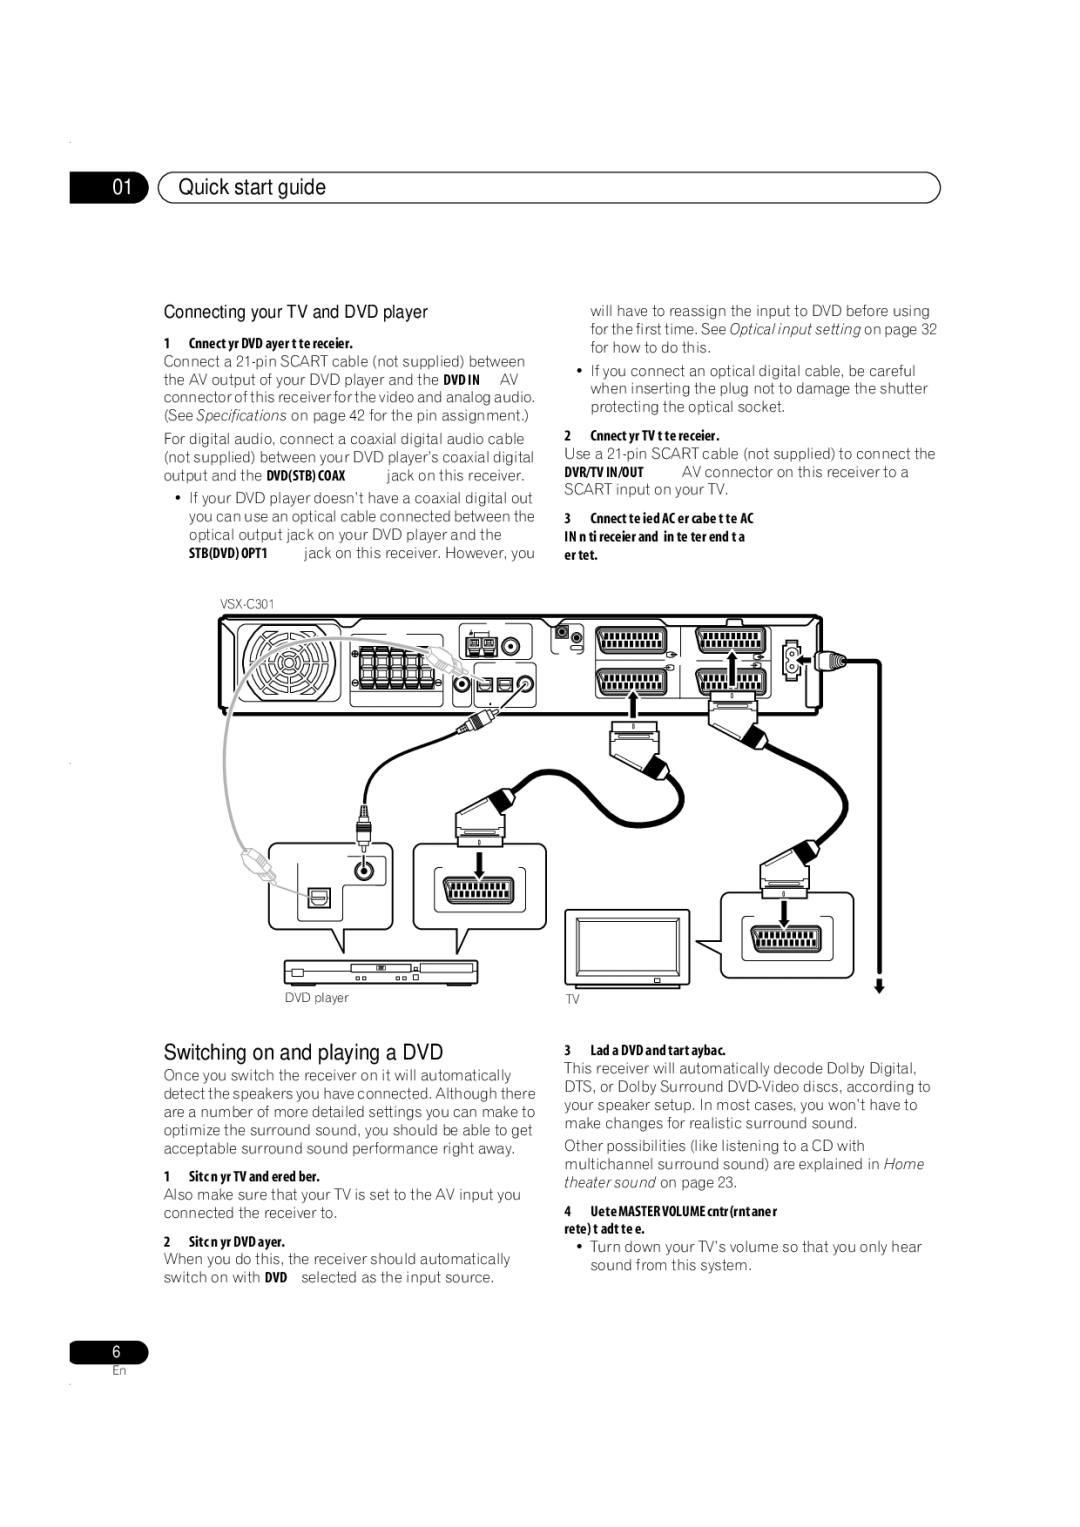
1Connect your DVD player to the receiver. Connect a 21-pin SCART cable (not supplied) between the AV output of your DVD player and the DVD IN AV connector of this receiver for the video and analog audio. (See Specifications on page 42 for the pin assignment.)

For digital audio, connect a coaxial digital audio cable (not supplied) between your DVD player’s coaxial digital output and the DVD(STB) COAX jack on this receiver.

If your DVD player doesn’t have a coaxial digital out you can use an optical cable connected between the optical output jack on your DVD player and the STB(DVD) OPT1 jack on this receiver. However, you

will have to reassign the input to DVD before using for the first time. See Optical input setting on page 32 for how to do this.

If you connect an optical digital cable, be careful when inserting the plug not to damage the shutter protecting the optical socket.

2 Connect your TV to the receiver.

Use a 21-pin SCART cable (not supplied) to connect the DVR/TV IN/OUT AV connector on this receiver to a SCART input on your TV.

3Connect the supplied AC power cable to the AC IN on this receiver and plug in the other end to a power outlet.

VSX-C301


SPEAKERS


FRONT

CENTER

SURROUND

R

L

R

L


ANTENNA

AM LOOP


FMUNBAL75


DIGITAL IN


SUB

STB

DVR/TV

DVD

WOOFER

(DVD)


(STB)

OUT

OPT1

OPT2

COAX

AC IN

IN


OUT


CONTROL

VIDEO IN/OUT

DVR/TV


AV CONNECTOR


DVD IN

STB

DIGITAL AUDIO OUT

COAXIAL

OPTICAL

DVD player

AVOUT

AVIN

TV

Switching on and playing a DVD

Once you switch the receiver on it will automatically detect the speakers you have connected. Although there are a number of more detailed settings you can make to optimize the surround sound, you should be able to get acceptable surround sound performance right away.

1Switch on your TV and powered subwoofer. Also make sure that your TV is set to the AV input you connected the receiver to.

2Switch on your DVD player.

When you do this, the receiver should automatically switch on with DVD selected as the input source.

3 Load a DVD and start playback.

This receiver will automatically decode Dolby Digital, DTS, or Dolby Surround DVD-Video discs, according to your speaker setup. In most cases, you won’t have to make changes for realistic surround sound.

Other possibilities (like listening to a CD with multichannel surround sound) are explained in Home theater sound on page 23.

4Use the MASTER VOLUME control (front panel or remote) to adjust the volume.

Turn down your TV’s volume so that you only hear sound from this system.

6

En

Page 6
Image 6
Pioneer VSX-C301 manual Quick start guide, Switching on and playing a DVD, Connecting your TV and DVD player

VSX-C301 specifications

The Pioneer VSX-C301 is a compact yet powerful surround sound receiver that exemplifies the company's commitment to delivering high-quality audio and thoughtful design. Tailored for home theater enthusiasts looking to maximize their audiovisual experiences without sacrificing space, the VSX-C301 stands out with its array of features and technologies.

At the heart of the VSX-C301 is its advanced 5.1 channel amplification system, which unleashes dynamic sound across multiple channels. With a power output of 100 watts per channel, this receiver is capable of filling any room with crisp and balanced audio, ensuring that dialogue, action scenes, and music come through with exceptional clarity. The unit supports Dolby Digital and DTS decoding, immersing listeners in rich, three-dimensional soundscapes that enhance their movie-watching experience.

Integrated with Pioneer's proprietary technologies, the VSX-C301 boasts an easy-to-use setup that facilitates seamless configuration for any home theater setup. The system includes auto-calibration features that allow it to adapt to the unique acoustics of your room, ensuring optimal speaker placement and performance. This is particularly useful for those who may not have extensive knowledge of audio setups but still want to achieve that high-fidelity sound.

On the connectivity front, the VSX-C301 is versatile and modern. It offers multiple HDMI inputs, accommodating various devices such as gaming consoles, Blu-ray players, and streaming boxes. This enables users to enjoy high-definition video and audio through a single connection, simplifying the overall setup. The inclusion of digital audio inputs, composite video inputs, and even a front panel USB port ensures that users can easily connect their favorite devices and enjoy their favorite content, regardless of its source.

User-friendliness is another strong suit of the VSX-C301. The intuitive remote control and on-screen menus make navigation seamless, allowing users to adjust settings, select audio modes, and customize their sound experience with ease. Additionally, the receiver features various sound modes such as Stereo, Auto Surround, and others, providing options for different types of media.

In summary, the Pioneer VSX-C301 is a remarkable choice for compact home theater installations. Its blend of robust sound performance, versatile connectivity options, and user-friendly features make it appealing to both audiophiles and casual viewers alike. Whether you are watching a blockbuster film or enjoying your favorite music, this receiver promises a satisfying auditory experience.