Manuals
/
Planar
/
Computer Equipment
/
Projector
Planar
PR5020, PR3020
manual
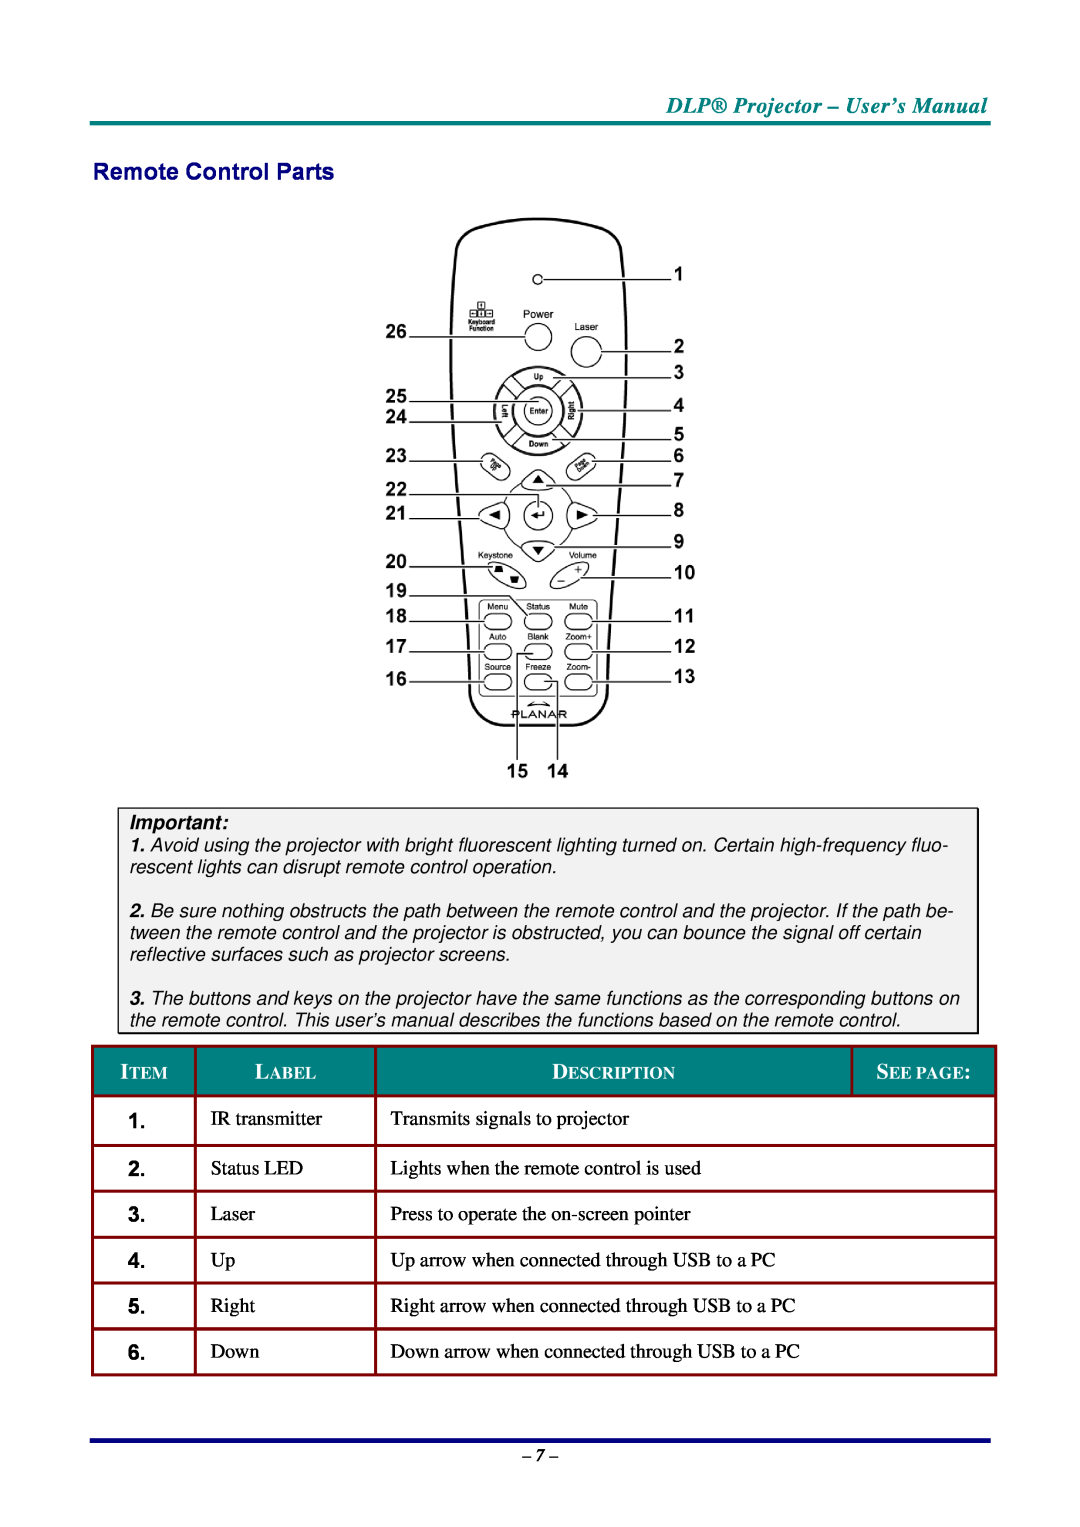
Remote Control Parts, DLP Projector - User’s Manual
Models:
PR5020
PR3020
1
15
54
54
Download
54 pages
49.52 Kb
12
13
14
15
16
17
18
19
Troubleshooting
Specification
Error codes
Signal
Symbols Used
Connecting Input Devices
Dimension
Maintenance
Config Menu
Lamp Problems
Page 15
Image 15
Page 14
Page 16
Page 15
Image 15
Page 14
Page 16
Contents
Page
Telephone US 1-866-PLANAR1 866 Outside US 503
Planar Systems, Inc
Planar Customer Support
Corporate Headquarters 1195 NW Compton Drive Beaverton, OR
Trademark Recognition
User’s Manual
Copyright
Disclaimer
General Safety Information
Important Safety Information
Symbols Used
Remote Control
Replacing the Lamp
Power Safety
Cleaning the Projector
Symbol Explanations
Register Your Planar Products Today
Main Features
Cables, Replacement Lamps and Accessories
About this manual
MAINTENANCE AND SECURITY
Table of contents
SETUP AND OPERATION
ON-SCREEN DISPLAY OSD MENU SETTINGS
REGULATORY COMPLIANCE
SAFETY CERTIFICATIONS
PR5020 Projection distance and size table
TIMING MODE TABLE
Packing Checklist
GETTING STARTED
Avoid using the projector in dusty environments
Views of Projector Parts
Front-right View
DLP Projector - User’s Manual
Height-adjuster button
Push to release height adjuster
Top view-On-screen Display OSD buttons and LEDs
User’s Manual
Rear view
system
Bottom view
Security Lock
Secure to permanent object with a Kensington Lock
Remote Control Parts
Page Down
Page down when connected through USB to a PC
Projector and Remote Control Buttons
Remote Control Operating Range
Inserting the Remote Control Batteries
SETUP AND OPERATION
Connecting Input Devices
User’s Manual
Starting and Shutting down the Projector
Turn off the main Power switch when the Ready LED stops flashing
Setting an Access Password Security Lock
Adjusting the Projector Level
Adjusting the Zoom, Focus and Keystone
Adjusting the Volume
Use the Keystone button to correct image distor- tion
ON-SCREEN DISPLAY OSD MENU SETTINGS
Navigating the OSD
OSD Menu Controls
Setting the OSD Language
User’s Manual
Main Menu
Input
Gamma
x = available to video source
Main Menu Functions Available for Connected Source
Setup Menu
Setup Menu Functions Available for Connected Source
Data source
Advance Feature
DLP Projector - User’s Manual
User Color
The Config menu functions are available to all video sources
Config Menu
Utility Menu
Utility Menu Functions Available for Connected Source
Tool Menu
These
Status Menu
Replacing the Projection Lamp
MAINTENANCE AND SECURITY
2. Open the lamp com- partment cover B
3. Remove the two screws from the lamp module C
4. Lift the module handle up D
Pull firmly on the mod- ule handle to remove the lamp module D
Reverse steps 1 to 5 to install the new lamp module
Cleaning the Projector
Resetting the Lamp
Cleaning the Lens
Cleaning the Case
Using the Kensington Lock
TROUBLESHOOTING
Common problems and solutions
Tips for Troubleshooting
Problem The image is blurred
LED Error Messages
Image Problems
Problem No image appears on the screen
Problem The image is flat with no contrast
Lamp Problems
Remote Control Problems
Audio Problems
PR3020
SPECIFICATIONS
Input/output connectors
PR3010
PR3020 and PR3010 Projection distance and size table
Projection Distance V.S. Projection Size
L Projection Distance
Shaded rows are equivalent measurement in feet and inches
PR5020 Projection distance and size table
Video
Timing Mode Table
Signal
Resolution
300 mm11.8 mm396 244 mm9.6
Projector Dimensions
Canada
Safety Certifications
REGULATORY COMPLIANCE
FCC Warning
Planar Customer Support
Planar Systems, Inc
Top
Page
Image
Contents