INSTALLING THE OPTIONAL GRIPVAC™ (892)
| GripVac Parts |
| 1 | 10 |
|
|
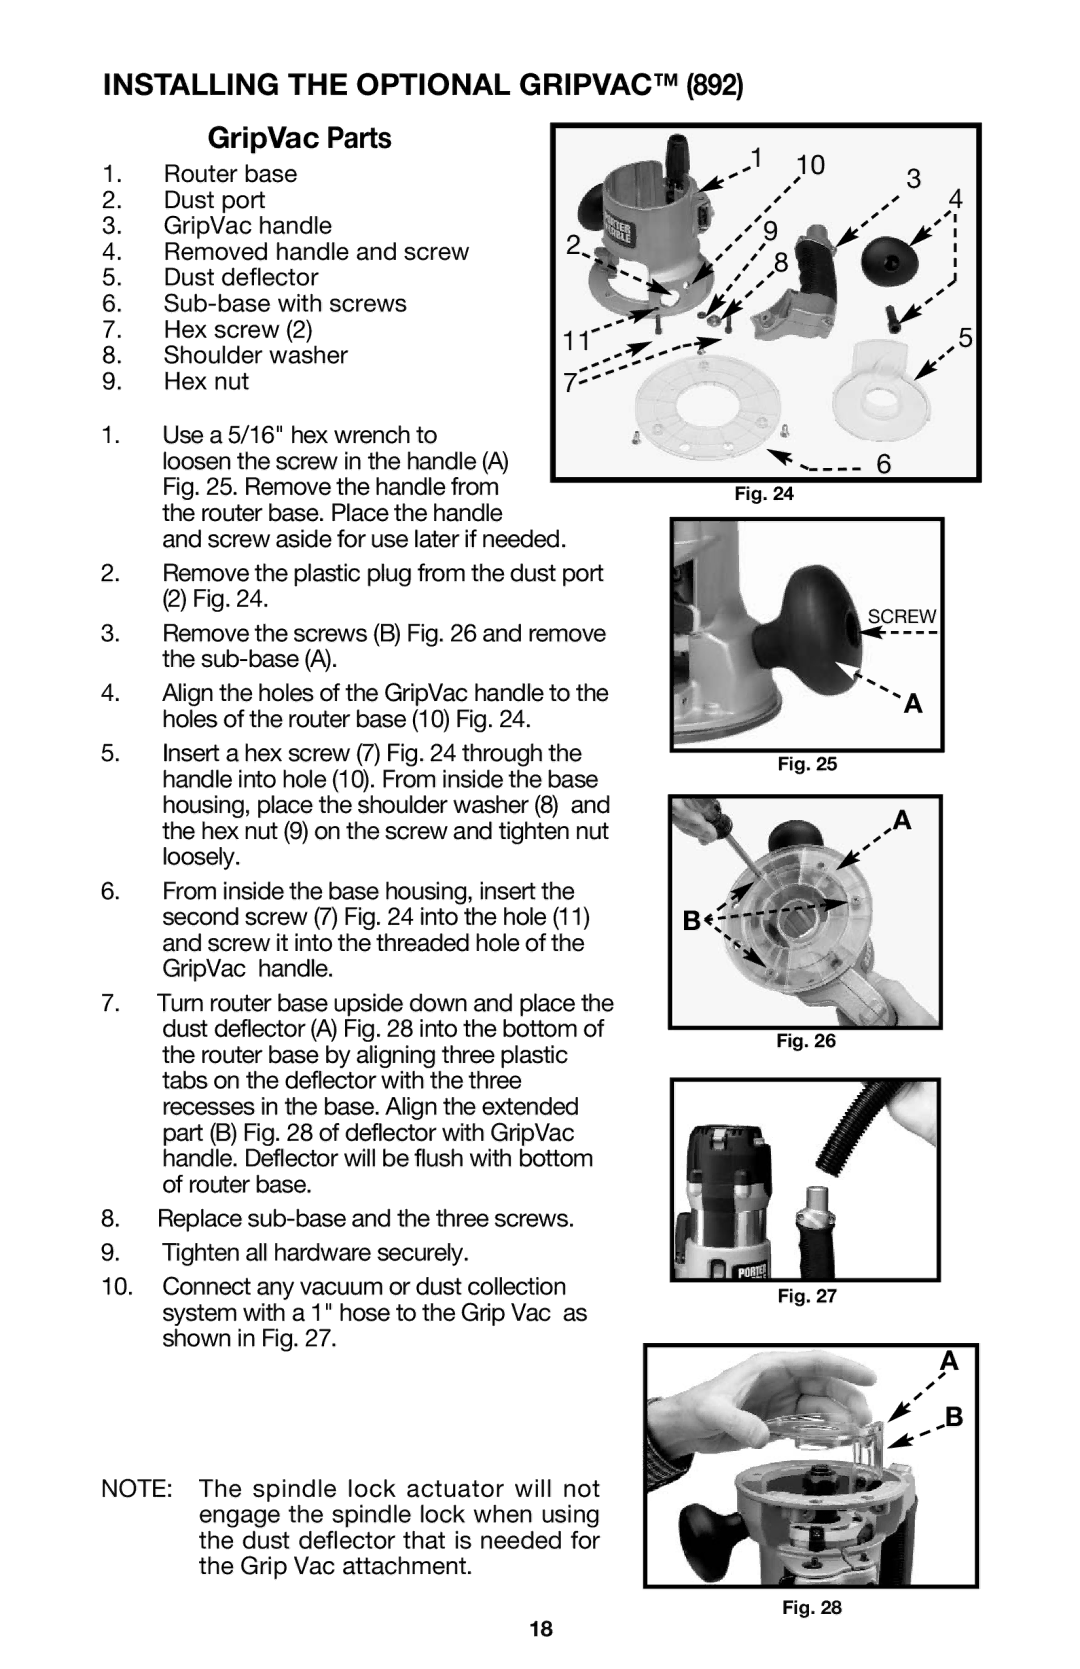
1. | Router base |
| 3 |
| ||
|
|
|
| |||
2. | Dust port |
|
|
| 4 | |
3. | GripVac handle | 2 | 9 |
|
|
|
|
|
| ||||
4. | Removed handle and screw | 8 |
|
|
| |
5. | Dust deflector |
|
|
|
| |
|
|
|
|
| ||
|
|
|
|
| ||
6. |
|
|
|
|
| |
7. | Hex screw (2) | 11 |
|
| 5 | |
8. | Shoulder washer |
|
|
|
|
|
9. | Hex nut | 7 |
|
|
|
|
1.Use a 5/16" hex wrench to
loosen the screw in the handle (A) | 6 |
| |
Fig. 25. Remove the handle from |
| Fig. 24 |
|
the router base. Place the handle |
|
| |
and screw aside for use later if needed. |
|
| |
2.Remove the plastic plug from the dust port
(2) Fig. 24.
3. | Remove the screws (B) Fig. 26 and remove | SCREW | ||
| ||||
| the |
| ||
4. | Align the holes of the GripVac handle to the | A | ||
| holes of the router base (10) Fig. 24. | |||
|
| |||
5. | Insert a hex screw (7) Fig. 24 through the |
| ||
Fig. 25 | ||||
| handle into hole (10). From inside the base | |||
|
| |||
| housing, place the shoulder washer (8) and |
| A | |
| the hex nut (9) on the screw and tighten nut |
| ||
|
|
| ||
| loosely. |
|
| |
6. | From inside the base housing, insert the |
|
| |
| second screw (7) Fig. 24 into the hole (11) |
| B | |
| and screw it into the threaded hole of the |
|
| |
| GripVac handle. |
|
| |
7. | Turn router base upside down and place the |
|
| |
| dust deflector (A) Fig. 28 into the bottom of |
|
| |
|
| Fig. 26 | ||
| the router base by aligning three plastic | |||
|
| |||
| tabs on the deflector with the three |
| ||
|
| |||
| recesses in the base. Align the extended |
| ||
| part (B) Fig. 28 of deflector with GripVac |
| ||
| handle. Deflector will be flush with bottom |
| ||
| of router base. |
| ||
8. | Replace |
| ||
9. | Tighten all hardware securely. |
| ||
10. | Connect any vacuum or dust collection |
| ||
Fig. 27 | ||||
system with a 1" hose to the Grip Vac as shown in Fig. 27.
A
B
NOTE: The spindle lock actuator will not engage the spindle lock when using the dust deflector that is needed for the Grip Vac attachment.
Fig. 28
18