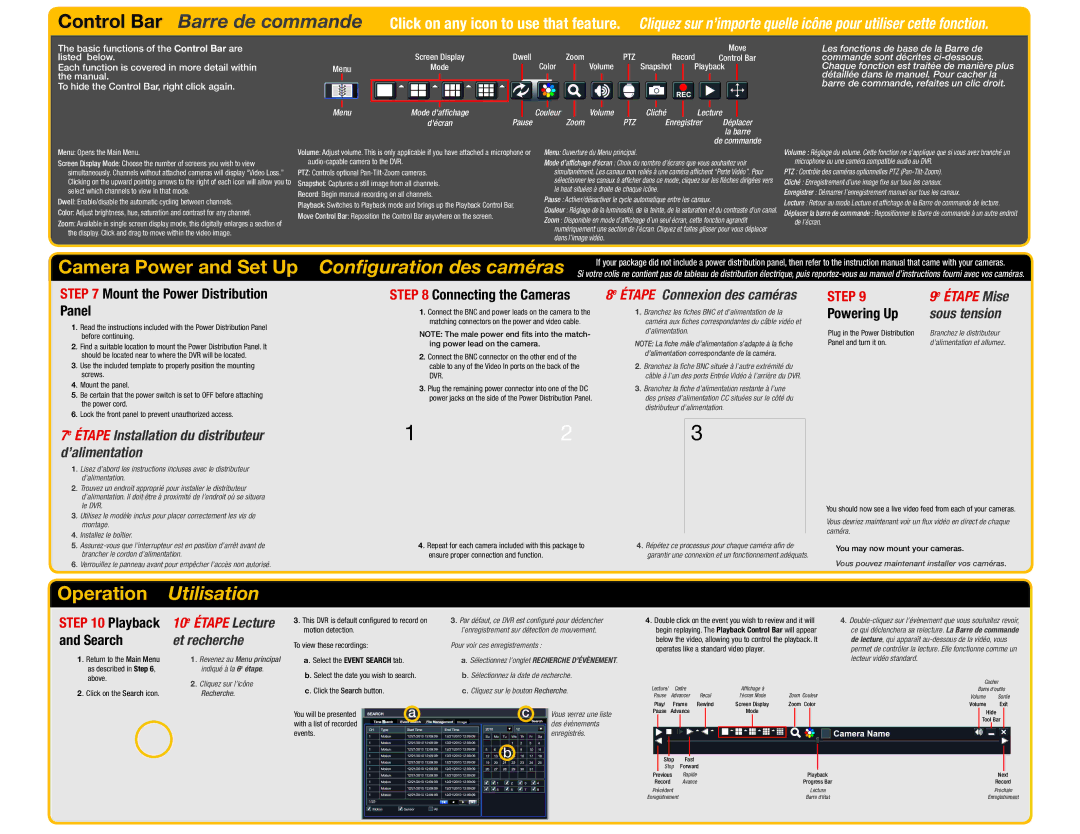
Control Bar Barre de commande Click on any icon to use that feature. Cliquez sur n’importe quelle icône pour utiliser cette fonction.
The basic functions of the Control Bar are listed below.
Each function is covered in more detail within the manual.
To hide the Control Bar, right click again.
| Screen Display | Dwell | Zoom | PTZ |
| Record | Move |
|
| Control Bar | |||||
Menu | Mode | Color | Volume |
| Snapshot | Playback | |
Menu | Mode d'affichage | Couleur | Volume |
| Cliché | Lecture | |
| d'écran | Pause | Zoom | PTZ | Enregistrer | Déplacer | |
|
|
|
|
|
|
| la barre |
de commande
Les fonctions de base de la Barre de commande sont décrites
Menu: Opens the Main Menu.
Screen Display Mode: Choose the number of screens you wish to view simultaneously. Channels without attached cameras will display “Video Loss.” Clicking on the upward pointing arrows to the right of each icon will allow you to select which channels to view in that mode.
Dwell: Enable/disable the automatic cycling between channels.
Color: Adjust brightness, hue, saturation and contrast for any channel.
Zoom: Available in single screen display mode, this digitally enlarges a section of the display. Click and drag to move within the video image.
Volume: Adjust volume. This is only applicable if you have attached a microphone or
PTZ: Controls optional
Snapshot: Captures a still image from all channels.
Record: Begin manual recording on all channels.
Playback: Switches to Playback mode and brings up the Playback Control Bar.
Move Control Bar: Reposition the Control Bar anywhere on the screen.
Menu: Ouverture du Menu principal.
Mode d’affichage d’écran : Choix du nombre d’écrans que vous souhaitez voir simultanément. Les canaux non reliés à une caméra affichent “Perte Vidéo”. Pour sélectionner les canaux à afficher dans ce mode, cliquez sur les flèches dirigées vers le haut situées à droite de chaque icône.
Pause : Activer/désactiver le cycle automatique entre les canaux.
Couleur : Réglage de la luminosité, de la teinte, de la saturation et du contraste d’un canal.
Zoom : Disponible en mode d’affichage d’un seul écran, cette fonction agrandit numériquement une section de l’écran. Cliquez et faites glisser pour vous déplacer dans l’image vidéo.
Volume : Réglage du volume. Cette fonction ne s’applique que si vous avez branché un microphone ou une caméra compatible audio au DVR.
PTZ : Contrôle des caméras optionnelles PTZ
Cliché : Enregistrement d’une image fixe sur tous les canaux.
Enregistrer : Démarrer l’enregistrement manuel sur tous les canaux.
Lecture : Retour au mode Lecture et affichage de la Barre de commande de lecture.
Déplacer la barre de commande : Repositionner la Barre de commande à un autre endroit de l’écran.
Camera Power and Set Up
Configuration des caméras If your package did not include a power distribution panel, then refer to the instruction manual that came with your cameras.
Si votre colis ne contient pas de tableau de distribution électrique, puis
STEP 7 Mount the Power Distribution
Panel
1. Read the instructions included with the Power Distribution Panel before continuing.
2. Find a suitable location to mount the Power Distribution Panel. It should be located near to where the DVR will be located.
3. Use the included template to properly position the mounting screws.
4. Mount the panel.
5. Be certain that the power switch is set to OFF before attaching the power cord.
6. Lock the front panel to prevent unauthorized access.
7e ÉTAPE Installation du distributeur d’alimentation
1. Lisez d’abord les instructions incluses avec le distributeur d’alimentation.
2. Trouvez un endroit approprié pour installer le distributeur d’alimentation. Il doit être à proximité de l’endroit où se situera le DVR.
3. Utilisez le modèle inclus pour placer correctement les vis de montage.
4. Installez le boîtier.
5.
6. Verrouillez le panneau avant pour empêcher l’accès non autorisé.
STEP 8 Connecting the Cameras
1. Connect the BNC and power leads on the camera to the matching connectors on the power and video cable.
NOTE: The male power end fits into the match- ing power lead on the camera.
2. Connect the BNC connector on the other end of the cable to any of the Video In ports on the back of the DVR.
3. Plug the remaining power connector into one of the DC power jacks on the side of the Power Distribution Panel.
12
4. Repeat for each camera included with this package to ensure proper connection and function.
8e ÉTAPE Connexion des caméras
1. Branchez les fiches BNC et d’alimentation de la caméra aux fiches correspondantes du câble vidéo et d’alimentation.
NOTE: La fiche mâle d’alimentation s’adapte à la fiche d’alimentation correspondante de la caméra.
2. Branchez la fiche BNC située à l’autre extrémité du câble à l’un des ports Entrée Vidéo à l’arrière du DVR.
3. Branchez la fiche d’alimentation restante à l’une des prises d’alimentation CC situées sur le côté du distributeur d’alimentation.
3
4. Répétez ce processus pour chaque caméra afin de garantir une connexion et un fonctionnement adéquats.
STEP 9 | 9e ÉTAPE Mise |
Powering Up | sous tension |
Plug in the Power Distribution | Branchez le distributeur |
Panel and turn it on. | d’alimentation et allumez. |
You should now see a live video feed from each of your cameras.
Vous devriez maintenant voir un flux vidéo en direct de chaque caméra.
You may now mount your cameras.
Vous pouvez maintenant installer vos caméras.
Operation | Utilisation | |
STEP 10 Playback | 10e ÉTAPE Lecture | |
and Search | et recherche | |
1. Return to the Main Menu | 1. Revenez au Menu principal | |
as described in Step 6, | indiqué à la 6e étape. | |
above. | 2. Cliquez sur l’icône | |
2. Click on the Search icon. | ||
Recherche. |
3. This DVR is default configured to record on motion detection.
To view these recordings:
a. Select the EVENT SEARCH tab.
b. Select the date you wish to search.
c. Click the Search button.
You will be presented |
|
| a | ||
with a list of recorded |
|
|
|
|
|
|
|
|
| ||
events. |
|
|
|
|
|
|
|
|
|
| |
|
|
|
|
|
|
|
|
|
|
|
|
|
|
|
|
|
|
3. Par défaut, ce DVR est configuré pour déclencher | 4. Double click on the event you wish to review and it will | 4. | |
l’enregistrement sur détection de mouvement. | begin replaying. The Playback Control Bar will appear | ce qui déclenchera sa relecture. La Barre de commande | |
Pour voir ces enregistrements : | below the video, allowing you to control the playback. It | de lecture, qui apparaît | |
operates like a standard video player. | permet de contrôler la lecture. Elle fonctionne comme un | ||
| |||
a. Sélectionnez l’onglet RECHERCHE D’ÉVÈNEMENT. |
| lecteur vidéo standard. |
b. Sélectionnez la date de recherche.
|
| Lecture/ |
| Cadre |
| Affichage à |
| Cacher | |
c. Cliquez sur le bouton Recherche. |
| Recul | Zoom Couleur | Barre d’outils | |||||
|
| Pause | Advancer | l'écran Mode | Volume | Sortie | |||
c |
| Play/ | Frame | Rewind | Screen Display | Zoom Color | Volume | Exit | |
Vous verrez une liste | Pause | Advance |
| Mode |
|
| Hide | ||
|
|
|
|
|
| Tool Bar | |||
Image | des évènements |
|
|
|
|
|
| ||
|
|
|
|
|
|
|
|
| |
| enregistrés. |
|
|
|
|
|
|
|
|
b |
| Stop | Fast |
|
|
|
|
| |
|
|
|
|
|
|
| |||
|
| Stop | Forward |
|
|
|
| ||
Previous | Rapide | Playback | Next |
Record | Avance | Progress Bar | Record |
Précédent |
| Lecture | Prochain |
Enregistrement |
| Barre d'état | Enregistrement |