SERVICING - WARNING

Disconnect from electricity and gas before servicing. Check appliance is safe when you have finished.

20. To Remove Oven Inner Back.

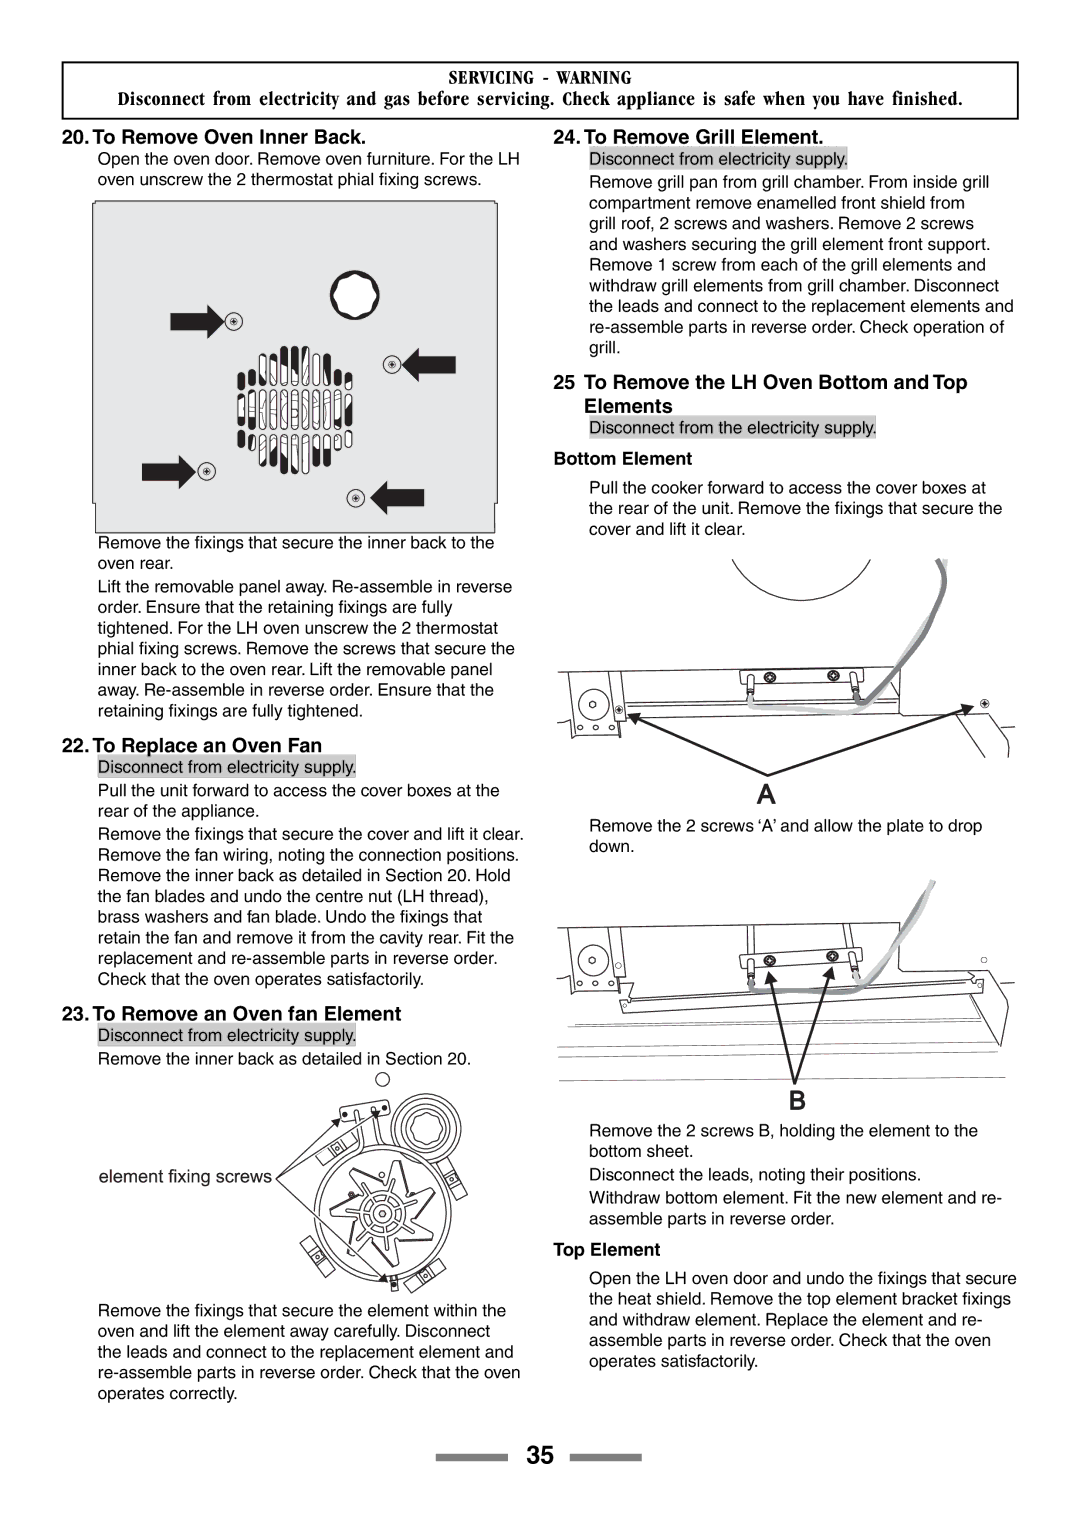
Open the oven door. Remove oven furniture. For the LH oven unscrew the 2 thermostat phial fixing screws.

Remove the fixings that secure the inner back to the oven rear.

Lift the removable panel away. Re-assemble in reverse order. Ensure that the retaining fixings are fully tightened. For the LH oven unscrew the 2 thermostat phial fixing screws. Remove the screws that secure the inner back to the oven rear. Lift the removable panel away. Re-assemble in reverse order. Ensure that the retaining fixings are fully tightened.

22. To Replace an Oven Fan

Disconnect from electricity supply.

Pull the unit forward to access the cover boxes at the rear of the appliance.

Remove the fixings that secure the cover and lift it clear. Remove the fan wiring, noting the connection positions. Remove the inner back as detailed in Section 20. Hold the fan blades and undo the centre nut (LH thread), brass washers and fan blade. Undo the fixings that retain the fan and remove it from the cavity rear. Fit the replacement and re-assemble parts in reverse order. Check that the oven operates satisfactorily.

23. To Remove an Oven fan Element

Disconnect from electricity supply.

Remove the inner back as detailed in Section 20.

Remove the fixings that secure the element within the oven and lift the element away carefully. Disconnect the leads and connect to the replacement element and re-assemble parts in reverse order. Check that the oven operates correctly.

24. To Remove Grill Element.

Disconnect from electricity supply.

Remove grill pan from grill chamber. From inside grill compartment remove enamelled front shield from grill roof, 2 screws and washers. Remove 2 screws and washers securing the grill element front support. Remove 1 screw from each of the grill elements and withdraw grill elements from grill chamber. Disconnect the leads and connect to the replacement elements and re-assemble parts in reverse order. Check operation of grill.

25 To Remove the LH Oven Bottom and Top Elements

Disconnect from the electricity supply.

Bottom Element

Pull the cooker forward to access the cover boxes at the rear of the unit. Remove the fixings that secure the cover and lift it clear.

Remove the 2 screws ‘A’ and allow the plate to drop down.

Remove the 2 screws B, holding the element to the bottom sheet.

Disconnect the leads, noting their positions.

Withdraw bottom element. Fit the new element and re- assemble parts in reverse order.

Top Element

Open the LH oven door and undo the fixings that secure the heat shield. Remove the top element bracket fixings and withdraw element. Replace the element and re- assemble parts in reverse order. Check that the oven operates satisfactorily.

35

Page 35
Image 35
Rangemaster 90 To Remove Oven Inner Back, To Replace an Oven Fan, To Remove an Oven fan Element, To Remove Grill Element

90 specifications

The Rangemaster 90 is a sophisticated cooking appliance that embodies both functionality and elegance, making it a popular choice for both amateur chefs and culinary enthusiasts alike. This range cooker is thoughtfully designed to provide a perfect blend of traditional cooking methods with modern technology, ensuring that every meal is prepared to perfection.

One of the standout features of the Rangemaster 90 is its dual fuel capabilities. This allows users to harness the precision of gas cooking for immediate heat control while utilizing the consistent and even temperatures of an electric oven for baking and roasting. This combination ensures that every dish can be prepared with the utmost accuracy, whether it is a delicate soufflé or a hearty roast.

Another significant aspect of the Rangemaster 90 is its generous cooking space. With a 90cm width, it provides ample room for multiple dishes. The oven compartment typically includes two cavities, offering a main oven and a secondary oven that operates as a separate temperature zone. This design feature is particularly advantageous for those who enjoy multitasking in the kitchen, allowing different dishes to be prepared simultaneously.

The Rangemaster 90 also features advanced cooking technologies, such as the multifunction oven, which provides several cooking modes ranging from convection cooking to grilling. This versatility empowers users to experiment with diverse culinary techniques, enhancing their cooking experience. Additionally, many models come equipped with an integrated grill, further expanding the range of cooking options available.

Customization is another hallmark of the Rangemaster 90. It is available in a variety of colors and styles, allowing homeowners to select a model that complements their kitchen décor. The signature look often includes classic features such as a bold control panel, sturdy cast iron pan supports, and elegant handles, making it a visually striking addition to any kitchen environment.

Lastly, the Rangemaster 90 prioritizes ease of use and maintenance. It typically incorporates an easy-clean enamel coating within ovens that simplifies the cleaning process, making this beautiful appliance as practical as it is stylish.

Overall, the Rangemaster 90 is an exceptional cooker that combines state-of-the-art technology, a wealth of cooking options, and an impressive aesthetic appeal, making it a centerpiece for any modern kitchen. Its robust features ensure that it can handle the diverse needs of today’s culinary enthusiasts, whether preparing a casual family meal or an elaborate feast for guests.