fig.4-8

5 mm


Fitting the Furniture Door


If you need the door to open from the other side, then reverse

=

=


Worktop

the door before fitting the furniture door (see ‘Reversing the


door’).


Tools required:

5 mm

Tape measure


15 mm


Sharp pencil


Small flat bladed screwdriver


Spanner


Procedure


Side view

1.

Undo the 2 screws from the mounting bracket. Remove


the bracket.


2.

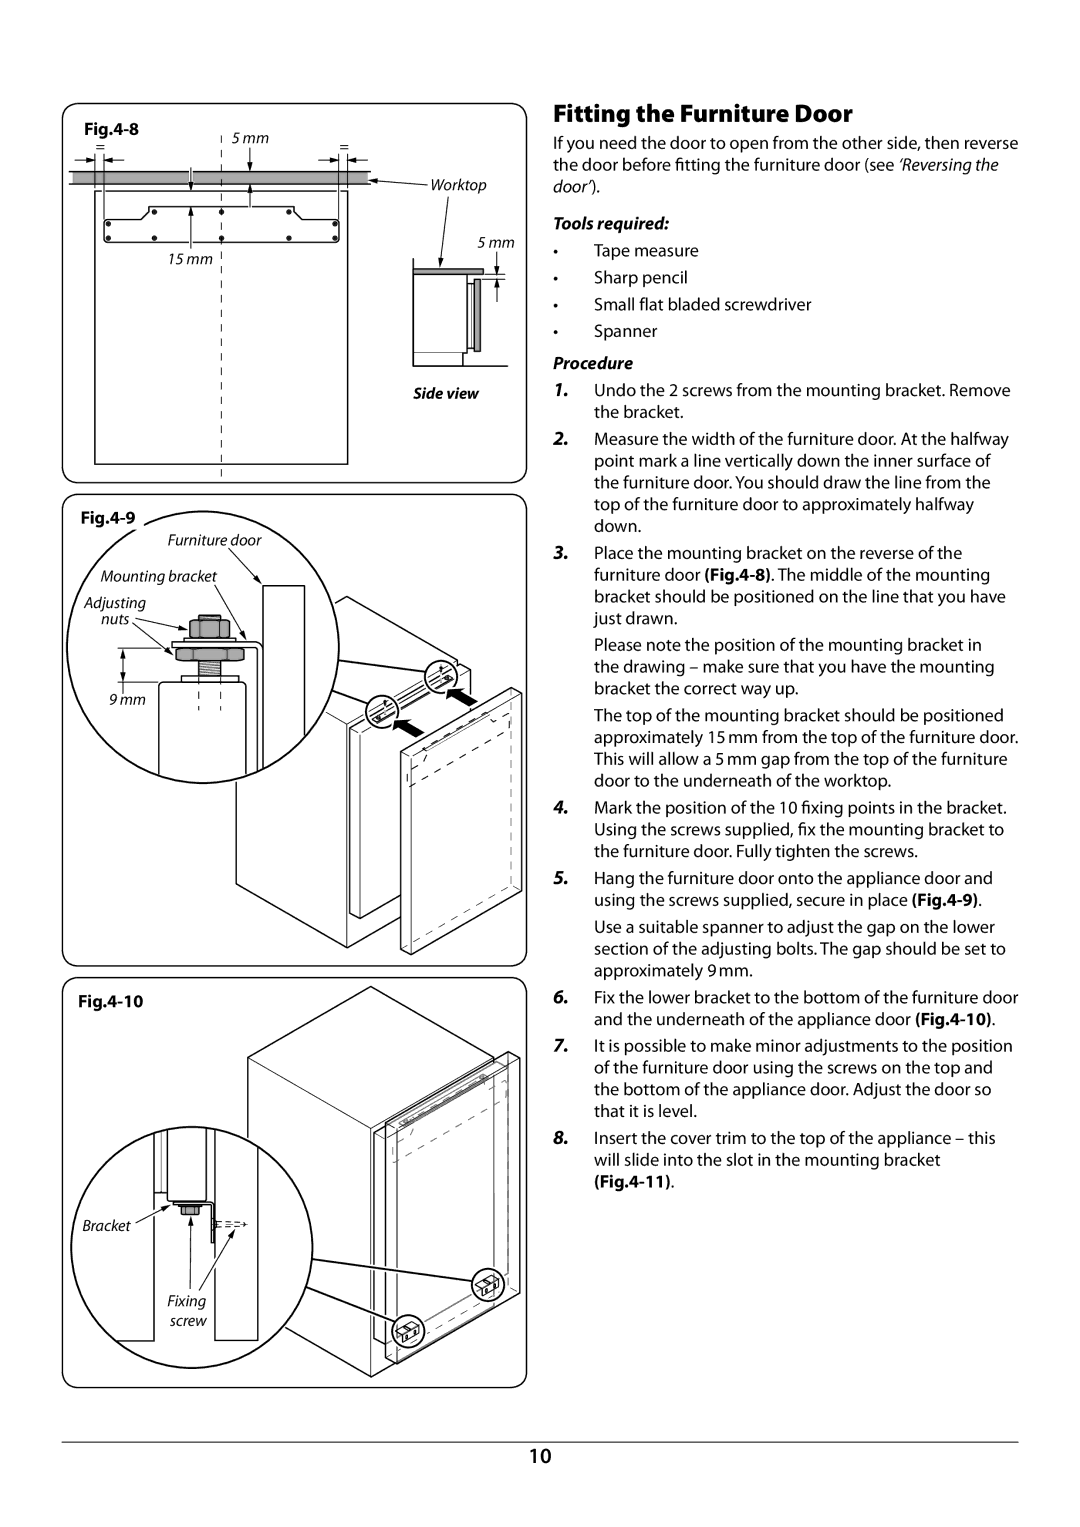
Measure the width of the furniture door. At the halfway


point mark a line vertically down the inner surface of


the furniture door. You should draw the line from the

fig.4-9


top of the furniture door to approximately halfway


down.


Furniture door


3.

Place the mounting bracket on the reverse of the


Mounting bracket


furniture door (fig.4-8). The middle of the mounting

Adjusting


bracket should be positioned on the line that you have

nuts


just drawn.


Please note the position of the mounting bracket in


the drawing – make sure that you have the mounting

9 mm


bracket the correct way up.


The top of the mounting bracket should be positioned


approximately 15 mm from the top of the furniture door.


This will allow a 5 mm gap from the top of the furniture


door to the underneath of the worktop.


4.

Mark the position of the 10 fixing

points in the bracket.


Using the screws supplied, fix the

mounting bracket to


the furniture door. Fully tighten the screws.


5.

Hang the furniture door onto the appliance door and


using the screws supplied, secure in place (fig.4-9).


Use a suitable spanner to adjust the gap on the lower


section of the adjusting bolts. The gap should be set to


approximately 9 mm.


fig.4-10

6.

Fix the lower bracket to the bottom of the furniture door


and the underneath of the appliance door (fig.4-10).


7.

It is possible to make minor adjustments to the position


of the furniture door using the screws on the top and


the bottom of the appliance door. Adjust the door so


that it is level.


8.

Insert the cover trim to the top of the appliance – this


will slide into the slot in the mounting bracket


(fig.4-11).


Bracket


Fixing


screw


10

Page 12
Image 12
Rangemaster U110120 - 01A manual Tape measure, Sharp pencil Small flat bladed screwdriver Spanner, Approximately 9 mm

U110120 - 01A specifications

The Rangemaster U110120 - 01A is an exemplary range cooker that combines advanced technology with traditional craftsmanship to elevate your culinary experience. Designed for home chefs and cooking enthusiasts alike, this model stands out with its blend of aesthetic appeal and functionality.

One of the defining features of the Rangemaster U110120 - 01A is its expansive cooking capacity, which accommodates multiple dishes simultaneously. The unit typically encompasses several ovens, each designed to perform specific cooking functions, from baking and roasting to grilling and slow cooking. This versatility makes it ideal for large families or those who enjoy hosting gatherings.

The Rangemaster employs advanced heating technologies, including multi-function ovens engineered to ensure even heat distribution. This design allows for precise cooking results, making it possible to achieve a perfect bake every time. Additionally, the unit often features a built-in fan, which promotes efficient heat circulation for uniform cooking.

Another standout characteristic of the U110120 - 01A is its powerful hob configuration. With multiple cooking zones, including high-output burners and a wok burner, it offers the flexibility needed for various cooking styles. Users can easily switch between simmering sauces and boiling water, all on a single surface.

Aesthetically, the Rangemaster model is designed to be a focal point in any kitchen. Its elegant finishes, available in a range of stylish colors, ensure it complements diverse interior designs. The attention to detail is reflected in the control knobs, handles, and overall build quality, which exhibits a blend of modern design and classic elements.

Safety features are paramount in the Rangemaster U110120 - 01A, which may include flame failure devices and auto shut-off capabilities. These features provide peace of mind, particularly for busy kitchens where multitasking is common.

In summary, the Rangemaster U110120 - 01A is not just a cooking appliance but a versatile culinary partner. With its rich combination of features, advanced technology, and striking design, this model represents a perfect fusion of style and performance, making it an excellent choice for discerning home chefs. Whether you are preparing daily meals or elaborate feasts, the Rangemaster U110120 - 01A is equipped to meet your culinary needs with ease and sophistication.