ADJUSTMENTS/REPLACEMENTSOF

COMPONENTS

CAUTION: Label all wires prior to disconnection when servicing controls. Wiring errors can cause improper and dangerous operation. Verify proper operation after servicing.

DANGER-SHOCKHAZARD

Make sure electrical power to the heater is disconnect- ed to avoid potential serious injury or damage to com- ponents.

1.Gas Valve Replacement

a)Shut off electrical power and gas supply to the heater.

b)Remove gas piping to gas valve inlet.

c)Disconnect wiring connections, pilot tubing (when equipped).

d)Remove screws (2) holding the burner tray.

e)Slide burner tray out.

f)Remove gas valve bracket screws and bracket.

g)Unscrew gas valve from gas pipe.

h)Reverse above procedure to re-install.

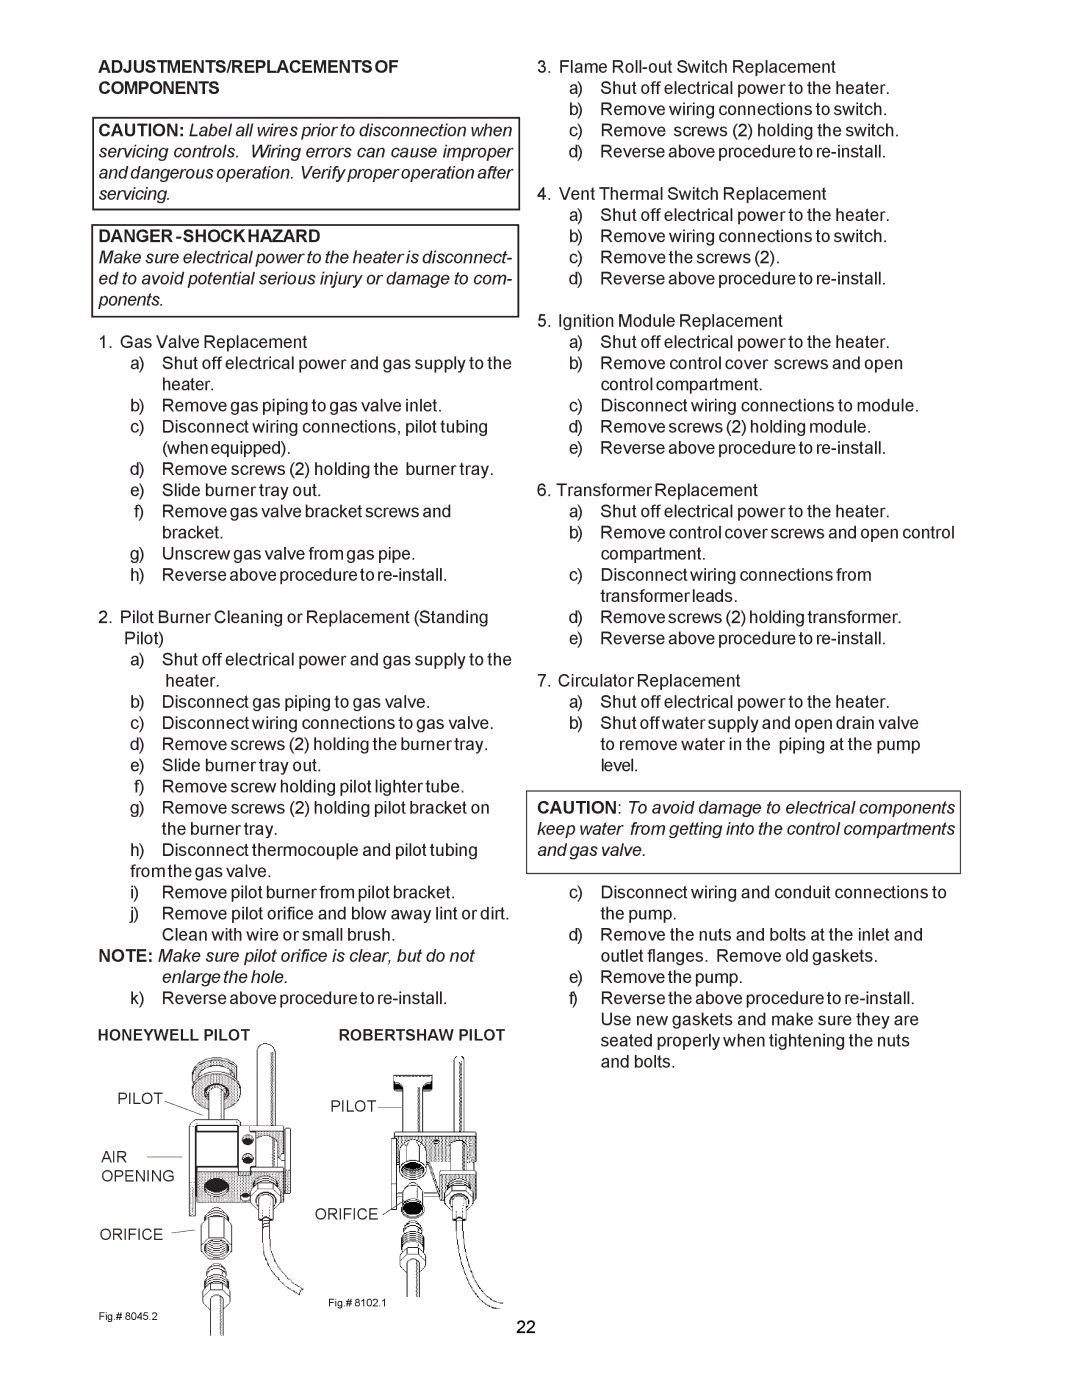
2.Pilot Burner Cleaning or Replacement (Standing Pilot)

a)Shut off electrical power and gas supply to the heater.

b)Disconnect gas piping to gas valve.

c)Disconnect wiring connections to gas valve.

d)Remove screws (2) holding the burner tray.

e)Slide burner tray out.

f)Remove screw holding pilot lighter tube.

g)Remove screws (2) holding pilot bracket on the burner tray.

h)Disconnect thermocouple and pilot tubing from the gas valve.

i)Remove pilot burner from pilot bracket.

j)Remove pilot orifice and blow away lint or dirt. Clean with wire or small brush.

NOTE: Make sure pilot orifice is clear, but do not enlarge the hole.

k) Reverse above procedure to re-install.

HONEYWELL PILOT

ROBERTSHAW PILOT

PILOTPILOT

AIR

OPENING

ORIFICE

ORIFICE

3.Flame Roll-out Switch Replacement

a)Shut off electrical power to the heater.

b)Remove wiring connections to switch.

c)Remove screws (2) holding the switch.

d)Reverse above procedure to re-install.

4.Vent Thermal Switch Replacement

a)Shut off electrical power to the heater.

b)Remove wiring connections to switch.

c)Remove the screws (2).

d)Reverse above procedure to re-install.

5.Ignition Module Replacement

a)Shut off electrical power to the heater.

b)Remove control cover screws and open control compartment.

c)Disconnect wiring connections to module.

d)Remove screws (2) holding module.

e)Reverse above procedure to re-install.

6.Transformer Replacement

a)Shut off electrical power to the heater.

b)Remove control cover screws and open control compartment.

c)Disconnect wiring connections from transformer leads.

d)Remove screws (2) holding transformer.

e)Reverse above procedure to re-install.

7.Circulator Replacement

a)Shut off electrical power to the heater.

b)Shut off water supply and open drain valve to remove water in the piping at the pump level.

CAUTION: To avoid damage to electrical components keep water from getting into the control compartments and gas valve.

c)Disconnect wiring and conduit connections to the pump.

d)Remove the nuts and bolts at the inlet and outlet flanges. Remove old gaskets.

e)Remove the pump.

f)Reverse the above procedure to re-install. Use new gaskets and make sure they are seated properly when tightening the nuts and bolts.

Fig.# 8102.1

Fig.# 8045.2

22

Page 22
Image 22
Raypak 135A, 195A, 090A manual ADJUSTMENTS/REPLACEMENTSOF Components, Fig.#

090A, 135A, 195A specifications

Raypak, a leading manufacturer in the pool and spa heating industry, presents its advanced line of heaters, specifically the Raypak 195A, 090A, and 135A models. These heaters are renowned for their high performance, durability, and energy efficiency, making them ideal for a variety of applications, including residential and commercial pools and spas.

The Raypak 195A heater stands out with its powerful heating capacity, which is designed to quickly raise water temperatures, ensuring comfortable swimming conditions even in cooler climates. Its compact design allows for easy installation in tight spaces, and it operates quietly, enhancing the user experience. The 090A, meanwhile, is exceptional for smaller pools or spas, delivering reliable heating performance with energy-saving features. This model is particularly popular among homeowners looking to maintain a comfortable temperature without inflating their energy bills.

In contrast, the 135A model offers an impressive balance of power and efficiency, making it suitable for medium-sized pools. It incorporates advanced technologies to minimize energy consumption while maximizing output, allowing users to enjoy their pools while being environmentally conscious.

All three models boast Raypak's innovative digital control system, which provides precise temperature management and easy programming. Users can easily set desired temperatures and schedules, minimizing manual adjustments and enhancing convenience. The built-in diagnostic capabilities alert users to any potential maintenance needs, assuring long-term reliability and performance.

Furthermore, the heaters utilize a copper heat exchanger, known for its exceptional thermal conductivity, which ensures rapid heating and corrosion resistance. The specially designed rust-resistant cabinet protects the internal components from the elements, prolonging the lifespan of the heaters.

In addition to their robust features, these Raypak models are designed for easy maintenance. The streamlined layouts make it simple for service technicians to access vital components, reducing downtime and ensuring efficiency when repairs are necessary.

With their combination of advanced technology, energy efficiency, and user-friendly features, the Raypak 195A, 090A, and 135A models stand as top choices for pool and spa heating solutions. Their reliability and performance make them a valuable addition to any backyard oasis, allowing users to enjoy warm water year-round, regardless of the climate.