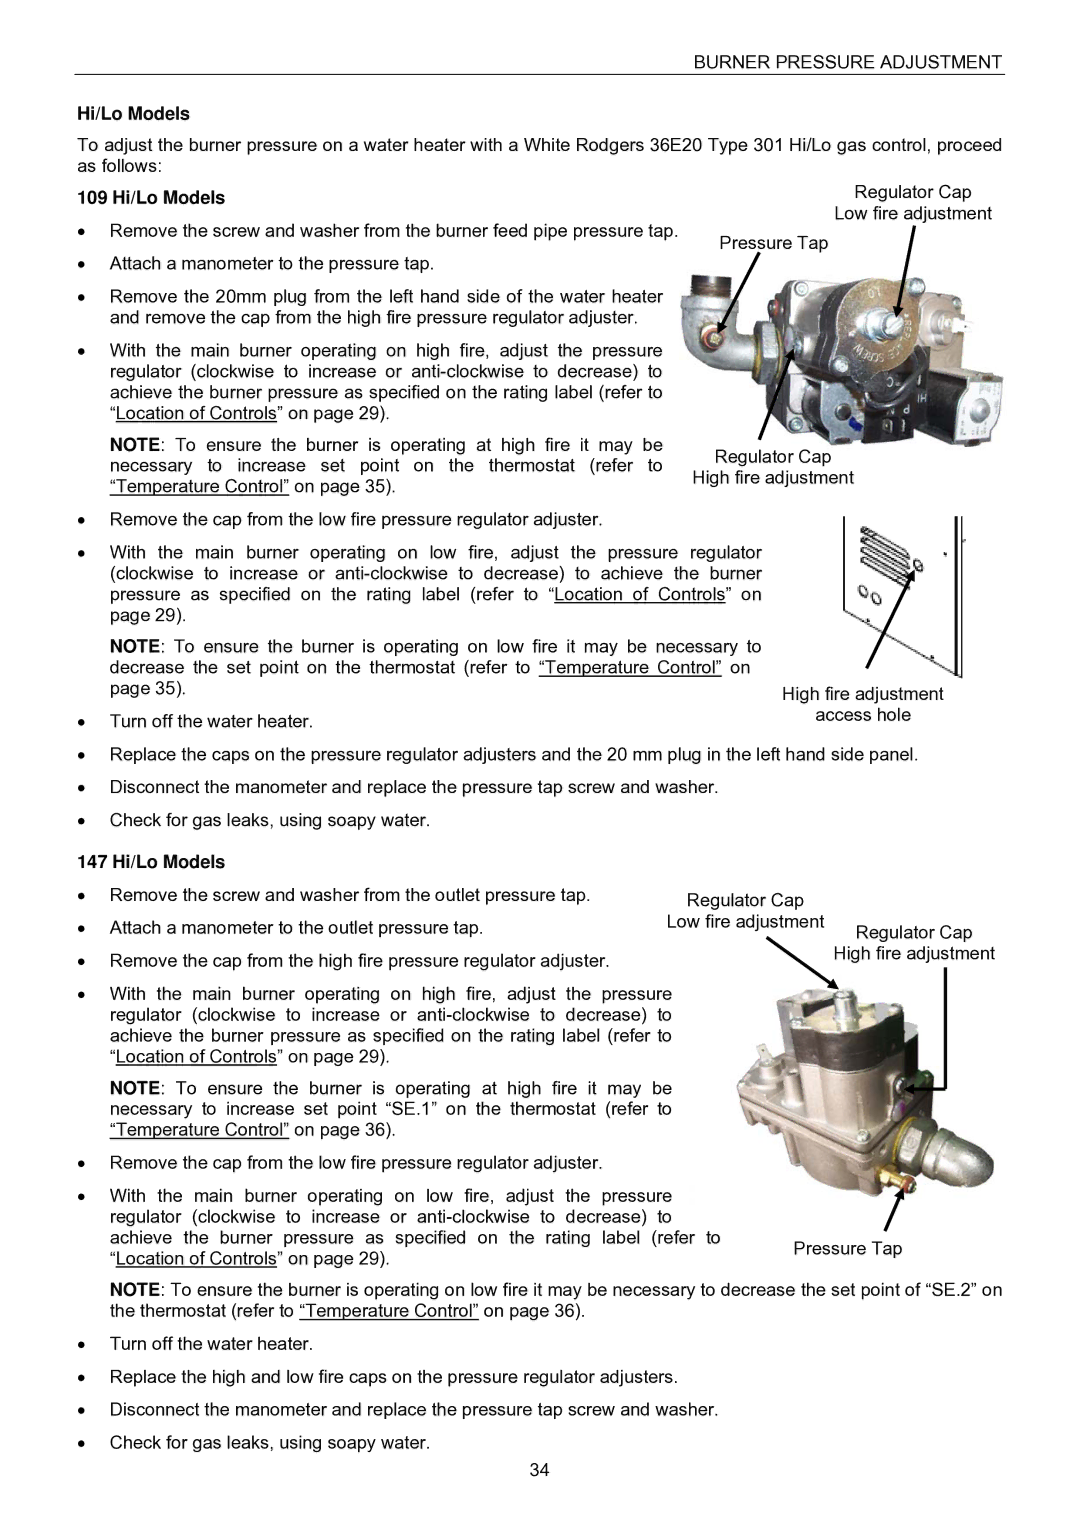
Regulator Cap
Low fire adjustment

BURNER PRESSURE ADJUSTMENT

Hi/Lo Models

To adjust the burner pressure on a water heater with a White Rodgers 36E20 Type 301 Hi/Lo gas control, proceed as follows:

109 Hi/Lo Models

Regulator Cap

Remove the screw and washer from the burner feed pipe pressure tap.

Low fire adjustment

Pressure Tap


Attach a manometer to the pressure tap.

Remove the 20mm plug from the left hand side of the water heater and remove the cap from the high fire pressure regulator adjuster.

With the main burner operating on high fire, adjust the pressure regulator (clockwise to increase or anti-clockwise to decrease) to achieve the burner pressure as specified on the rating label (refer to “Location of Controls” on page 29).

NOTE: To ensure the burner is operating

at high fire

it may

be

Regulator Cap

necessary to increase set point on the

thermostat

(refer

to

High fire adjustment

“Temperature Control” on page 35).


Remove the cap from the low fire pressure regulator adjuster.

With the main burner operating on low fire, adjust the pressure regulator (clockwise to increase or anti-clockwise to decrease) to achieve the burner pressure as specified on the rating label (refer to “Location of Controls” on page 29).

NOTE: To ensure the burner is operating on low fire it may be necessary to


decrease the set point on the thermostat (refer to “Temperature Control” on


page 35).

High fire adjustment

Turn off the water heater.

access hole


Replace the caps on the pressure regulator adjusters and the 20 mm plug in the left hand side panel.

Disconnect the manometer and replace the pressure tap screw and washer.

Check for gas leaks, using soapy water.

147 Hi/Lo Models

Remove the screw and washer from the outlet pressure tap.

Attach a manometer to the outlet pressure tap.

Remove the cap from the high fire pressure regulator adjuster.

With the main burner operating on high fire, adjust the pressure regulator (clockwise to increase or anti-clockwise to decrease) to achieve the burner pressure as specified on the rating label (refer to “Location of Controls” on page 29).

NOTE: To ensure the burner is operating at high fire it may be necessary to increase set point “SE.1” on the thermostat (refer to “Temperature Control” on page 36).

Remove the cap from the low fire pressure regulator adjuster.

With the main burner operating on low fire, adjust the pressure regulator (clockwise to increase or anti-clockwise to decrease) to achieve the burner pressure as specified on the rating label (refer to “Location of Controls” on page 29).

Regulator Cap

High fire adjustment

Pressure Tap

NOTE: To ensure the burner is operating on low fire it may be necessary to decrease the set point of “SE.2” on the thermostat (refer to “Temperature Control” on page 36).

Turn off the water heater.

Replace the high and low fire caps on the pressure regulator adjusters.

Disconnect the manometer and replace the pressure tap screw and washer.

Check for gas leaks, using soapy water.

34

Page 34
Image 34
Raypak B0147, B0109 installation instructions 109 Hi/Lo Models, 147 Hi/Lo Models

B0109, B0147 specifications

Raypak is a well-established name in the world of heating technology, particularly recognized for its efficient and reliable pool and spa heaters. Among their range, the Raypak B0147 and B0109 models stand out for their performance and advanced features designed to enhance user experience.

Both the Raypak B0147 and B0109 models prioritize efficiency, making them ideal choices for residential or commercial swimming pools. They are engineered to deliver reliable heating, ensuring that water maintains a comfortable temperature no matter the season. One of the standout features is their compact design, which allows for easy installation in various settings without requiring extensive modifications to existing infrastructure.

A key characteristic of the Raypak B0147 is its digital control system. This advanced technology allows users to set precise temperatures and monitor heater performance. The intuitive interface makes it user-friendly, facilitating adjustments on-the-fly. The B0109 model, meanwhile, offers robust heating capabilities, featuring a high-output design that can rapidly elevate water temperatures, perfect for pools with significant heat loss.

Both models utilize a copper-fin-tube heat exchanger, which enhances heat transfer efficiency and extends the lifespan of the heater. This design not only improves thermal efficiency but also ensures that users experience lower energy bills over time. They also come equipped with a dependable ignition system, featuring an automatic spark ignition that eliminates the need for pilot lights, leading to improved safety and reliability.

Durability is another hallmark of the Raypak line. Both models are constructed with materials designed to withstand harsh weather conditions and exposure to pool chemicals, ensuring longevity. The corrosion-resistant housings prevent degradation, maintaining the heater's performance over time.

In summary, the Raypak B0147 and B0109 models deliver outstanding heating performance through efficient technology and durable construction. Their user-friendly controls, compact design, and energy-efficient heat exchangers make them excellent choices for pool owners looking to optimize their heating solutions. With Raypak, users can enjoy comfortable water temperatures year-round, backed by reliable technology and impressive efficiency.