LED Television User’s Guide
Made for Today
Important Information
Product Registration Product Information
Cleaning and Disinfection
Disconnecting Device from Mains
Page
Table of Contents
Connections and Setup
Things to Consider Before You Connect
Connections and Setup
Front Panel J22CE820
SERVICERS232
Rear Panel J22CE820
RGB in PC
Component in YPbPr Video/Audio inputs for Component
Front Panel J26CE820
Rear Panel J26CE820
Front Panel J32CE720
Rear Panel J32CE720
Selects the TV, AVAV1, Side AVAV2
Front Panel J42CE820
Video,YPBPR, VGA, HDMI1, HDMI2
Rear Panel J42CE820
Wall mount Installation
Wall Mounts
Vesa Standard TV Mounts 22/26 inches
Pedestal Mounts and Stands
Vesa Standard TV Mounts 32/42 inches
Installing a Vesa Standard Mount
General Guidelines Choosing a location for
Antenna Connection
VHF UHF
When connecting with an RCA cable
When connecting with an antenna
VCR Connection
When connecting with a S-Video cable
When connecting with a Component cable
When connecting with a Hdmi cable
DVD Connection
Audio R Video
When connecting with a Hdmi to DVI cable
When connecting with a D-Sub 15 pin cable
Hdstb Connection
HDMI-DTV Output
External A/V Source
PC Connection
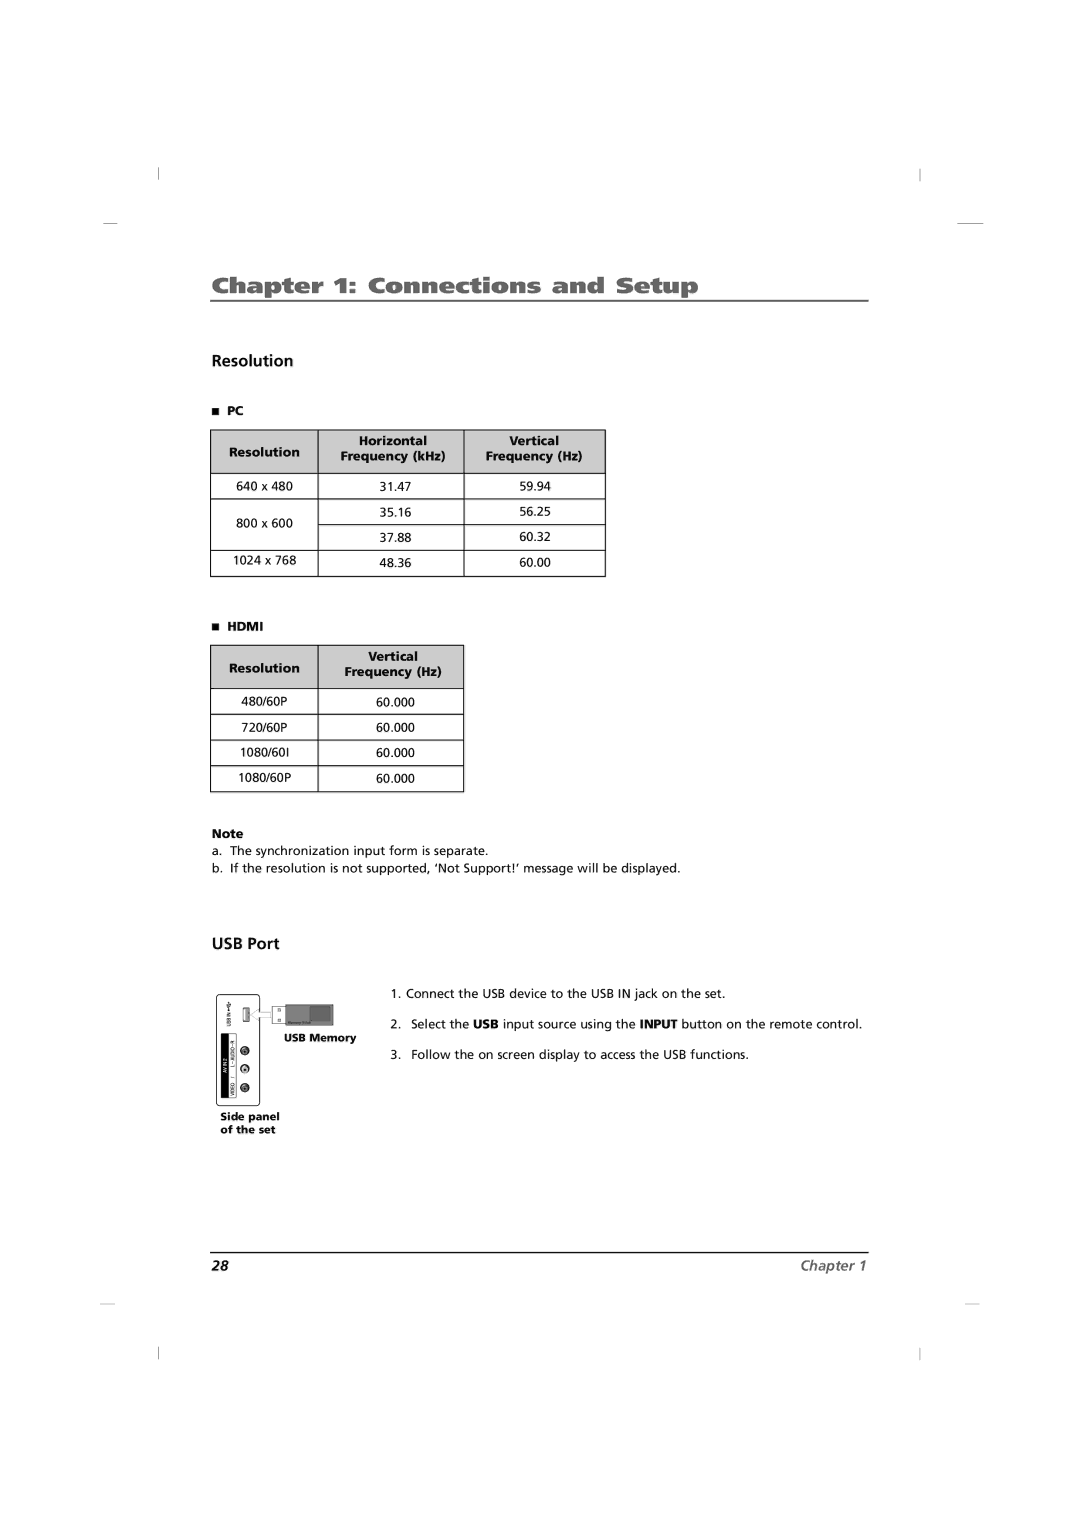
Resolution
Resolution Horizontal Vertical Frequency kHz Frequency Hz
Resolution Vertical Frequency Hz
USB Port
BasicUser Remote
Using the Remote Control
SAP
Using the Remote Control
17. CC
Selects the Caption menu directly
Mute
MasterInstaller Remote
Put Batteries in the Remote
How to clone TV
Learning Copying your settings out of the TV
Configuring your memory stick
Learning Settings from TV
How to clone TV
Teaching Placing settings into TV
Basic Operation
Basic Operation
Source Selection
Language Selection
Select between English, Español, Français
Commercial Interface Menus
Channel
Commercial Interface Menus
Volume
Source
Reset Commercial Interface
Power Management
Key Management
User Operations
Using the TVs Features
On Screen Menus
Setting up the TV Channel List
Using the TVs Features
Auto Scan
Add / Delete a Channel
Adjusting The Picture Controls
Picture Controls
Manual Picture Controls
Brightness
Contrast
Saturation
Reset Picture Mode
Adaptive Back Light
Advanced Video
Dynamic Noise Reduction
Flesh Tone
Adaptive Luma Control
Blue Mute
Blue Stretch
Press the Left or Right button to select between On or Off
Gamma
Color Temperature
Auto
Normal
Letterbox
Panorama
Adjusting The Sound Controls
Sound Controls
Manual Sound Controls
Balance
Bass
Treble
Stereo/SAP Broadcast Setup
Sound Surround
Speaker Type
Closed Caption Analog
Captions
Caption
Closed Caption Digital
Digital Closed Caption Options
Time Setting
Time Zone Settings
Auto Time Settings
Time
Manual Time Settings
Auto On /Off Time Settings
Sleep Timer
Reset
Reset Default
Set Password
Entering your password
Parental Control
Ratings Enable / Disable
Program Block
TV Ratings for USA
TV Ratings
TV FCC Content Sub-Categories
TV FCC Age Categories
TV-14
TV-G
Movie Ratings
Mpaa Rating System Movies
PG-13
Restricted NC-17
English TV Ratings for Canada
Canadian English Ratings Children C8+
14+
18+
French TV Ratings for Canada
Canadian French Ratings General Ans+
13 ans+
16 ans+
Downloadable Rating
Clean All
Block Unrated
Setting the PC Mode
Automatic Screen Adjustment
Manual Screen Adjustment
Phase
Horizontal Position
Vertical Position
USB Settings
USB Functions
Specifications
Models J22CE820
Models J26CE820
Models J32CE720
Models J42CE820
Problem Check Point
Troubleshooting
Other Information
Limited Warranty
Effective date of warranty
Other Information
Concerning Pixel Functionality
How you get service
Care and Cleaning
Product Registration
Page
DTI Services, LLC
DTI
Téléviseur LED Guide de l’utilisateur
Fabriqué pour aujourd’hui
Informations importantes
Enregistrement du produit Informations sur le produit
Précautions
Débranchement DU Secteur
Nota
Instructions Importantes Pour LA Sécurité
Lire avant d’utiliser l’appareil
Configuration de la liste des chaînes
Table des matières
Chapitre 1 Branchements et installation
Vérifier avant deffectuer les branchements
Chapitre 1 Branchements et installation
Capteur de la télécommande
Panneau Avant J22CE820
CH / CH Sélectionner un poste
Panneau Arrière J22CE820
Hdmi
Component in YPbPr
AV1
Panneau Avant J26CE820
Panneau Arrière J26CE820
Panneau Avant J32CE720
Panneau Arrière J32CE720
Panneau Avant J42CE820
Choisir le mode TV, AVAV1, Side AVAV2, S-Video,YPBPR
VGA, HDMI1, HDMI2 ou USB Témoin lumineux
Panneau Arrière J42CE820
Installation murale
Fixations murales
Support TV à la norme Vesa 22/26 pouces
Pieds et supports
Support TV à la norme Vesa 32/42 pouces
Directives générales choix d’un emplacement
Pour un support à la norme Vesa
Branchement de lantenne
THF UHF
Branchement avec une antenne
Branchement d’un magnétoscope
Branchement avec un câble RCA
Branchement avec un câble S-Video
Branchement à laide dun câble Hdmi
Branchement d’un lecteur DVD
Branchement à laide dun câble à composants
Audio R Video
Branchement à laide dun câble D-Sub 15 broches
Branchement Hdstb
Branchement à laide dun câble Hdmi à DVI
Branchement à laide dun câble à composants
Source A/V externe
Branchement dun PC
Résolutions
Résolution Fréquence Horizontale kHz Verticale Hz
Résolution Fréquence Verticale Hz
Port USB
Télécommande auxiliaire Utilisateur
Chapitre 2 Utilisation de la télécommande
Boutons numérotés Composer un numéro de poste
VOL + / VOL
Chapitre 2 Utilisation de la télécommande
CH + / CH
Télécommande principale installateur
Placez les batteries dans la télécommande
Configuration de votre memory stick
Chapitre 3 Méthode de clonage du téléviseur
Apprendre Copie de vos paramètres à partir du TV
Maîtrise des paramètres à partir du téléviseur
Instructions Installation des paramètres dans le téléviseur
Chapitre 3 Méthode de clonage du téléviseur
Chapitre 4 Opérations de base
Chapitre 4 Opérations de base
Sélection de la source
Sélection du langage
Sélectionnez English, Español, Français
Chapitre 5 Menus d’interface standard
Volume Volume
Chapitre 5 Menus d’interface standard
Power Management Gestion de lalimentation
Key Management Gestion des touches
Chapitre 6 Opérations utilisateur
Panneaux de commande à lécran
Chapitre 7 Utilisation des fonctions du téléviseur
Chapitre 7 Utilisation des fonctions du téléviseur
Configuration de la liste des chaînes de télévision
Balayage automatique
Ajouter / supprimer des postes
Réglages de limage
Réglage de l’image
Réglage manuel de limage
Brightness, Contrast, Saturation, HUE, Sharpness
Réinitialisation du mode d’affichage
Lumière à contre jour adaptative
Configuration avancée du signal vidéo
Réduction dynamique du bruit
Tonalité de la peau
Contrôle Luma adapté
Étendu bleu
Mire bleue
Gamma
Température de la couleur
Mode écran
Contrôle du niveau sonore
Réglage du son
Contrôle manuel
Cela permet de régler les sons aigus
Son panoramique
Réglage de la diffusion Stereo/SAP
Type de haut-parleur
Sous-titrage
Sous-titrage analogique
Sous-titrage numérique
Options de sous-titrage numérique
Sélectionne une couleur de fond pour les sous- titres
Réglage de lheure
Réglage du fuseau horaire
Réglage automatique de lheure
Réglage manuel de lheure
Réglage de louverture / la fermeture automatique
Extinction automatique
Réinitialiser
Restauration des réglages par défaut
Blocage parental
Configurer le code daccès
Saisie de votre mot de passe
Activation / désactivation des classements
Classements TV pour les EU
Catégories dâge pour la télévision FCC
Sous catégories en rapport avec le contenu FCC
Classement Mpaa films
Classements pour les films
Restrictions NC-17
Notations de la télévision anglophone au Canada
Classement pour le Canada anglais Enfants C8+
Notations de la télévision francophone au Canada
Classement pour le Canada français
Sélection d’un classement
Block Unrated bloquer les chaînes hors notation
Remise à zéro
Configuration du mode PC
Réglage automatique de l’écran
Réglage manuel de l’écran
Fonctions USB
Paramètres USB
Spécifications
Modèle J22CE820
Modèle J26CE820
Modèle J32CE720
Modèle J42CE820
Dépannage
Chapitre 8 Autres informations
Problème Vérifier
Concernant la résolution
Chapitre 8 Autres informations
Limitation de garantie
Date d’entrée en vigueur de la garantie
Pour toute réparation
Entretien et nettoyage
Enregistrement du produit
Page
No 3350GDKM0139A GPN12MA013B