for the first time.
Safety Precautions
WARNING:
•TO PREVENT FIRE OR SHOCK HAZARD, DO NOT EXPOSE THE UNIT TO RAIN OR MOISTURE.
•TO AVOID ELECTRICAL SHOCK, DO NOT OPEN THE CABINET. REFER SERVICING TO QUALIFIED PERSONNEL ONLY.
•The UNIT shall not be exposed to dripping or splashing and that no objects filled with liquid, such as vases, shall be placed on the UNIT.
DO NOT TOUCH THE LENS
CAUTION: INVISIBLE LASER
RADIATION WHEN OPEN AND
INTERLOCKS DEFEATED
AVOID EXPOSURE TO BEAM
| The symbol for Class II | Thisproductcontains |
| a low power laser |
| (Double Insulation) |
| device. |
| |
FCC Information
This device complies with Part 15 of the FCC rules. Operation is subject to the following two conditions:
(1)This device may not cause harmful interference, and
(2)This device must accept any interference received, including interference that may cause undesired operation.
NOTE: This equipment has been tested and found to comply with the limits for a Class B digital device, pursuant to part 15 of the FCC Rules. These limits are designed to provide reasonable protection against harmful interference in a residential installation. This equipment generates, uses, and can radiate radio frequency energy and, if not installed and used in accordance with the instructions, may cause harmful interference to radio communications. However, there is no guarantee that interference will not occur in a particular installation. If this equipment does cause harmful interference to radio or television reception, which can be determined by turning the equipment off and on, the user is encouraged to try to correct the interference by one or more of the following measures:
•Reorient or relocate the receiving antenna.
•Increase the separation between the equipment and receiver.
•Connect the equipment into an outlet on a circuit different from that to which the receiver is connected.
•Consult the dealer or an experienced radio/TV technician for help.
WARNING: Changes or modifications to this unit not expressly approved by the party responsible for compliance could void the user’s authority to operate the equipment.
For Customers in Canada
This apparatus complies with the Class B limits for radio noise emission set out in radio interference regulations.
This Class B digital apparatus complies with Canadian ICES-003.
Cet appareil numérique de la classe B est conforme à la norme NMB-003 du Canada.
Warning:
•The AC adapter is used as disconnect device and it should remain readily operable during intended used. In order to disconnect the unit from the mains completely, the AC adapter should be disconnected from the mains socket outlet completely.
•The AC adapter of unit should not be obstructed OR should be easily accessed during intended use.
•Minimum 10 cm (4 inches) distances around the unit for sufficient ventilations.
•The ventilation should not be impeded by covering the ventilation openings with items such as newspaper, table-cloths, curtains, etc.
•No naked flame sources such as lighted candles should be placed on the unit.
On Safety
As the laser beam used in this compact disc player could be harmful to the eyes, do not attempt to disassemble the casing. Refer servicing to qualified personnel only.
•Do not put any foreign objects in the disc compartment. If you do so, the laser beam interlock may be defeated allowing the laser to remain on when the lid is opened.
•Should any objects or liquids fall into the unit, disconnect the power supply and have the unit checked by qualified personnel before any further operation.
On Operation
Since the CD system offers a wide dynamic range, the peaks of the high level inputs are recorded with high fidelity, and the noise level is very low. Do not turn up the volume while listening to a part of the disc with no audio signals or very low level inputs. If you do so, the speakers may be damaged when the peak level of the sound is played. The lens of the laser should be kept clean. Do not touch the lens. If you do so, the lens may be damaged and the unit will not operate correctly.
On Use
Never use the unit where it would be subject to:
-Heat sources such as radiators or air ducts.
-Direct sunlight.
dust from collecting on the pick-up lens, do not leave the compartment door open for |
an extended period of time. If the lens becomes dirty, clean it with a soft brush, or use |
an air blower brush designed for camera lenses. |
Headset safety
•Have a Blast-Just Not in your eardrums! Make sure you turn down the volume on the unit before you put on headphones. Increase the volume to the desired level only after headphone are in place.
•Do not play your headset at high volume. Hearing experts warn against extended high- volume play.
•If you experience ringing in your ears, reduce volume or discontinue use.
•You should use with extreme caution or temporarily discontinue use in potentially hazardous situations. Even if your headset is an open-air designed to let you to hear outside sounds, do not turn up the volume so high that you are unable to hear what is around you.
•Excessive sound pressure from earphones and headphone can cause hearing loss.
IMPORTANT SAFETY INSTRUCTIONS
1.Read these instructions.
2.Keep these instructions.
3.Heed all warnings.
4.Follow all instructions.
5.Do not use this apparatus near water.
6.Clean only with dry cloth.
7.Do not block any ventilation openings. Install in accordance with the manufacturer’s instructions.
8.Do not install near any heat sources such as radiators, heat registers, stoves, or other apparatus (including amplifiers) that produce heat.
9.Do not defeat the safety purpose of the polarized or grounding-type plug. A polarized plug has two blades with one wider than the other. A grounding type plug has two blades and a third grounding prong. The wide blade or the third prong are provided for your safety. If the provided plug does not fit into your outlet, consult an electrician for replacement of the obsolete outlet.
10.Protect the power plug from being walked on or pinched particularly at plugs, convenience receptacles, and the point where they exit from the apparatus.
11.Only use attachments/accessories specified by the manufacturer.
12.Use only with a cart, stand, tripod, bracket, or table specified by the manufacturer, or sold with the apparatus. When a cart is used, use caution when moving the cart/apparatus combination to avoid injury from tip-over.
13.Unplug this apparatus during lightening storms or when unused
for a long period of time. 14. Refer all servicing to qualified service personnel. Servicing is
required when the apparatus has been damaged in any way, such as the power-supply cord or plug is damaged, liquid has
spilled or objects have fallen into the apparatus, the apparatus has been exposed to rain or moisture, does not operate normally, or has been dropped.
ACCESSORIES
Please locate the included accessories.
To order replacement units, visit http://www.RCAav.com
Remote with battery | x 1 | iPod adapter | x 4 |
AC adapter | x 1 | | |
| GETTING START |
ATTENTION | 1. Open the battery door. |
Remove the plastic sheet before operating the remote control.
2. Insert one CR2025 (3V) size battery.
•Point the remote control at the REMOTE SENSOR located on the unit.
•When there is a strong ambient light source, the performance of the infrared REMOTE SENSOR may be degraded, causing unreliable operation.
•The effective maximum distance for remote operation is about 19 feet (6 meters).
Battery Replacement
When the battery becomes weak, the operating distance of the remote control is greatly reduced and you will need to replace it.
Note: If the remote control is not going to be used for a long time, remove the battery to avoid damage caused by battery leakage corrosion.
WARNING:
•Do not dispose of battery in fire; battery may explode or leak.
•Battery shall not be exposed to excessive heat such as sunshine, fire or the like.
•Danger of explosion if battery is incorrectly replaced. Replace only with the same or equivalent type.
CAUTION: When discarding batteries, environmental problems must be considered and local rules or laws governing the disposal of these batteries must be strictly followed.
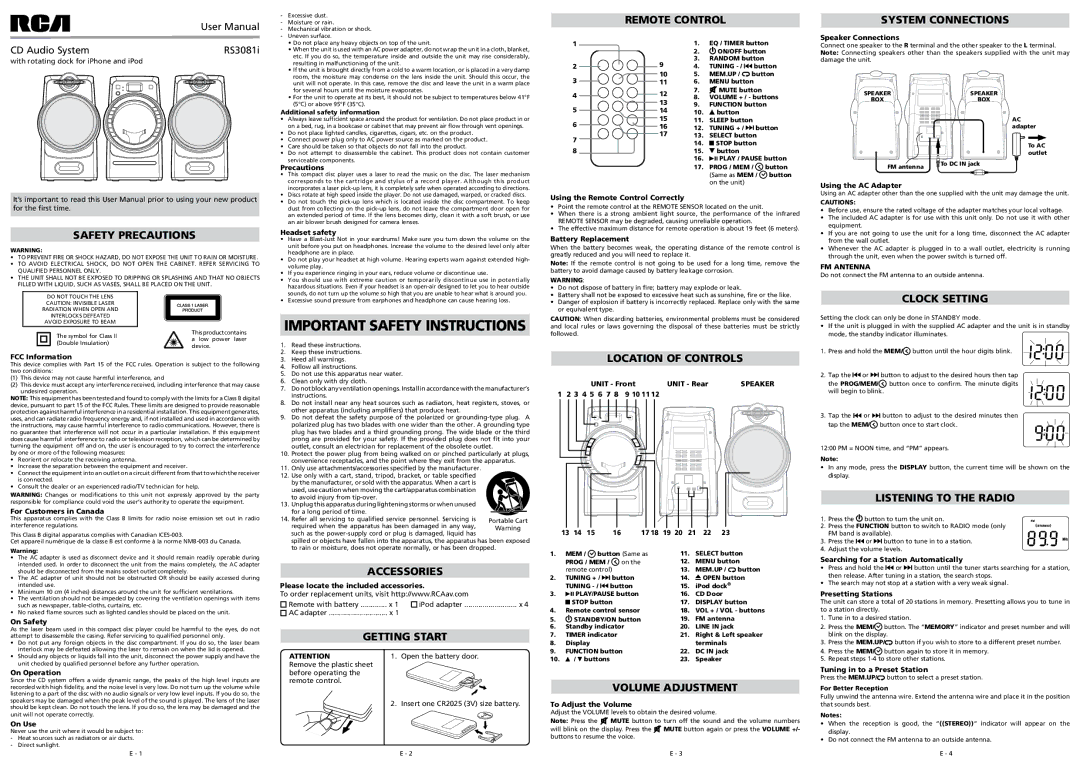
LOCATION OF CONTROLS
UNIT - Front | UNIT - Rear | SPEAKER |
1 2 3 4 5 6 7 8 | 9 10 11 12 | | |
| | | | | | | | | | | | | | |
| 13 | 14 | 15 | 16 | 17 18 | 19 20 | 21 | 22 | 23 |
1. | | MEM / button (Same as | 11. | SELECT button |
| | PROG / MEM / | on the | | 12. | MENU button |
| | remote control) | | 13. | MEM.UP / button |
2. | | TUNING + / | button | | 14. | | OPEN button |
| | TUNING - / | button | | 15. | iPod dock® |
3. | | | | | | PLAY/PAUSE button | | 16. | CD Door |
| | | | |
| | | | |
| | | | STOP button | | 17. | DISPLAY button |
| | | | |
4. | | Remote control sensor | | 18. | VOL + / VOL - buttons |
5. | | | | | | STANDBY/ON button | | 19. | FM antenna |
6. | | Standby indicator | | 20. | LINE IN jack |
7. | | TIMER indicator | | 21. | Right & Left speaker |
8. | | Display | | | | | terminals |
9. | | FUNCTION button | | 22. | DC IN jack |
10. | | | / | buttons | | | 23. | Speaker |
volume adjustment
To Adjust the Volume
Adjust the VOLUME levels to obtain the desired volume.
Note: Press the  MUTE button to turn off the sound and the volume numbers will blink on the display. Press the
  MUTE button again or press the VOLUME +/- buttons to resume the voice.
•Before use, ensure the rated voltage of the adapter matches your local voltage.
•The included AC adapter is for use with this unit only. Do not use it with other equipment.
•If you are not going to use the unit for a long time, disconnect the AC adapter from the wall outlet.
•Whenever the AC adapter is plugged in to a wall outlet, electricity is running through the unit, even when the power switch is turned off.
FM ANTENNA
Do not connect the FM antenna to an outside antenna.
CLOCK SETTING
Setting the clock can only be done in STANDBY mode.
•If the unit is plugged in with the supplied AC adapter and the unit is in standby mode, the standby indicator illuminates.
1. Press and hold the MEM/ button until the hour digits blink.
2. Tap the 
 or
or 
 button to adjust to the desired hours then tap
the PROG/MEM/ button once to confirm. The minute digits will begin to blink.
3. Tap the 
 or
or 
 button to adjust to the desired minutes then tap the MEM/
 button once to start clock.
12:00 PM = NOON time, and “PM” appears.
Note:
•In any mode, press the DISPLAY button, the current time will be shown on the display.
| | listening to the radio |
1. | Press the | button to turn the unit on. |
2. | Press the FUNCTION button to switch to RADIO mode (only |
| FM band is available). |
3. | Press the | or button to tune in to a station. |
4. | Adjust the volume levels. |
Searching for a Station Automatically
•Press and hold the 
 or
or 
 button until the tuner starts searching for a station, then release. After tuning in a station, the search stops.
•The search may not stop at a station with a very weak signal.
Presetting Stations
The unit can store a total of 20 stations in memory. Presetting allows you to tune in to a station directly.
1.Tune in to a desired station.
2.Press the MEM/ button. The “MEMORY” indicator and preset number and will blink on the display.
3.Press the MEM.UP/ button if you wish to store to a different preset number.
4.Press the MEM/ button again to store it in memory.
5.Repeat steps 1-4 to store other stations.
Tuning in to a Preset Station
Press the MEM.UP/ button to select a preset station.
For Better reception
Fully unwind the antenna wire. Extend the antenna wire and place it in the position that sounds best.
Notes:
•When the reception is good, the “((STEREO))” indicator will appear on the display.
•Do not connect the FM antenna to an outside antenna.