HOW TO USE PRESET PROGRAMS
Segment column of the matrix and no time remains in the program.
1 Begin pedaling to activate the console. |
| Note: During the program, you can override the |
| resistance setting for the current segment by | |
See step 1 on page 12. |
| pressing the Resistance buttons. However, when |
|
| the next segment begins, the resistance will auto- |
2 Select one of the six preset programs. |
| matically change if a different resistance setting is |
| programmed for the next segment. If you stop | |
To select a preset |
| pedaling for several seconds, a tone will sound |
program, press the |
| and the program will pause. To restart the pro- |
Program Select |
| gram, simply resume pedaling. |
button repeatedly | 4 | Use the pace (RPM) guide. |
until “P 1,” “P 2,” | ||
“P 3,” “P 4,” “P 5,” |
| |
| During preset pro- | |
or “P 6” appears in |
| |
the lower display. |
| grams, the pace |
|
| guide will prompt |
When a preset program is selected, the matrix |
| you to increase or |
will show the first six resistance settings of the |
| decrease your ped- |
program. |
| aling pace. When |
|
| one of the arrows |
Press the Program Start button or begin |
| below the center indicator lights, increase your |
3 pedaling to start the program. |
| pace; when one of the arrows above the center |
|
| indicator lights, decrease your pace. When the |
Each program is divided into several time seg- |
| center indicator lights, maintain your current |
ments of different lengths. One resistance setting |
| pace. Important: The pace settings of the pro- |
is programmed for each segment. (The same |
| gram are intended only to provide a goal. |
resistance setting may be programmed for two or |
| Make sure to pedal at a pace that is comfort- |
more consecutive segments.) |
| able for you. |
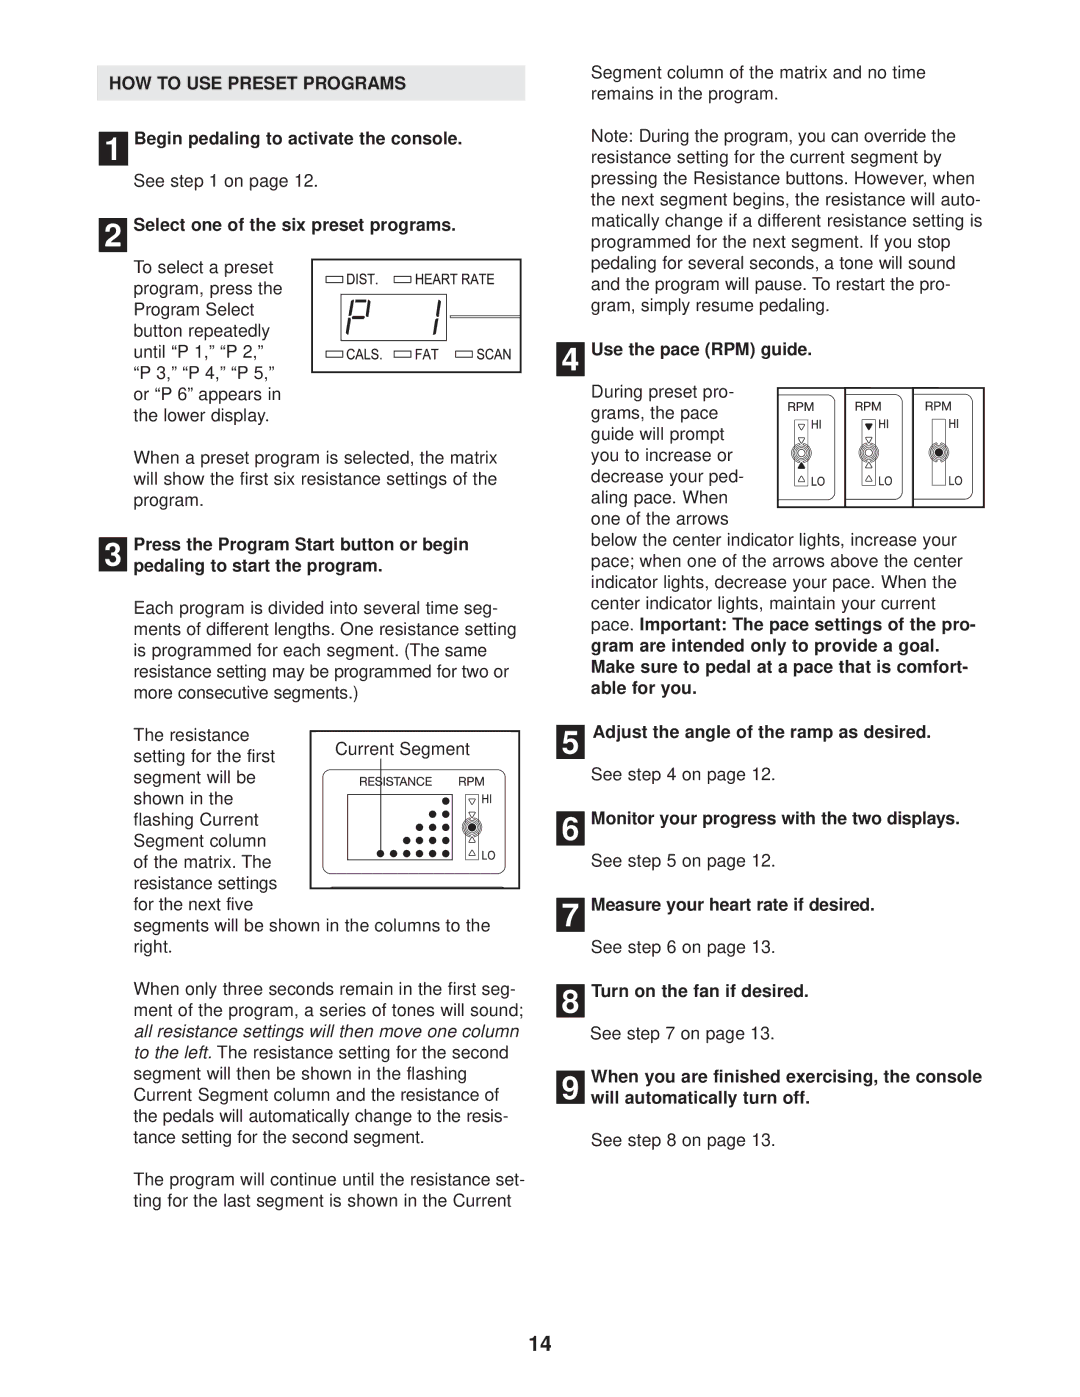
The resistance |
|
|
|
|
|
|
|
|
|
| 5 | Adjust the angle of the ramp as desired. | |
|
| Current Segment |
|
|
|
| |||||||
setting for the first |
|
|
|
|
|
| |||||||
segment will be |
|
|
|
|
|
|
|
|
|
|
| See step 4 on page 12. | |
|
|
|
|
|
|
|
|
|
|
| |||
shown in the |
|
|
|
|
|
|
|
|
|
|
| Monitor your progress with the two displays. | |
|
|
|
|
|
|
|
|
|
|
| |||
|
|
|
|
|
|
|
|
|
|
| |||
flashing Current |
|
|
|
|
|
|
|
|
|
|
| ||
|
|
|
|
|
|
|
|
|
| 6 | |||
Segment column |
|
|
|
|
|
|
|
|
|
|
| ||
|
|
|
|
|
|
|
|
|
|
| See step 5 on page 12. | ||
of the matrix. The |
|
|
|
|
|
|
|
|
|
|
| ||
|
|
|
|
|
|
|
|
|
|
| |||
resistance settings |
|
|
|
|
|
|
|
|
|
|
|
| |
for the next five |
|
|
|
|
|
|
|
|
|
|
| Measure your heart rate if desired. | |
|
|
|
|
|
|
|
|
|
| 7 | |||
segments will be shown in the columns to the |
| ||||||||||||
right. |
|
|
|
|
|
|
|
|
|
|
| See step 6 on page 13. | |
When only three seconds remain in the first seg- |
| Turn on the fan if desired. | |||||||||||
8 | |||||||||||||
ment of the program, a series of tones will sound; | |||||||||||||
all resistance settings will then move one column |
| See step 7 on page 13. | |||||||||||
to the left. The resistance setting for the second |
|
| |||||||||||
segment will then be shown in the flashing |
| When you are finished exercising, the console | |||||||||||
9 | |||||||||||||
Current Segment column and the resistance of | will automatically turn off. | ||||||||||||
the pedals will automatically change to the resis- |
|
| |||||||||||
tance setting for the second segment. |
| See step 8 on page 13. | |||||||||||
The program will continue until the resistance set- ting for the last segment is shown in the Current
14